Cart is empty.
.png)


Home Assistant turns your Raspberry Pi (or another device) into the ultimate home automation hub. With Home Assistant, you can focus on integrating your devices and writing automations.

Instructions how to run the Denkovi Modules with Home Assistant
1. Install Home Assistant. Instructions can be found here. The current examples are tested on Raspberry Pi 5 64bit and Home Assistant 2026.1.0 Operating System 16.3
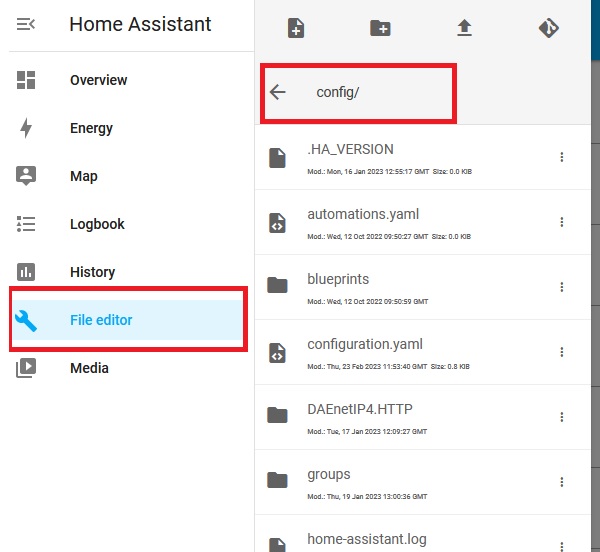
2. It is needed to install the "Configurator" Add-on. It is recommend for uploading the Denkovi devices files as shown below.
3. Download the Denkovi devices files archive from this link
4. Extract
5. Find the particular directory for your Denkovi module from the main directory of the archive. The folder name shows the module type and the communication protocol used. Supported modules list is shown below:
|
Denkovi device
|
Folder Name
|
| DAEnetIP2 - SNMP Ethernet controller with 24 digital/analog I/O (and all relay kits and modules based on it) | HA.DAEnetIP2.SNMP |
| DAEnetIP2 - SNMP 8 Relay Module | HA.DAEnetIP2 8 Relay module-WEB.SNMP |
| DAEnetIP3 - HTTP Ethernet controller with 32 digital/analog I/O (and all relay kits and modules based on it) | HA.DAEnetIP3.HTTP, HA.DAEnetIP3.TCP1, HA.DAEnetIP3.TCP2 |
| DAEnetIP4 - SNMP Ethernet controller with 34 digital/analog I/O (and all relay kits and modules based on it) | HA.DAEnetIP4.SNMP, HA.DAEnetIP4.HTTP |
| smartDEN 16 Relay Module | HA.smartDEN IP-16R.SNMP, HA.smartDEN IP-16R-XX.HTTP |
| smartDEN 16 Relay Module (ModBus-TCP) | HA.smartDEN IP-16R - Modbus.TCP, HA.smartDEN IP-16R-XX.HTTP |
| smartDEN 16 Relay Module (MQTT) | HA.smartDEN IP-16R - MQTT, HA.smartDEN IP-16R-XX.HTTP |
| smartDEN IP-Maxi | HA.smartDEN IP-Maxi.SNMP, HA.smartDEN IP-Maxi.HTTP |
| smartDEN IP-Maxi (MQTT) | HA.smartDEN IP-Maxi-MQ.MQTT, HA.smartDEN IP-Maxi-XX_PLC.HTTP |
| smartDEN IP-Maxi (ModBus-TCP) | HA.smartDEN IP-Maxi - Modbus.TCP, HA.smartDEN IP-Maxi-XX_PLC.HTTP |
| smartDEN IP-PLC | HA.smartDEN IP-Maxi-XX_PLC.HTTP |
| smartDEN IP-32IN Module | HA.smartDEN IP-32IN.SNMP, HA.smartDEN IP-32IN-XX.HTTP |
| smartDEN Notifier | HA.smartDEN Notifier.MQTT, HA.smartDEN IP-32IN-XX.HTTP |
| smartDEN Logger | HA.Logger.HTTP |
| smartDEN IP-32IN-MT | HA.smartDEN IP-32IN.Modbus.TCP, HA.smartDEN IP-32IN-XX.HTTP |
| smartDEN Watchdog | HA.smartDEN IP-WatchDog.HTTP |
| USB 16 Relay Module - ModBus RTU (PCB) / USB 16 Relay Module - ModBus RTU (Din Rail Box) | HA.USB-Modbus-16.RTU |
| USB Four(4) Relay Output Module,Board for Home Automation | HA.USB_4_8_Relays_FT245RL |
| USB Eight Channel Relay Board for Automation | HA.USB_4_8_Relays_FT245RL |
| USB 16 Channel Relay Board for Automation / USB 16 Channel Relay Module for Automation, DIN Rail BOX | HA.USB_16 Relay.Serial |
| USB Relay Module 4 Channels, for Home Automation - v2 | MCP2200 |
| USB 8 Opto-Isolated Digital Inputs Module | MCP2200 |
| smartDEN Opener | HA.smartDEN Opener.HTTP, HA.smartDEN Opener.MQTT |
| WiFi 16 Relay Board (PCB) / WiFi 16 Relay Board (Din Rail Box) | HA.WiFi 16 Relay.TCP |
| WiFi 16 Relay Module - ModBus (PCB) / WiFi 16 Relay Module - ModBus (Din Rail Box) | HA.WiFi 16 Relay.Modbus |
| DAEnetIP2 v2 - SNMP Ethernet controller with 24 digital/analog I/O (and all relay kits and modules based on it) | HA.DAEnetIP2 v2.SNMP |
| DAEnetIP2 v2 - SNMP 8 Relay Module | HA.DAEnetIP2 v2 Eight Relay Module.SNMP |
In the folder HA.Multiple_Devices you will find examples of more than one device.
In some devices' folders (for example MQTT and ModBus) you will find two sub-folders - Old_Style and New_Style respectively for the old code style and new code style (depending on the Home Assistant version).
6. Inside the Denkovi device directory,there are another sub-directory and several files. All the IP addressess, ports, passwords, connection servers and serial ports must be replaced with the actual ones. For some devices threre is file readme.txt for more specific hints.
7. Copy the content of the particular Denkovi device directory to hassio -> config/
For example, if we work with smartDEN Notifier, the content of the Device main directory is
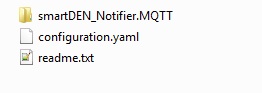
We need now to copy the configuration.yaml, smartDEN_Notifier.MQTT folder and the files inside smartDEN_Notifier.MQTT to hassio -> config/

8. Restart from Configuration -> Server Control -> Restart. If there are no errors, the restart should be executed successfilly. If not, an errors should appear in the "Notifications" tab.
9. The home screen should contain the Denkovi Module i/o.


