Cart is empty.
.png)


USB 16 Relay Timer is software from Denkovi for controlling all our USB 16 Relay Boards
|
|
- Who can use USB 16 Relay Timer
- List with currently supported USB 16 Channel Relay Boards
- Current version download
- USB 16 Relay Timer system requirements
- USB 16 Relay Timer installation guide for Windows
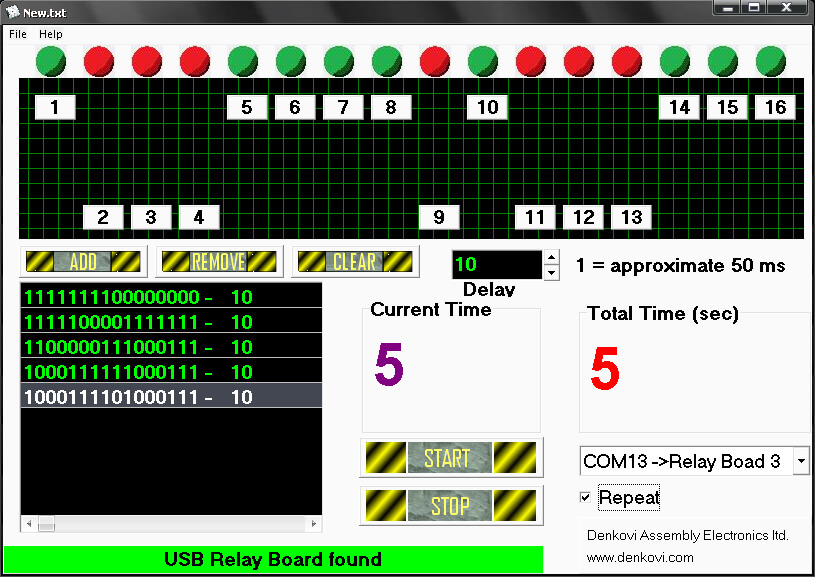
- User interface
Who can use USB 16 Relay Timer
USB 16 Relay Timer may be used by anyone who has at least one of Denkovi USB 16 Channel Relay Boards from the current version supported list.
List with currently supported USB 16 Channel Relay Boards
|
Order number
|
Relay board name and link
|
| DAE-RB/Ro16-12V + DAE-CM/Do16-USB | USB 16 Channel Relay Module - RS232 Controlled, 12V - ver.1 |
| DAE-CB/Ro16/Di4-USB | USB 16 Channel Relay Module - RS232 Controlled, 12V - ver.2 |
|
Version
|
Release date
|
Download links
|
Details
|
| 1.0 | 07.2010 |
USB 16 Relay Timer system requirements
Operating systems: Windows XP, Windows Vista, Windows 7
FTDI drivers: Yes. They are included in the installation setup file
USB 16 Relay Timer installation guide for Windows
To get installed USB 16 Relay Timer on your PC the only thing you need to do is to download and run the installation file USB16RelayTimer.exe. The whole installation takes several minutes. Here are the steps you should go through the installation:
1) Download USB16RelayTimer.exe and run it.

2) Select the place you would like to be installed USB 16 Rleay Timer. It is recommend to install it on drive that is different from C:\
3) Setup will create icons on your start menu.
4) Install.
5) Installation progress.
6) You will be asked if you have all the necessary drivers installed. If you hve already FTDI VCP drivers on your PC, skip this step. Otherwise click "Yes".
7) Finish the installation.
8) You may find the USB 16 Rleay Timer icon on your desktop
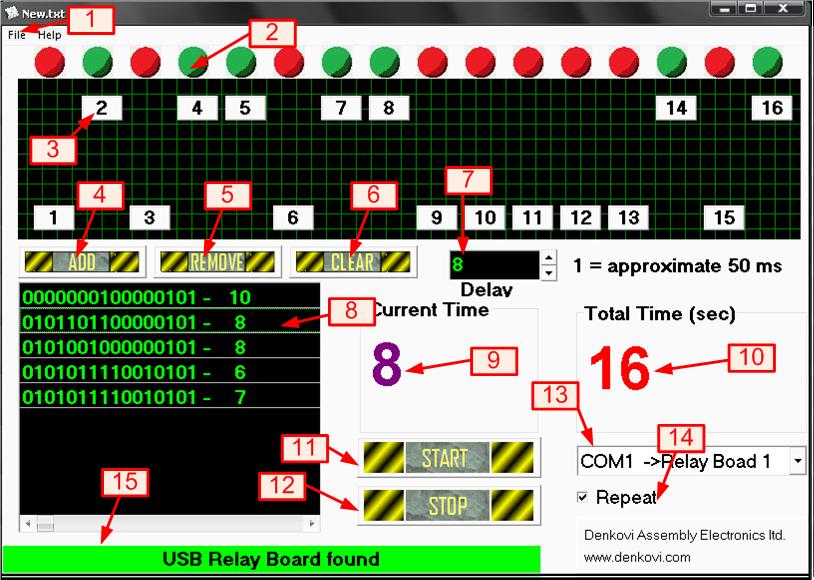
1) Menu File. Save/load file.
2) Relay status indicator. When it is green the relay is ON, red - OFF.
3) Timer relay button. When some timer relay button is in this position the given relay state is ON. If this button is clicked once the state will become OFF.
4) Button 'Add'. This button adds new state in the timer playlist.
5) Button 'Remove'. This button deletes the currently selected state from the timer playlist.
6) Button 'Clear'. This button deletes all the states from the timer playlist.
7) Delay. This value determines how long will appear this state. For example if this field is 5, the time that this state appears is 5x50=250 ms.
8) Timer list. It represent playlist with all relay states and their delays. The DRM software go through its states sequentialy until the playlist end is reached or go back to the beginning (if repeat is on).
9) Current time. This is current time for this state. When the program is running it is decreased every 50ms with one.
10) Total time. This is how long the program was started. When the program is running it is increased every 50ms with one.
11) Button 'Start'. This button starts playing the timer playlist. Note that there must be at least one state in the timer list to be played.
12) Button 'Stop'. This button stops playing the timer playlist.
13) Com Port list. List with all available com ports.
14) Checkbox 'Repeat'. When it is checked, the timer playlist will be played in loop.


