Cart is empty.
.png)
.png)


DAEnetIP Burner is software for TFTP firmware upgrade of denkovi DAEnetIP1 and DAEnetIP2 controllers.
|
|
- General overview
- Who can use DAEnetIP Burner
- List with currently supported relay boards
- Current version download
- DAEnetIP Burner system requirements
- DAEnetIP Burner installation guide for Windows
- User interface
- How to upgrade DAEnetIP1 (Tutorial)
- How to upgrade DAEnetIP2 (Tutorial)
- Recommends during firmware upgrade
DAEnetIP Burner is software for firmware ugrade of any denkovi DAEnetIP1 and DAEnetIP2 controller.
DAEnetIP Burner may be used by anyone who has at least one of Denkovi DAEnetIP1 or DAEnetIP2 controller or kit with this controller (some device from the list bellow)
List with currently supported Denkovi relay boards
|
Order code
|
Relay board name and link
|
| DAEnetIP1 | SNMP Ethernet controller with 28 digital/analog I/O |
| DAEnetIP2 | SNMP Ethernet controller with 24 digital/analog I/O |
| DAEnetIP2 + DAE-RB/Ro2-12V | Internet/Ethernet Two Channel Relay Board |
| DAEnetIP1 + DAE-RB/Ro4_v2 | Internet/Ethernet Four Channel Relay Board |
| DAEnetIP1 + DAE-RB/Ro8-12V | Internet/Ethernet Eight Channel Relay Board - ver.1 |
| DAEnetIP2 + DAE-RB/Ro8-12V | Internet/Ethernet Eight Channel Relay Board - ver.2 |
| DAEnetIP2 + DAE-RB/Ro16-12V | Internet/Ethernet Sixteen Channel Relay Board |
| DAE-PB-RO12/DI8/AI8 + DAEnetIP1 | SNMP and Web based Data Acqusition I/O Module |
|
Version
|
Release date
|
Download links
|
Details
|
| 1.2 | 04.Oct.2013 | DAEnetIP3 is not any more supported. If you would like to upgrade your DAEnetIP3 firmware, please contact with us and we will send instructions. |
DAEnetIP Burner system requirements
Operating systems: Windows
Java Virtual Machine: Java 6 - it is included in the installation setup file
DAEnetIP Burner Installation guide for Windows
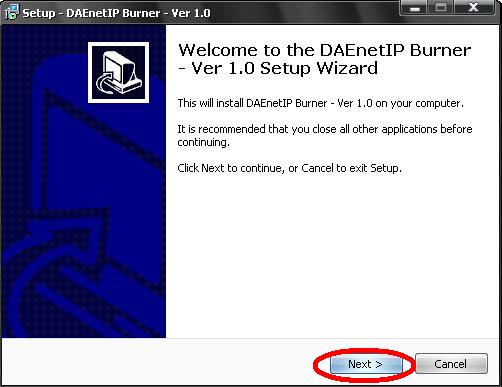
To get installed DAEnetIP Burner on your PC the only thing you need to do is to download and run the installation file DAEnetIP_Burner.exe. The whole installation takes several minutes. Here are the steps you should go through the installation:
1) Download DAEnetIP Burner.exe and run it.
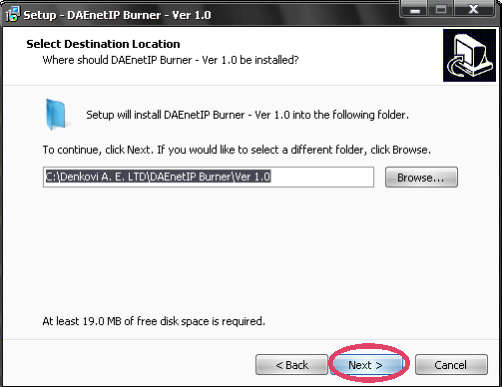
2) Select the place you would like to be installed DAEnetIP Burner. It is recommend to install it on drive that is different from C:\
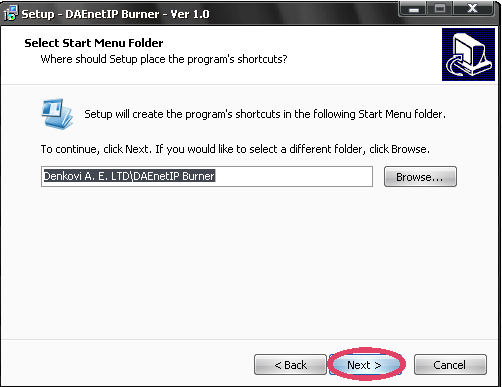
3) Setup will create icons on your start menu.
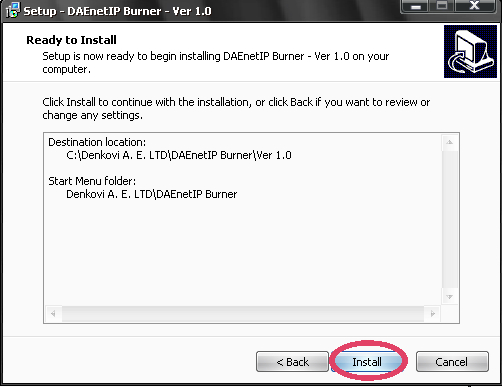
4) Install.
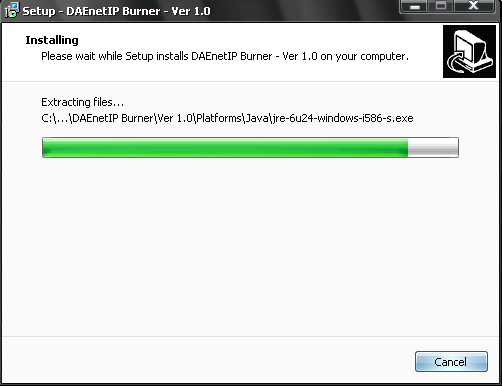
5) Installation progress.
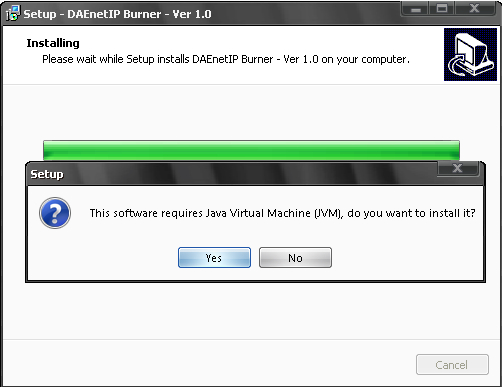
6) You will be asked if you have JVM (Java Virtual Machine). If your PC does not have any JVM installed, you need to click "Yes" and follow the steps that JVM installation window will guide throug. If you have already JVM click "No". If you have already JVM and click "Yes" to install it - don't worry. Nothing will be wrong, just will take several more minutes to update your JVM to the latest version.
7) Finish the installation.
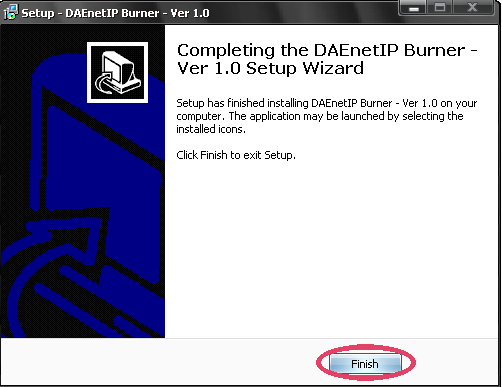
9) You may find the DAEnetIP Burner icon on your desktop.
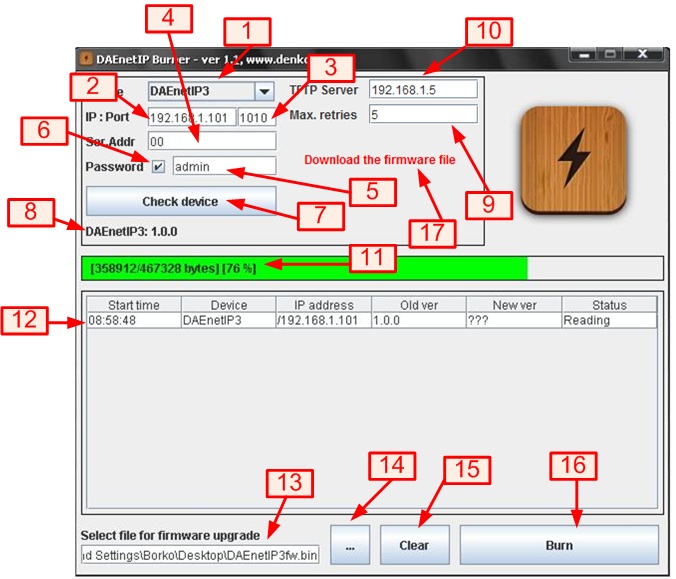
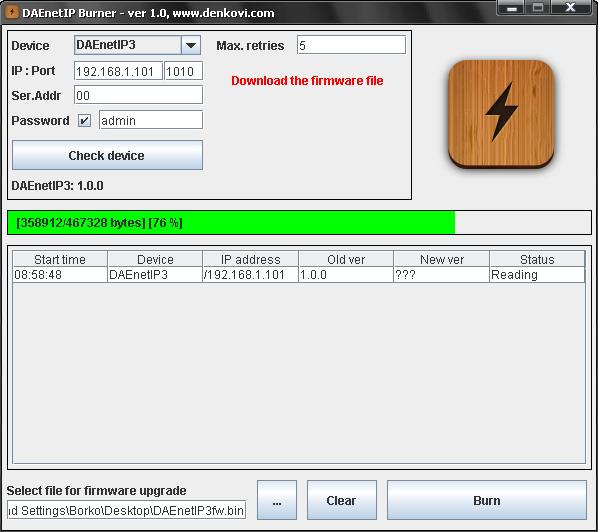
1) Device list. Select the DAEnetIPx controller for firmware upgrade.
2) IP. IP of the target controller
3) Port. Port of the controller on that it listens for TFTP firmware upgrade commands.
4) Serial Address. Some DAEnetIPx controllers have serial address that must be adjusted before the command for TFTP firmware upgrade is sent.
5) Password. Only autorized users can access the DAEnetIPx controllers.
6) Enable/Disable password. Some DAEnetIPx controllers have the possibility to enable/disable password protection. For example DAEnetIP3 may be with enabled/disabled RC4 password encryption.
7) Check device. Checks if connection is established with the controller.
8) Firmware version. It shows the current firmware version of the device.
9) Maximum retries. The maximum retries to connect with the DAEnetIPx controller when the connection is lost during firmware upgrade.
10)TFTP Ser. The IP of the TFTP Server that will be used for firmware upgrade. Usually this is the IP of the user's computer.
11) Progress bar. The current status in % of the firmware upgrade.
12) Upgrade line. This is detailed information of the firmware upgrade process.
12.1) Start time. The time when the firmware upgrade was initiated.
12.2) Device. The DAEnetIP3x controller type
12.3) IP address. The IP address of the controller.
12.4) Old version. The version before upgrade.
12.5) New version. The version after successful upgrade. If it is made downgrade (the new ver is greather than the old version) then restoring default settings is required.
12.6) Status. It may be:
12.6.1) Reading - The file is uploading
12.6.2) File not uploaded - The upgrade process has been interrupted
12.6.3) File uploaded - The file is uploaded and DAEnetIPx controller is ready for work.
DO NOT INTERRUPT THE UPGRADE PROCESS UNTIL THE STATUS MESSAGE BECOMES "FILE UPLOADED" OTHERWISE THE CONTROLLER MAY BE DAMAGED !
13) Firmware upgrade file. Path to firmware file
14) ... Browse button
15) Clear. Clear history button
16) Burn. When this button is clicked, it is started firmware upgrade process.
17) Download link. It is recommend to download an use the firmware from this link before upgrade the DAEnetIPx controller.
How to upgrade DAEnetIP1 (Tutorial)
1. Download and save the version you need for upgrading the DAEnetIP1 controller. The binary (.bin) file must be downloaded from denkovi.com. It may be downloaded from the link in the application or directly from this link. Support for firmware file also may be received by e-mail
2. Navigate the application to this file by clicking button with label “…”.
3. From the Device list select DAEnetIP1.
4. In the IP address field type the IP address of the DAEnetIP1 controller that must be upgraded.
5. In the Port field type the port on that DAEnetIP1 can be reached. This is the SNMP port. Ususally it is 161.
6. In the Password field type the SNMP password used in this DAEnetIP1 controller.
9. Check if the settings are correct by clicking button “Check device”. After successful connection under this button it must appears text with the DAEnetIP1 version. If this not happens it means the connection is not successful and you must repeat again steps 3-6.
7. Set the TFTP Server. This is usually the IP of the user's computer.
8. Set the maximum retries field. This field shows how many times the DAEnetIP Burner will try to reconnect with the DAEnetIP1 controller if the connection is lost for a moment. A value of 5-10 is reasonable.
9. Start update by clicking Burn button. If everything is correct, a new line must appear in the event log and the progress bar must starts moving on.
10. Wait until the file is uploaded. This will be indicated when the New version field is not ??? but some value – form example 1.50. Then the Status field must be with value “File is uploaded successfully”.
11. Your DAEnetIP1 controller is upgraded successfully with the desired firmware version. Now when you click button “Check device”, the new version must appear.
How to upgrade DAEnetIP2 (Tutorial)
1. Download and save the version you need for upgrading the DAEnetIP2 controller. The binary (.bin) file must be downloaded from denkovi.com. It may be downloaded from the link in the application or directly from this link. Support for firmware file also may be received by e-mail
2. Navigate the application to this file by clicking button with label “…”.
3. From the Device list select DAEnetIP2.
4. In the IP address field type the IP address of the DAEnetIP2 controller that must be upgraded.
5. In the Port field type the port on that DAEnetIP2 can be reached. This is the SNMP port. Ususally it is 161.
6. In the Password field type the SNMP password used in this DAEnetIP2 controller.
7. Check if the settings are correct by clicking button “Check device”. After successful connection under this button it must appears text with the DAEnetIP2 version. If this not happens it means the connection is not successful and you must repeat again steps 3-6.
8. Set the TFTP Server. This is usually the IP of the user's computer.
9. Set the maximum retries field. This field shows how many times the DAEnetIP Burner will try to reconnect with the DAEnetIP2 controller if the connection is lost for a moment. A value of 5-10 is reasonable.
10. Start update by clicking Burn button. If everything is correct, a new line must appear in the event log and the progress bar must starts moving on.
11. Wait until the file is uploaded. This will be indicated when the New version field is not ??? but some value – form example 1.50. Then the Status field must be with value “File is uploaded successfully”.
12. Your DAEnetIP2 controller is upgraded successfully with the desired firmware version. Now when you click button “Check device”, the new version must appear.
- Be sure the file you are using for firmware upgrade is correct. Incorrect file may damage the DAEnetIPx controller. Download the file only from the given links of denkovi.
- Do not shut off the power supply during firmware upgrade. This may damage the DAEnetIPx controller.
- Do not touch the DAEnetIPx controller with hands during firmware upgrade.
- Do not disconnect the firmware upgrade process. This may damage the DAEnetIPx controller.
- If you loose access to DAEnetIPx controller, then do not upgrade the firmware. You must load the default settings or simply contact with us via email b_denkov@abv.bg.
- If you downgrade the firmware (upgrade it with lower version), then it may be necessary to load the default settings.


