Cart is empty.
.png)


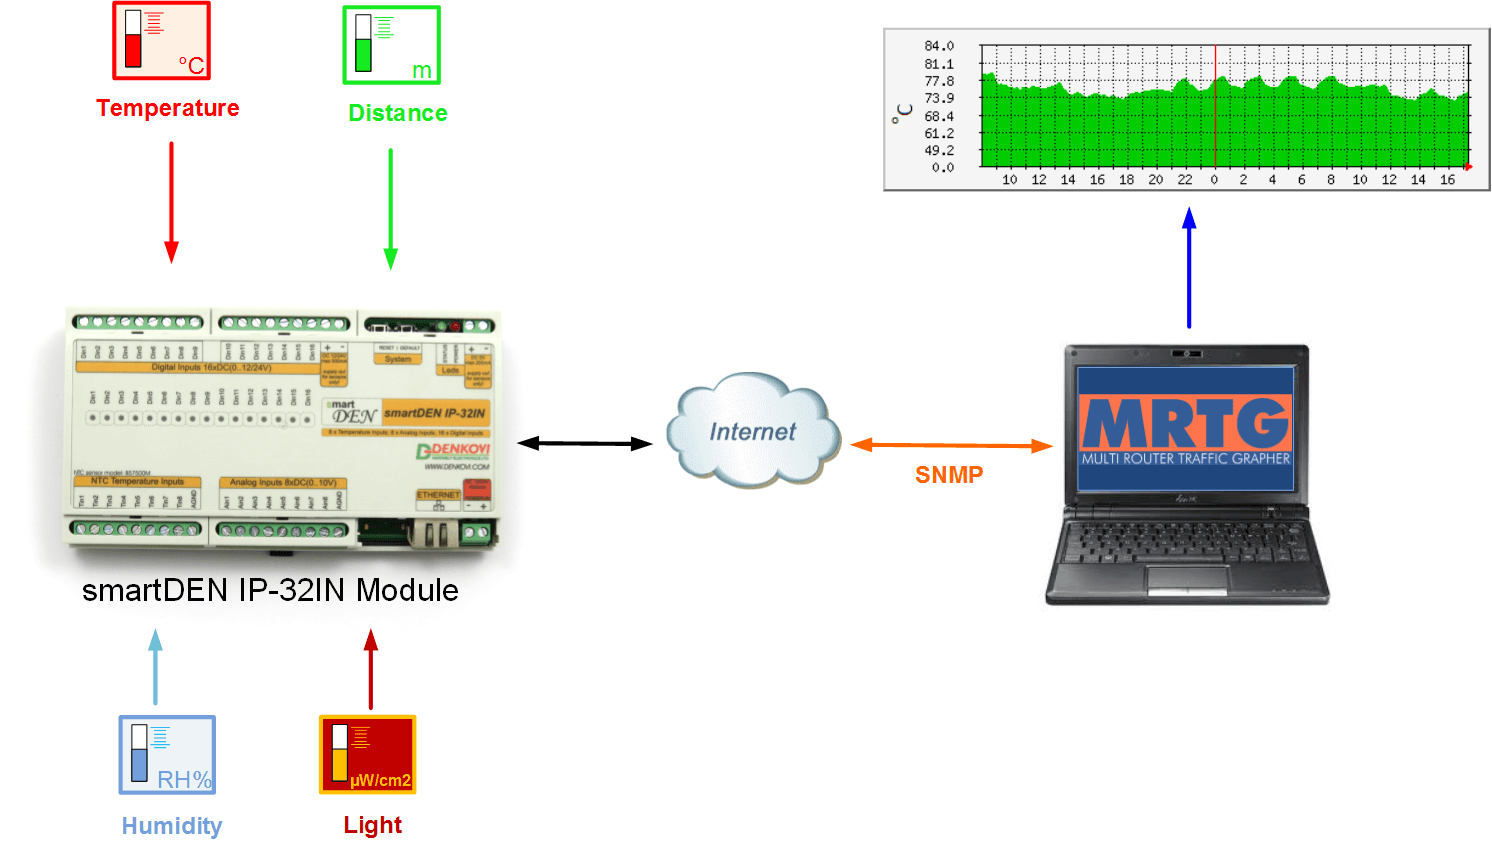
This application note describes a way to monitor Denkovi SNMP Modules (especially supporting inputs) using the popular free network tool MRTG (Multi Router Traffic Grapher). MRTG is a network application that can monitor any remote host which has the SNMP protocol support enabled. MRTG generates HTML pages containing PNG images which provide a live visual representation of monitored parameters. In addition to a detailed daily view, MRTG also creates graphs of the values seen during the last seven days, the last five weeks and the last twelve months.
Assumptions
Bellow it is described as an example how to use MRTG with smartDEN IP-32IN Input Module. Please note that generally every SNMP device by Denkovi can be used the same way with MRTG.
Requirements
- The Perl interpreter. A copy of Perl can be obtained from http://www.activestate.com/activeperl/downloads
- The MRTG package. A copy can be downloaded from http://oss.oetiker.ch/mrtg/pub/?M=D
- A Web Server (for example – Apache) - required only if the MRTG graphs should be available over the Web/HTTP. The Web server may be configured on the local machine or on a remote host (distributed installation).
Installation
This section presents the installation of the Windows version of MRTG. The Linux/Unix version basically follows the same procedure. The Linux/Unix installation instructions can be found in http://oss.oetiker.ch/mrtg/doc/mrtg-unix-guide.en.html.
The installation process for a non-distributed implementation will be described. A distributed implementation follows the same steps but needs modifications on path specification.
Step 1. Installing Perl
Perl has to be installed following the setup instructions. Make sure that the Perl binary directory is listed in system’s PATH variable.
Step 2. Installing MRTG
MRTG does not require specific installation tasks. Just unzip the MRTG files in the chosen MRTG folder (this document assumes the folder is <drive>\mrtg\, where <drive> can be for example C:, D:, etc.).
Step 3. Enabling SNMP support on SmartDEN IP-32IN
By default, the SNMP is enabled on SmartDEN IP-32IN. The relevant configuration options are depicted in the figure bellow:

For smartDEN IP-32IN especially, the above settings may be applied from integrated webserver -> SNMP Agent
Step 4. Configuring MRTG to monitor SmartDEN IP-32IN in Windows
Step 4.1. Create a folder
Step 4.2. Download the snmp MIB file and the mrtg config files for SmartDEN IP-32IN;
Step 4.3. Copy to the created smartDEN_IP-32IN folder the following files:
- smartDEN_IP-32IN.cfg
- smartDEN IP-32IN.mib
- mrtg-start.bat
Step 4.4. Open a command window in <drive>\Monitor\smartDEN_IP-32IN\ and type:
mrtg-start.bat
This command creates necessary sub-folders (html, images, logs) and starts the MRTG monitoring. To keep the monitoring on, don’t close the command window or break the execution by Ctrl-C.
Step 4.5. If everything is ok, you should see something like this and no other messages or warnings:
D:\Monitor\smartDEN_IP-32IN>perl \mrtg\bin\mrtg smartDEN_IP-32IN.cfg
Daemonizing MRTG ...
Do Not close this window. Or MRTG will die
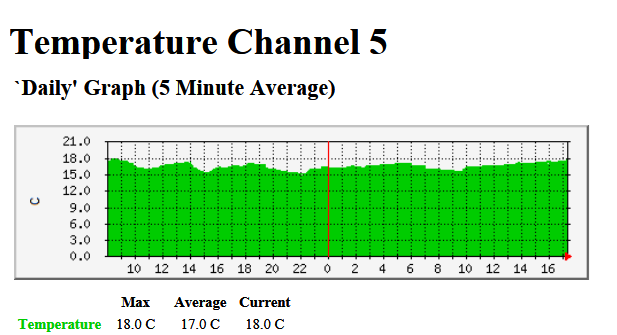
Step 4.6. In order to monitor the desired channels, navigate to folder <drive>\Monitor\smartDEN_IP-32IN\html\ and open index.html in a Web browser. The last file contains the HTML links to the monitored channels. Each channel page contains 4 graphs: daily, weekly, monthly and yearly. An example of daily graph is shown bellow:
NOTE:
The provided configuration assumes the next settings of device SmartDEN IP-32IN:
- SNMP community name: public
- IP address: 192.168.1.100
- UDP port of the SNMP agent: 161
To modify this configuration, put the relevant settings in the next lines of smartDEN_IP-32IN.cfg:

Troubleshooting
- If you get error similar to this one: ...' $target->[1]{$mode} ' did not eval into defined data... this means most probably the returned result is not valid number and this cause error while parsing. For example for smartDEN IP-32IN module, if there is not attached sensor to the temperature input, the returned value will be "---" and this will cause such error warning. It is good idea to leave only the monitored inputs in the .cfg file.
- If you get error like bellow, this means there is something wrong with the device community (password), IP or port and you have to check them once again:
SNMP Error:
no response received
SNMPv1_Session (remote host: "192.168.1.26" [192.168.1.26].9595)
community: "pass"
request ID: 443842055
PDU bufsize: 8000 bytes
timeout: 2s
retries: 5
backoff: 1)
at D:/mrtg/bin\..\lib\mrtg2/SNMP_util.pm line 497.
SNMPGET Problem for TemperatureInputValue.0 on pass@192.168.1.26:9595:::::v4only
at \mrtg\bin\mrtg line 2327.


