Cart is empty.
.png)


Software for temperature monitoring,logging and controlling Denkovi USB 4 Relay Board and temperature sensor.
|
|
- Who can use Denkovi USB 4 Relay Recorder Sofware
- List with currently supported relay boards
- Current version download
- System requirements
- Run the software
- Register the relay board
- User interface
Who can use Denkovi USB 4 Relay Recorder
This software may be used by anyone who has at least one of Denkovi relay boards from the current version supported list.
Using of Denkovi USB 4 Relay Recorder with devices which are not manufactured by Denkovi Assembly Electronics LTD is not allowed!
List with currently supported Denkovi relay boards
|
Order number
|
Relay board name and link
|
| DAE-CB/Ro4/TCN75A-USB | USB Four Channel Relay Board with temperature sensor TCN75A |
|
Version
|
Release date
|
Download | Notes |
| 1.1 | 02 Mar 2013 | ||
| 1.0 | 23 Jan 2013 | Does not work in Windows with FTDI drivers greater that 2.08.14 (see version history) |
Version history may be downloaded from here
Operating systems: Windows (tested on XP, Vista,7) and Linux (tested on Ubuntu, OpenSuse)
Java Virtual Machine: Required - download from http://www.java.com/en/download/index.jsp - Please note Oracle Java JDK/JRE with vertsion greather than 1.8.0_251 is not supported with this software!
FTDI drivers: Required - download from http://www.ftdichip.com/Drivers/VCP.htm
First download and extract the archive. This is Java based software and it is required to have installed java on the computer before run it. Assuming this is done, you can easily run the software by:
- double click on the .jar file (mark it as executable file for linux)
- right click -> run with Java platform (for windows)
- open comamnd line and write
java -jar "full/path/to/DenkoviUSB4RelayRecorder.jar"
Register the relay board (for Linux)
- You should be sure that you have permission to write to the chip. (/dev/bus/usb/[BUS]/[DEVICE], you can determinate the exact location by lsusb). By default you will not have permission, so you must chown it every time when you physically connect, or make an UDEV rule: this way. You must fit idVendor and idProduct values to ftdi's, using lsusb. For example a device: Bus 004 Device 003: ID (this is idVendor-->)0b38:0003(<--this is idProduct) ...
- From FTDI Linux D2xx readme: "Other problems will be related to the ftdi_sio driver loading - 1.you must unload this driver (and usbserial) if it is attached to your device ("rmmod ftdi_sio" and "rmmod usbserial" as root user)."
- Source: https://kenai.com/projects/javaftd2xx/pages/Home
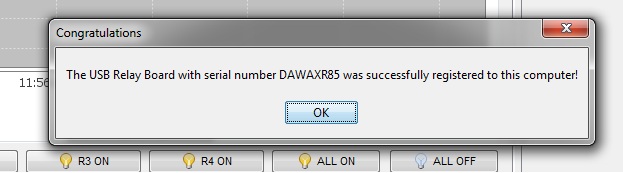
When you use the relay board with this software for first time, the software will try to register it. First you must be sure the relay board is ordered from Denkovi. If so after you run it for first time on certain computer it will register it in denkovi database automaticaly via internet. A confirmation message will be shown that the relay board is registered successfully. This will be done automaticaly. The only requirement is internet connection. Once the registration is done, you will be able to use the relay board and our software on this computer.
.jpg)
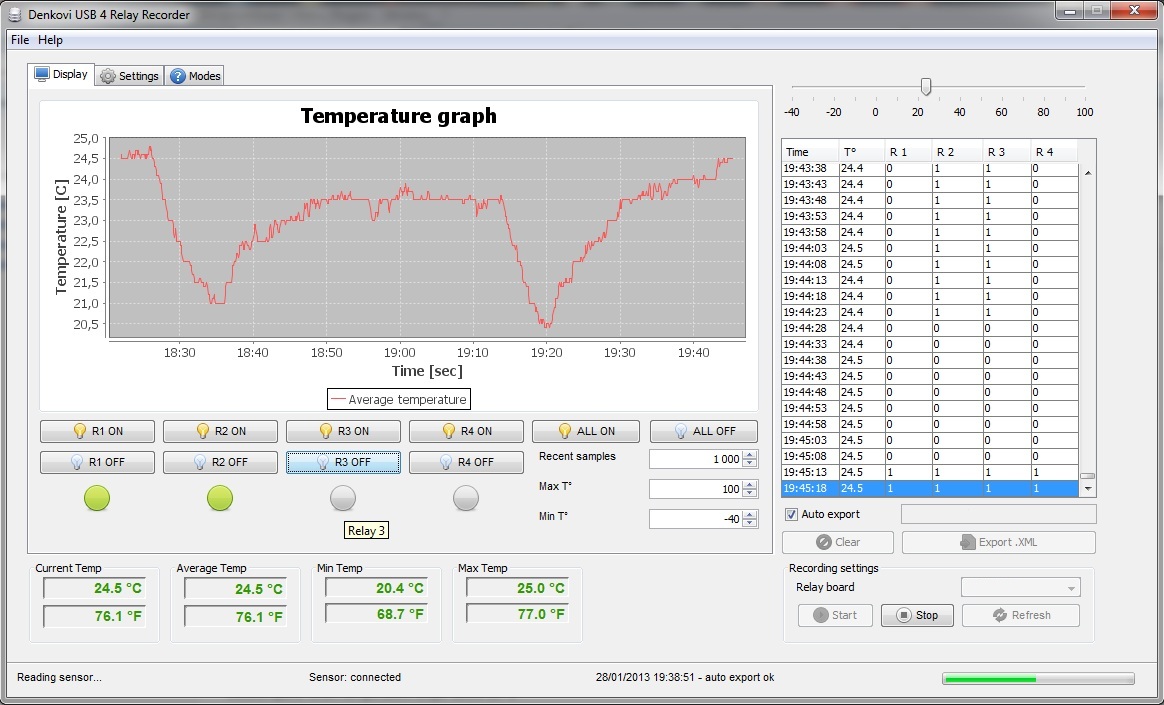
- Set relay On/Off - It is possible the relays to be controlled manually only if they are in mode "None"
- Relay status indicator - Green - relay is on, gray - relay is off
- Average temperature graph - shows the average temperature depeniding on time
- Temperature units - °C/°F - depending on settings
- Recent samples - set the recent samples count to be displayed on the graph
- Min/Max °T - Set the range of the graph.
- Current temperature - shows the current temperature polled from the sensor
- Average temperature - shows the average temperature value based on digital filter size. For example if filter size is 10, th eaverage temperature will be the sum of last 10 samples divided by 10. If filter size = 1, then the average temperature is equal to the current temperature.
- Min temperature - shows the minimial temperature value detected.
- Max temperature - shows the maximal temperature value detected.
- LOG - the recorder log for temperature and relay states
- Auto export - when this checkbox is selcted, the software will export every 15 minutes the data into the selected file. This is very vital in case of computer crashes as the information will be saved on the hard disk.
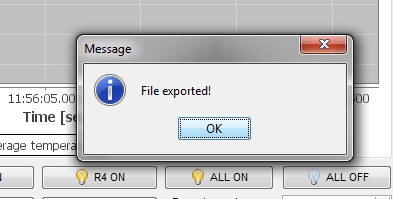
- Export .XML - manually save the log into .XML file. If there is larger amont of records it may take some time to export. Be patient. You should see confirmation message when it is done:
- Start/Stop recording - Starts/stops the recording temperature
- Relay board serial number - List with all relay boards connected to this computer. However only relay board from denkovi can work with this software.
- Refresh - Refresh the relay board list
.jpg)
- Relay name - set the name for each relay
- Mode - Working mode for each relay. It determines how it will be switched depeding on the temperature. It can be: None, Low, High, Low/High, Acc. The modes are described on the image bellow:
.png)
- LT - low threshold (in degrees °C/°F - depending on settings)
- HT - high threshold (in degrees °C/°F - depending on settings)
- LH - low hysteresis (in degrees °C/°F - depending on settings)
- HH - high hysteresis (in degrees °C/°F - depending on settings)
- Temperature units - It may be °C or °F. After changing the temperature values are not converted from °C to °F and vices versa.
- Filter size - digital filter size. The bigger size means more average temperature and slower reaction. If size is 1 then the average and current temperature are the same.
- Refresh time - Time (in seconds) between 2 samples.
- Save - save the settings. Must be done in order the settings take effect.


