DAE-iModules - Help
- About DAE-Modules
- List with available devices
- Add new device
- Delete device from the list
- Digital Inputs Screen
- Digital Outputs Screen
- Analog Inputs Screen
- Analog Outputs Screen
- Other Inputs Screen
- Settings - Main Screen
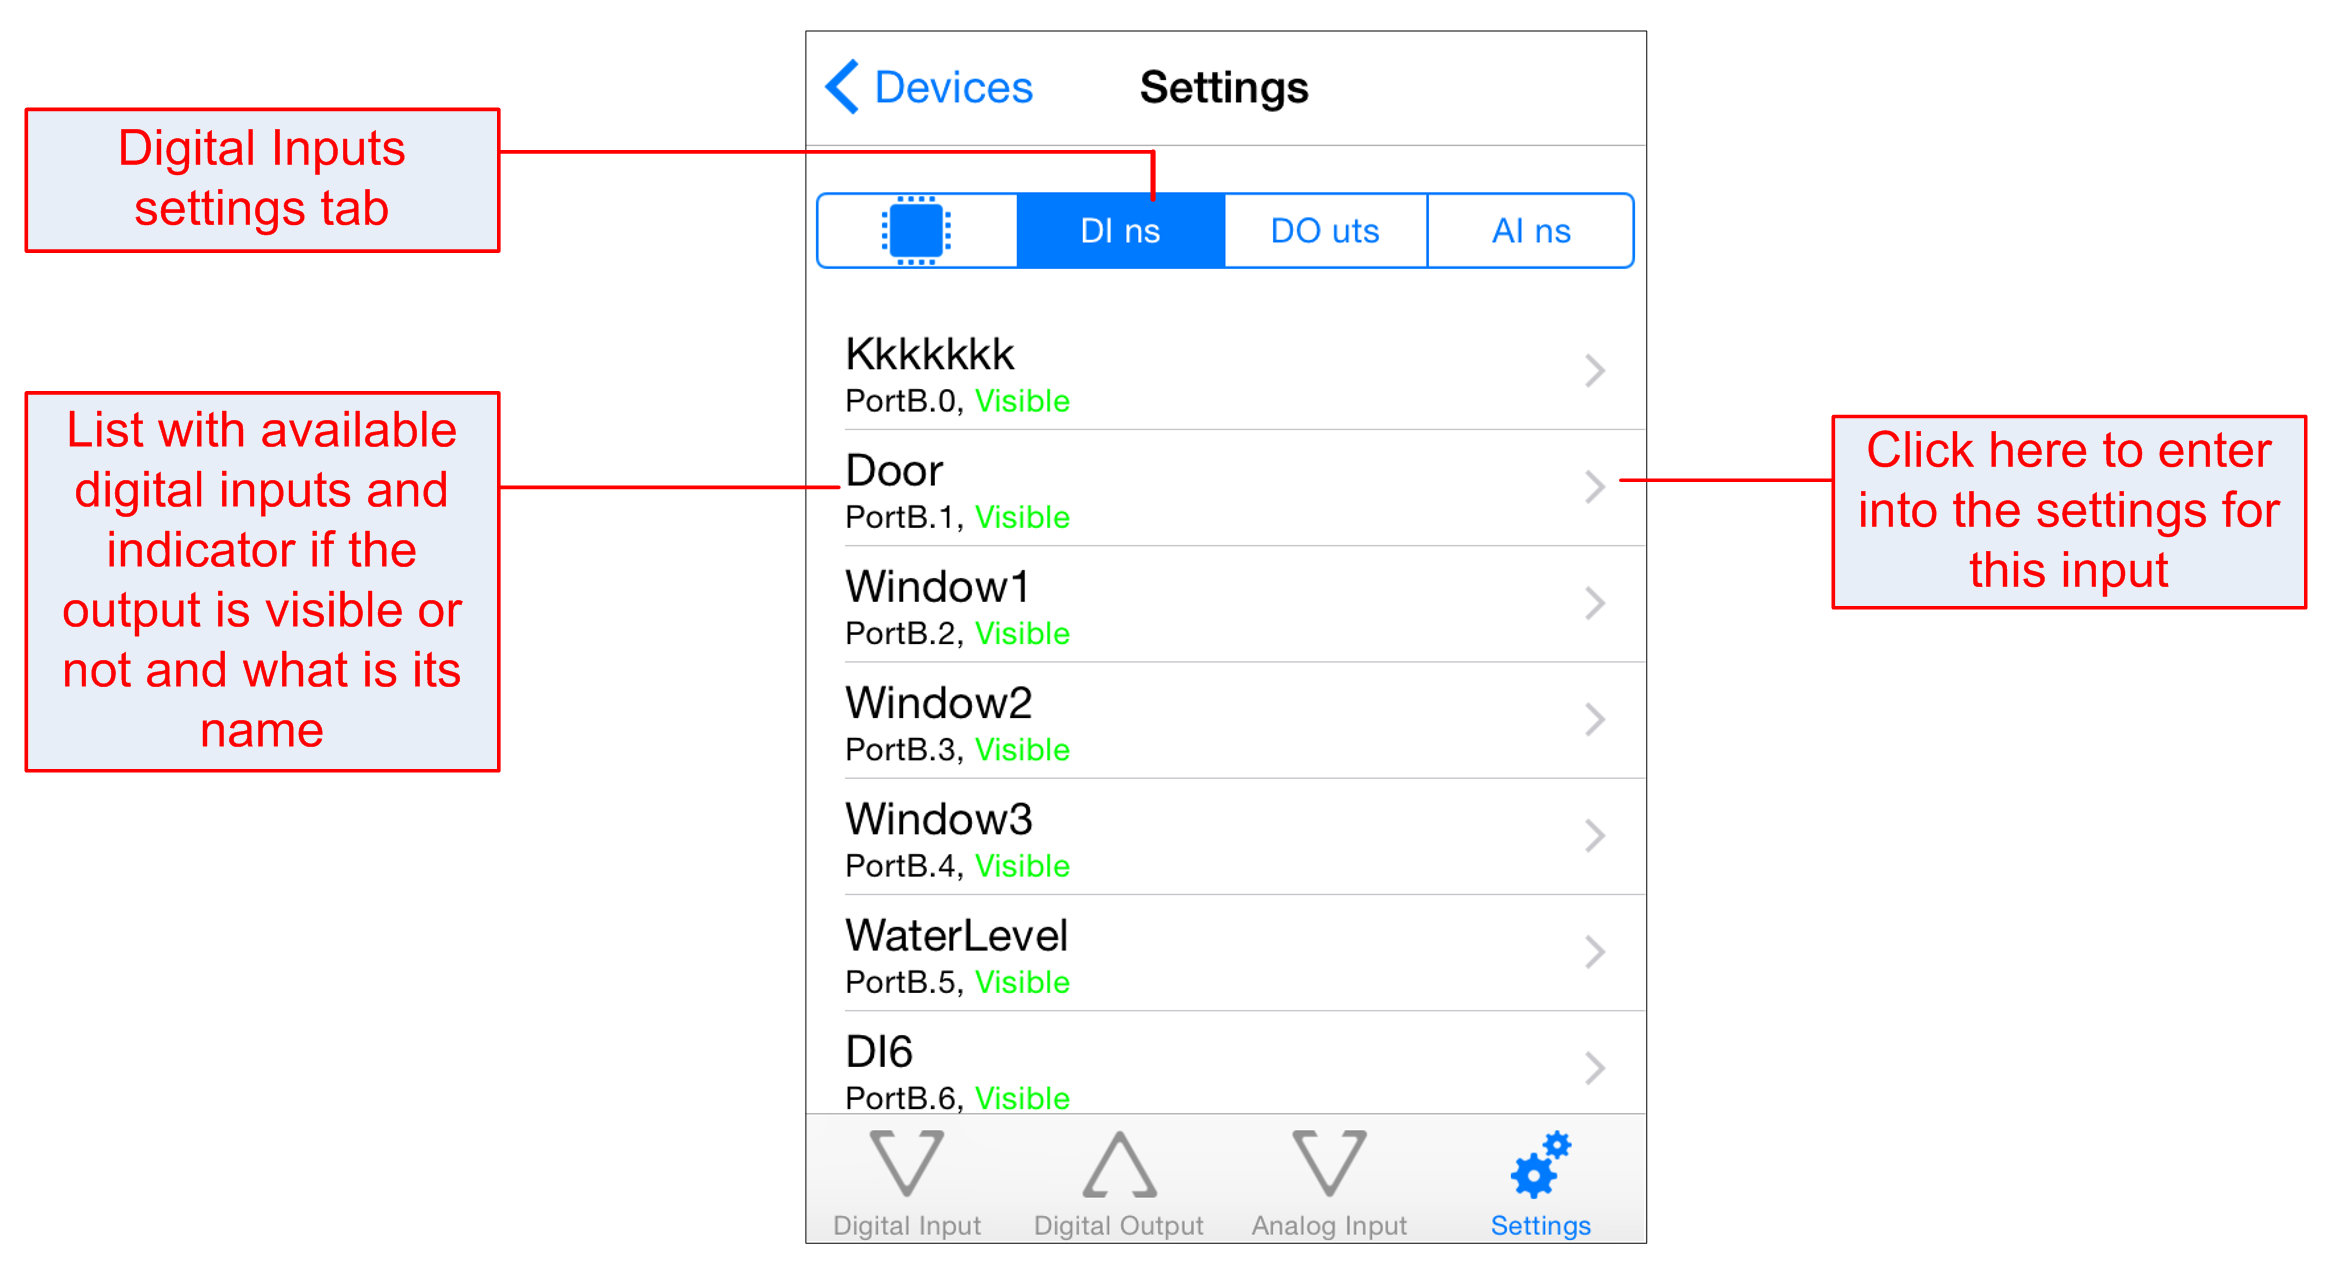
- Digital Inputs settings
- Digital Inputs settings - edit values
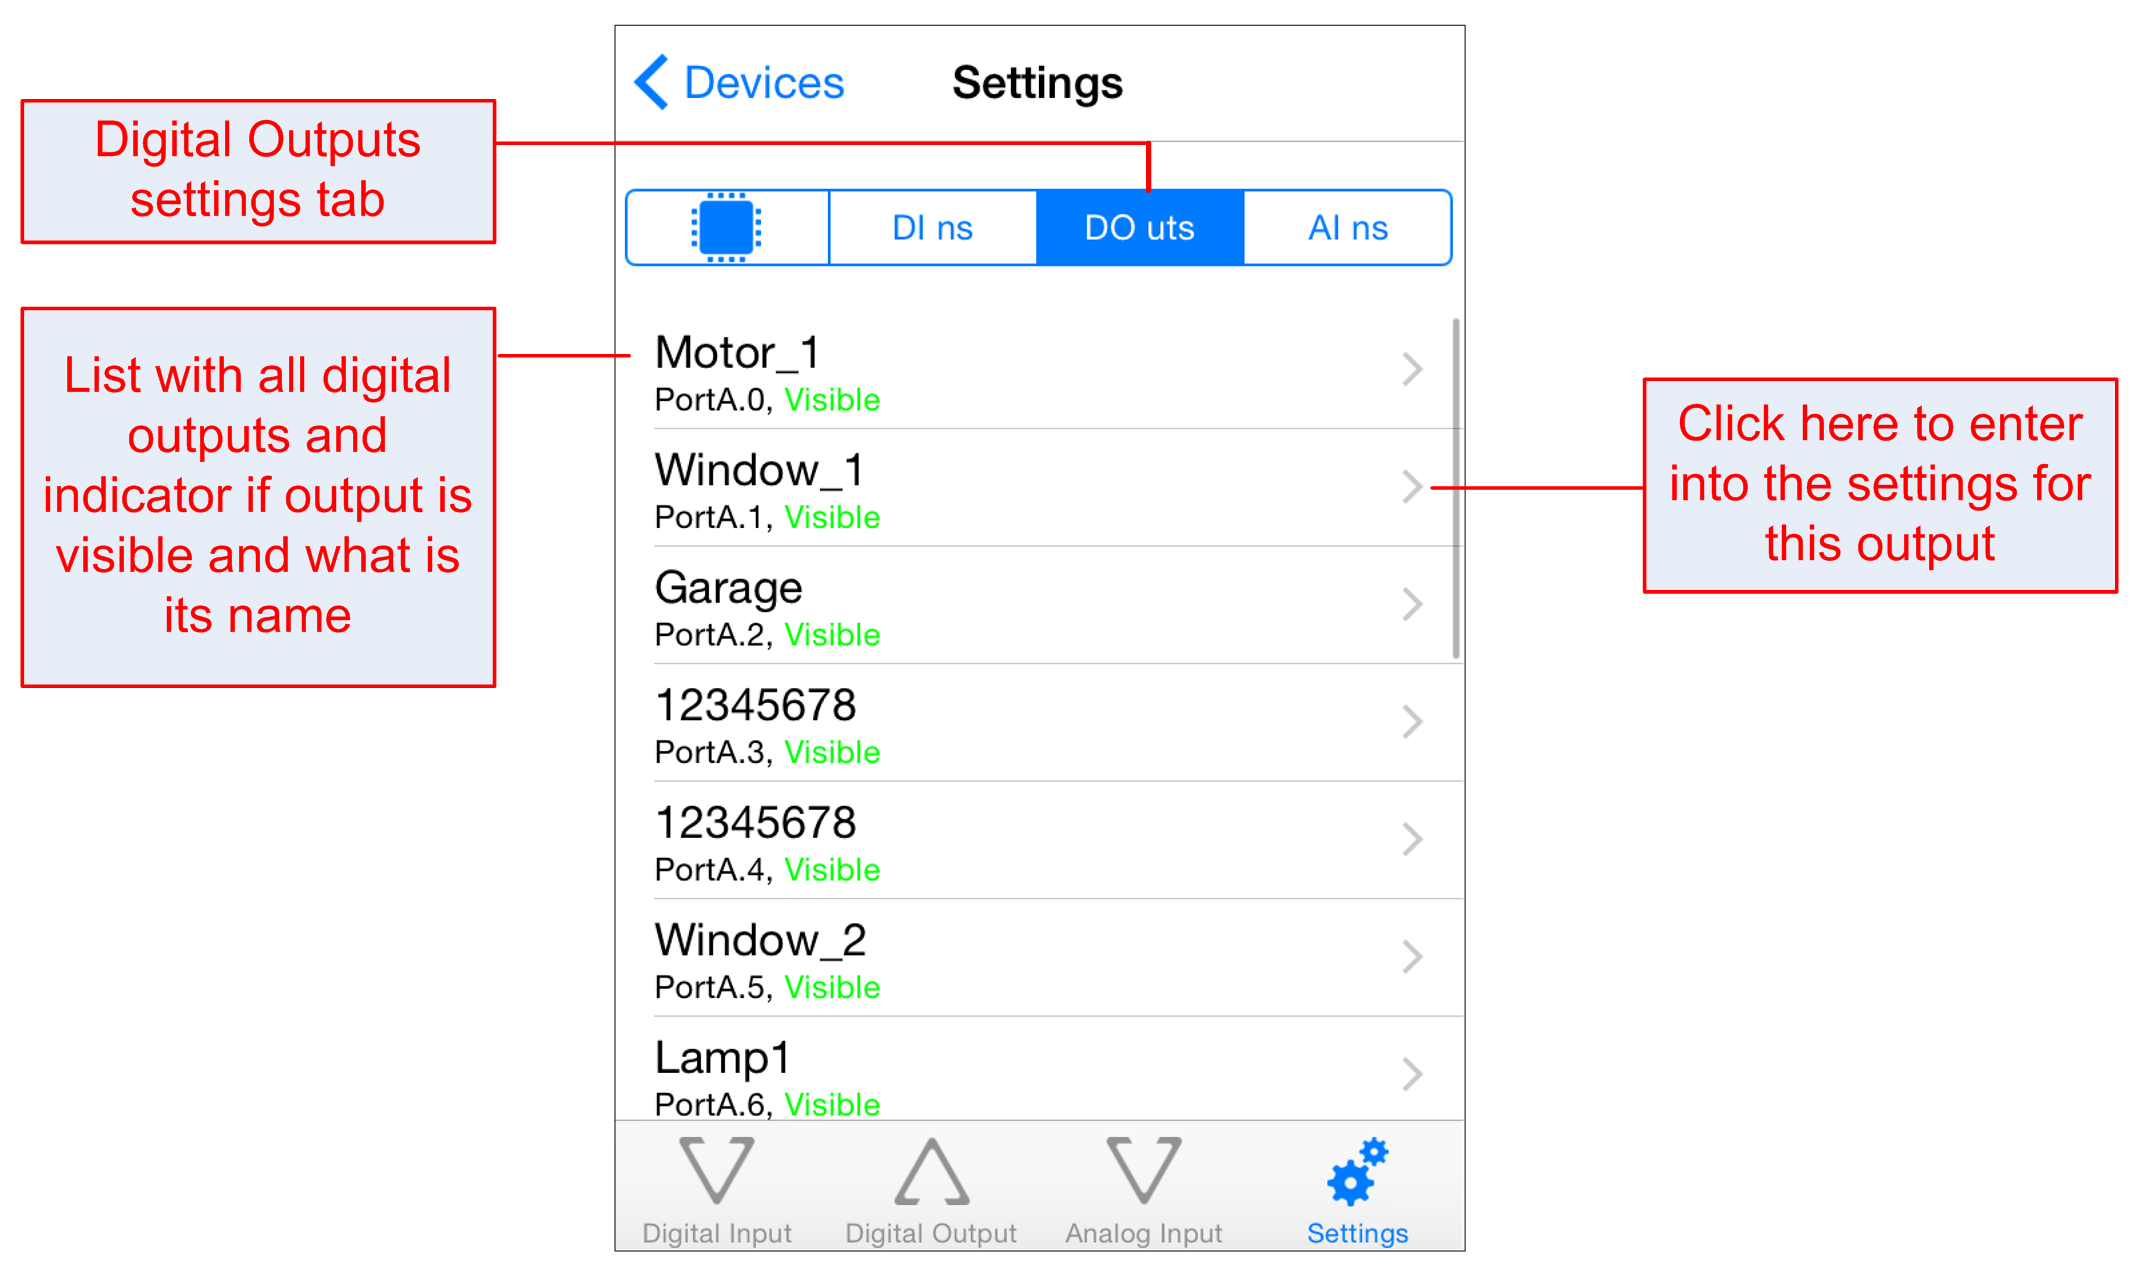
- Digital Outputs settings
- Digital Outputs settings - edit values
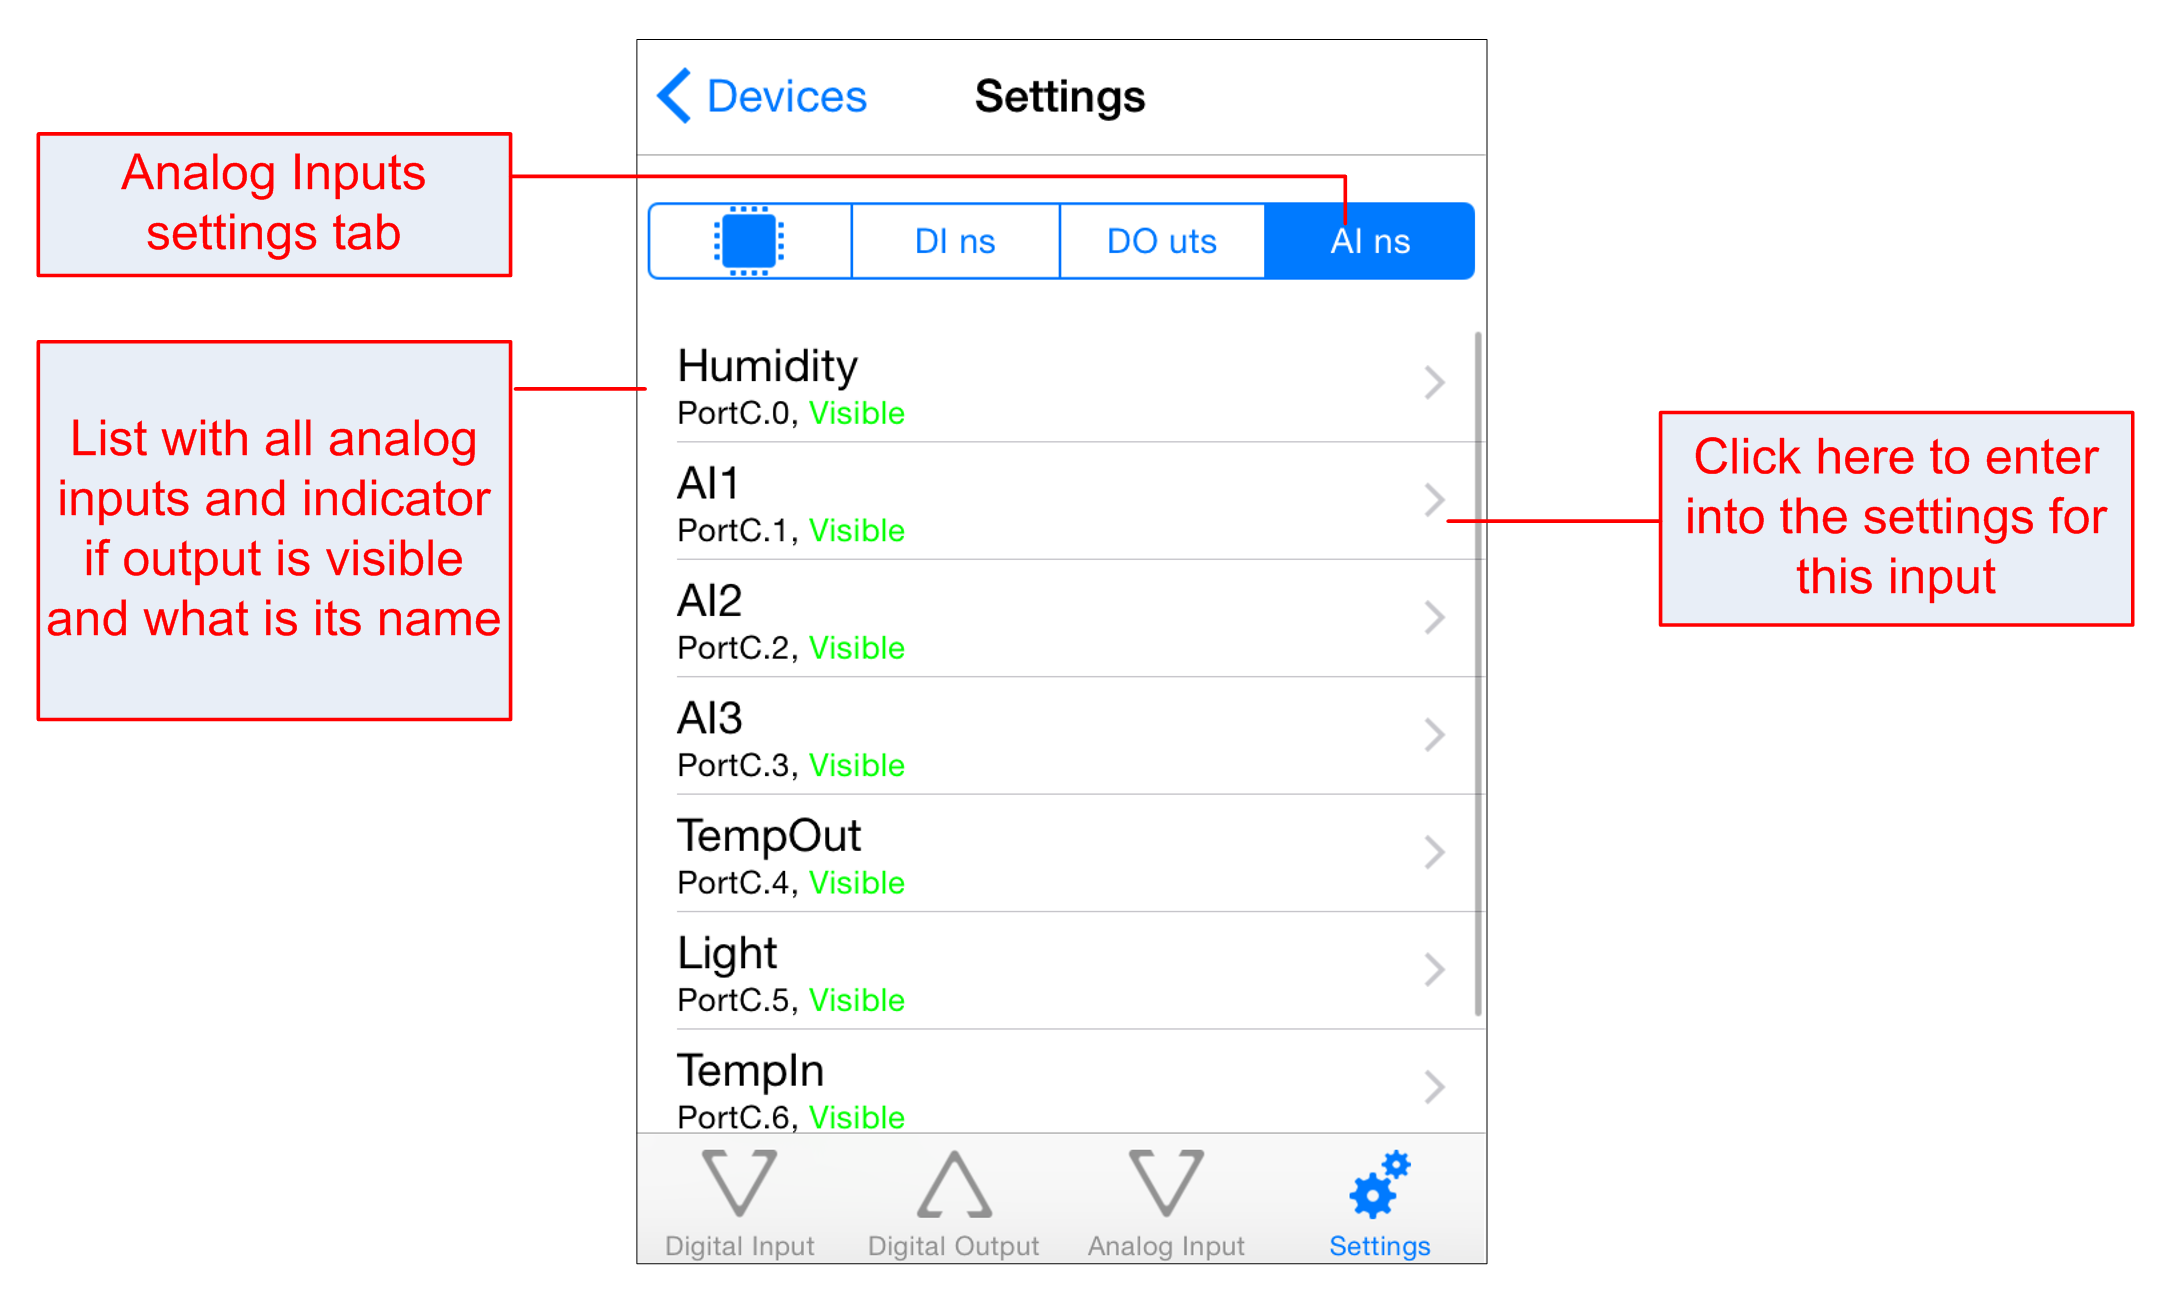
- Analog Inputs settings
- Analog Inputs settings - edit values
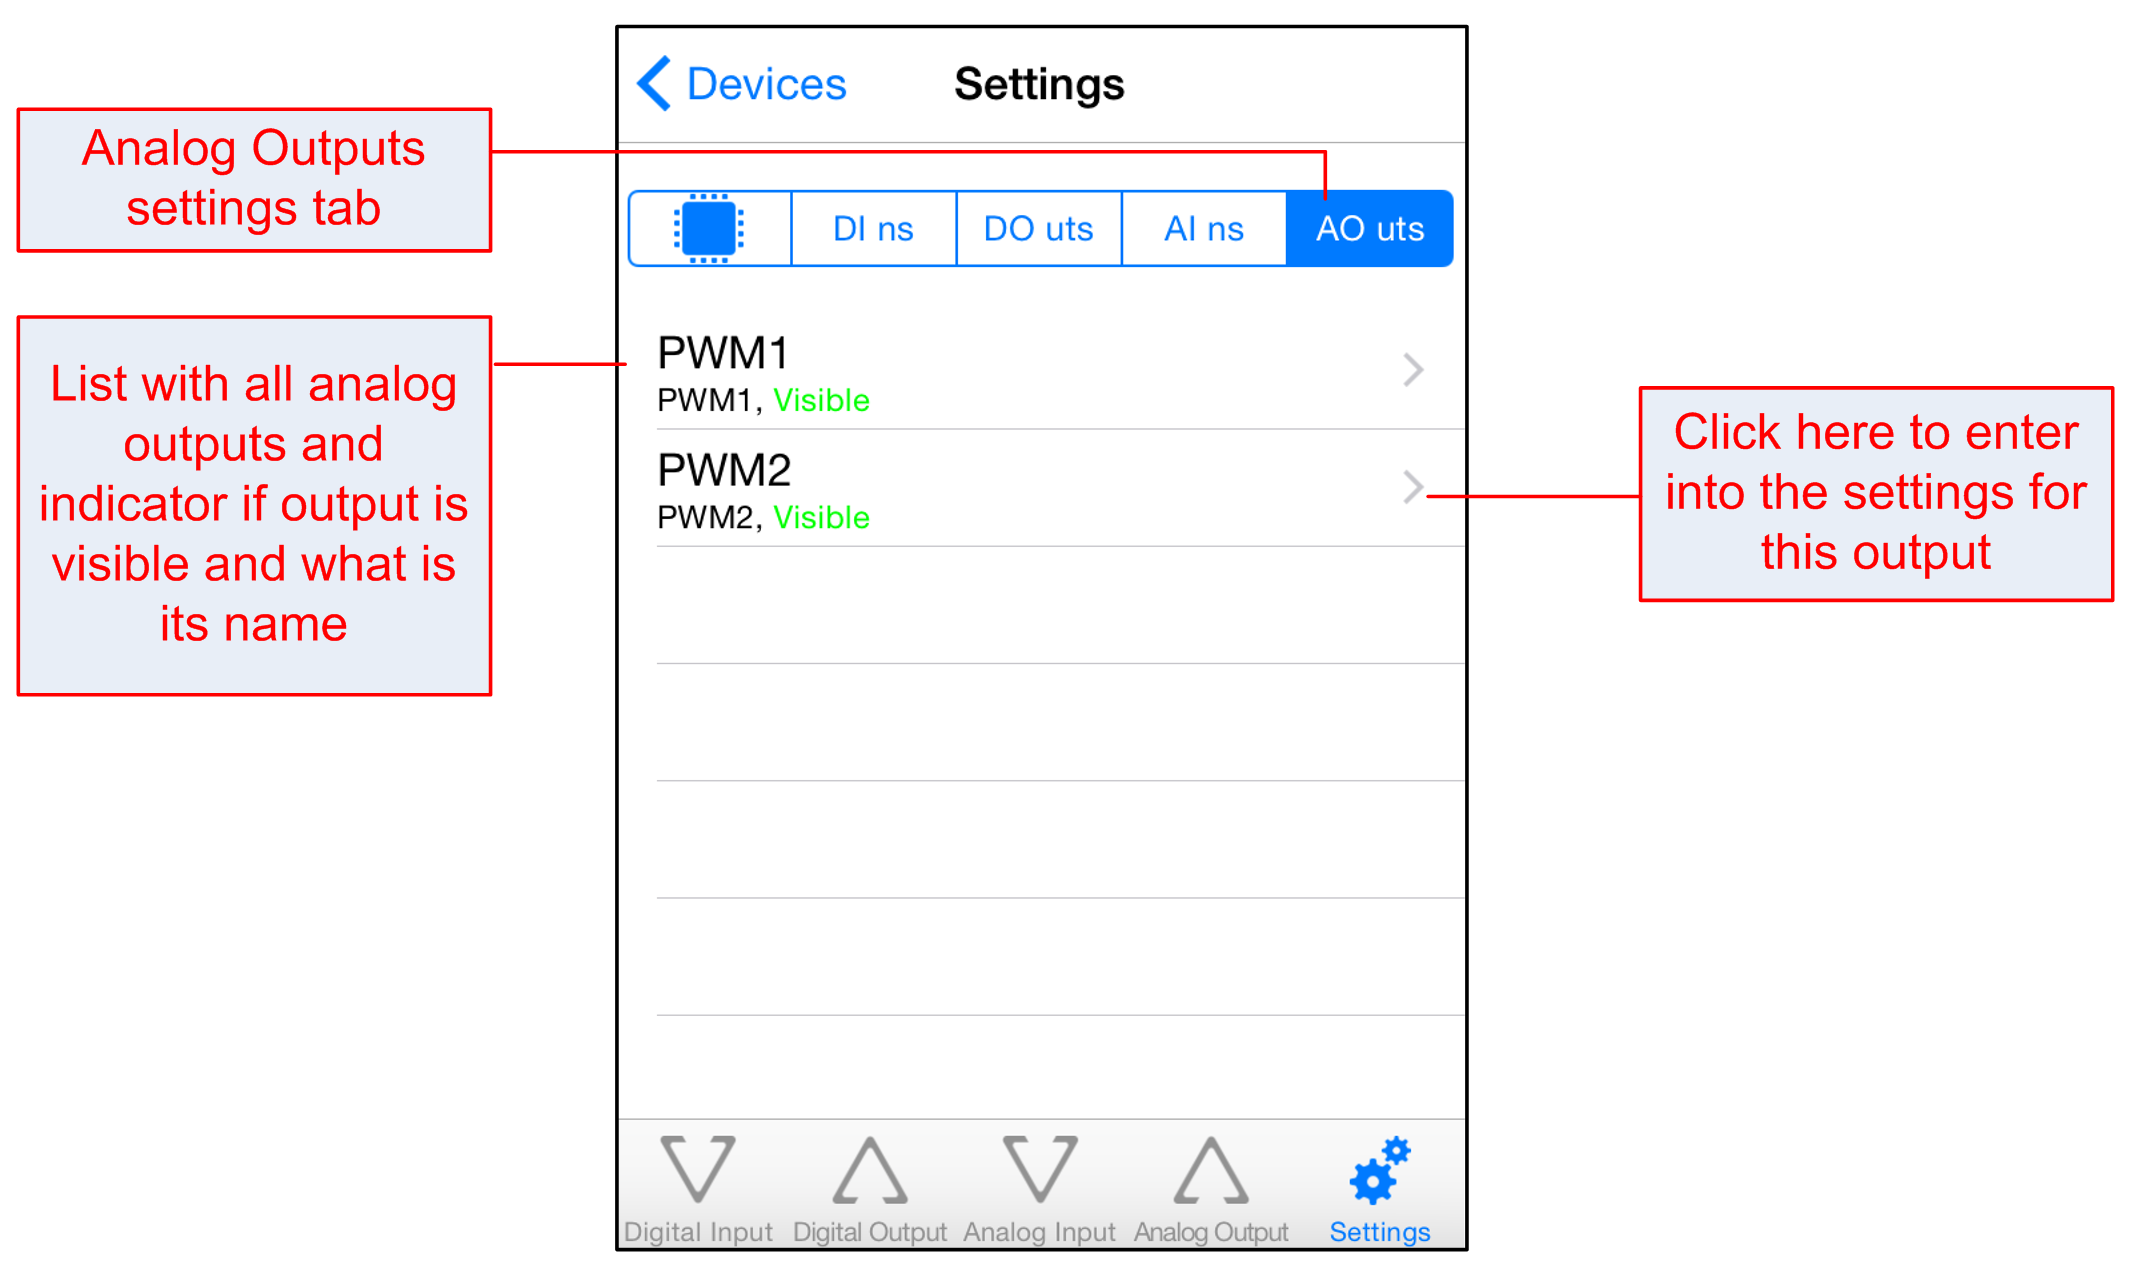
- Analog Outputs settings
- Analog Outputs settings - edit values
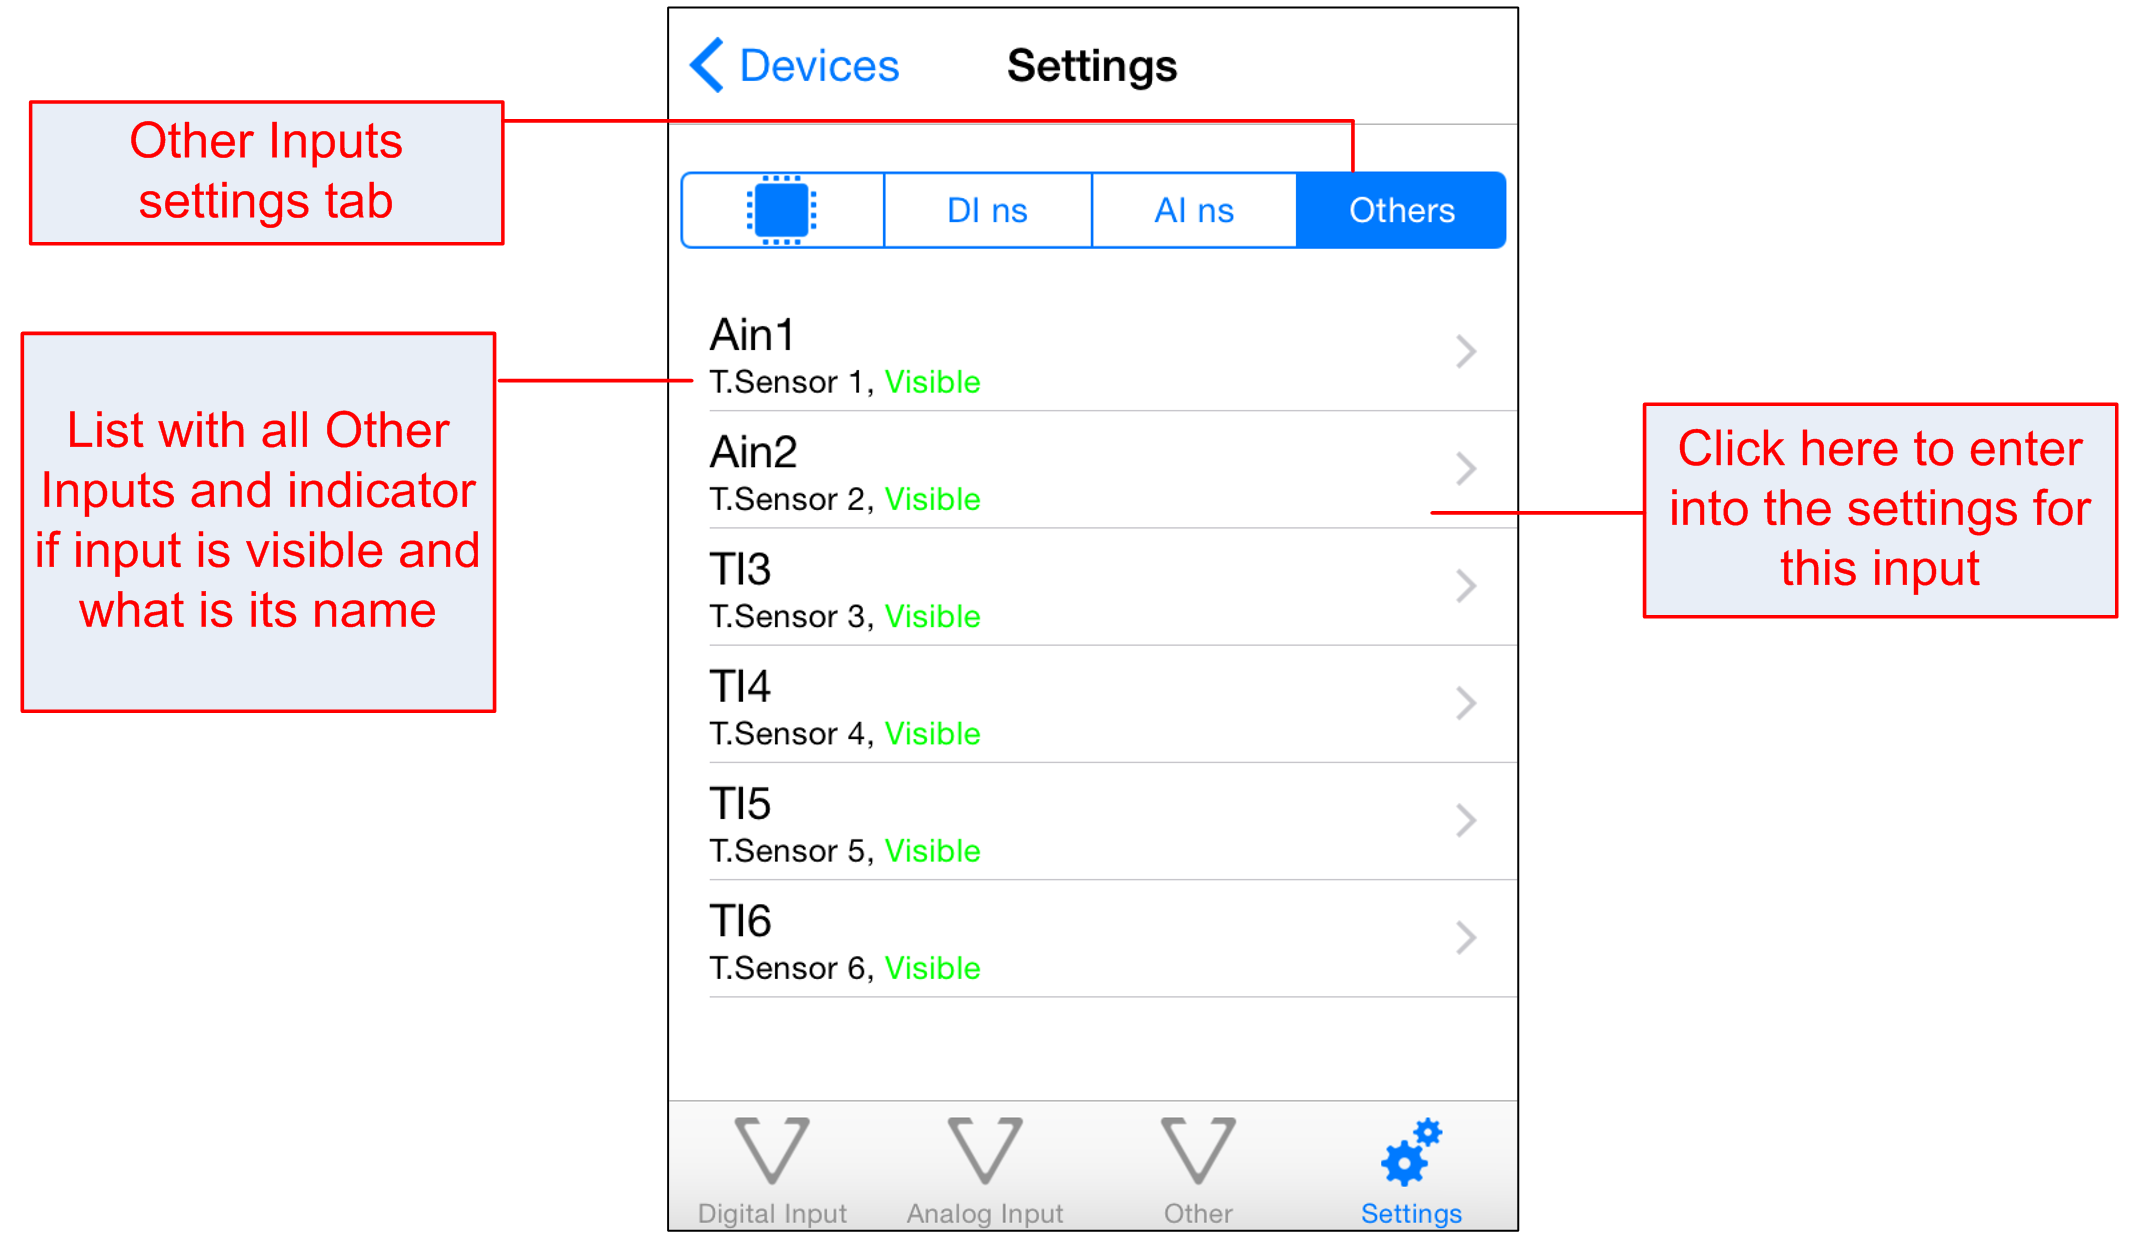
- Other Inputs settings
- Other Inputs settings - edit values
- Quick Tutorial 1 - How to access DAEnetIP2 device directly with computer
- Quick Tutorial 2 - How to access DAEnetIP2 device over WLAN via router
- Quick Tutorial 3 - How to access DAEnetIP2 device over Internet using port-forwarding
1. About DAE-iModules
The current application is for all ethernet devices by Denkovi Assembly Electronics LTD which are based on DAEnetIP2, DAEnetIP3, DAEnetIP4 controllers as well the smartDEN series. The technical documentation for these devices as well other information may be found on: http://denkovi.com/
These devices support different number of input/output lines depending on the model you have. However DAE-iModules is to be user-friendly and will display only the I/O ports which are supported by the particular device and the others will be hidden. So the application is capable to show:
- Digital Outputs (for example relays are represented as such outputs). Their state (ON or OFF) is read/write;
- Digital Inputs -Their state may be only read and can be ON or OFF as well;
- Counters - if your denkovi device support counters, they will be displayed together with the digital inputs. Their values are some integer number - for example DAEnetIP4 has 16 bit counters which is from 0 upto 65535;
- Analog Inputs - These inputs are used to measure analog signal values and are be read-only. Their values are number from 0 up to 1024 for example. You can use them to read sensors for temperature, humidity, pressure, light and so on;
- Analog Outputs - also so called PWM. Here you will see sliders to set them. They are usually used for dimming something - for example lights;
- Other Inputs - Some devices have specific inputs for temperature, humidity and so on. They are shown in this tab.
It is quite possible the default settings of this software to be for one such demo Denkovi Device attached online at our facility. In case you don't have access to it, don't panic. This is most probably there are too many request to this device (as it is demo) and you can try later.
Generally the DAEnetIP2 controller supports:
TOP
2. List with available devices
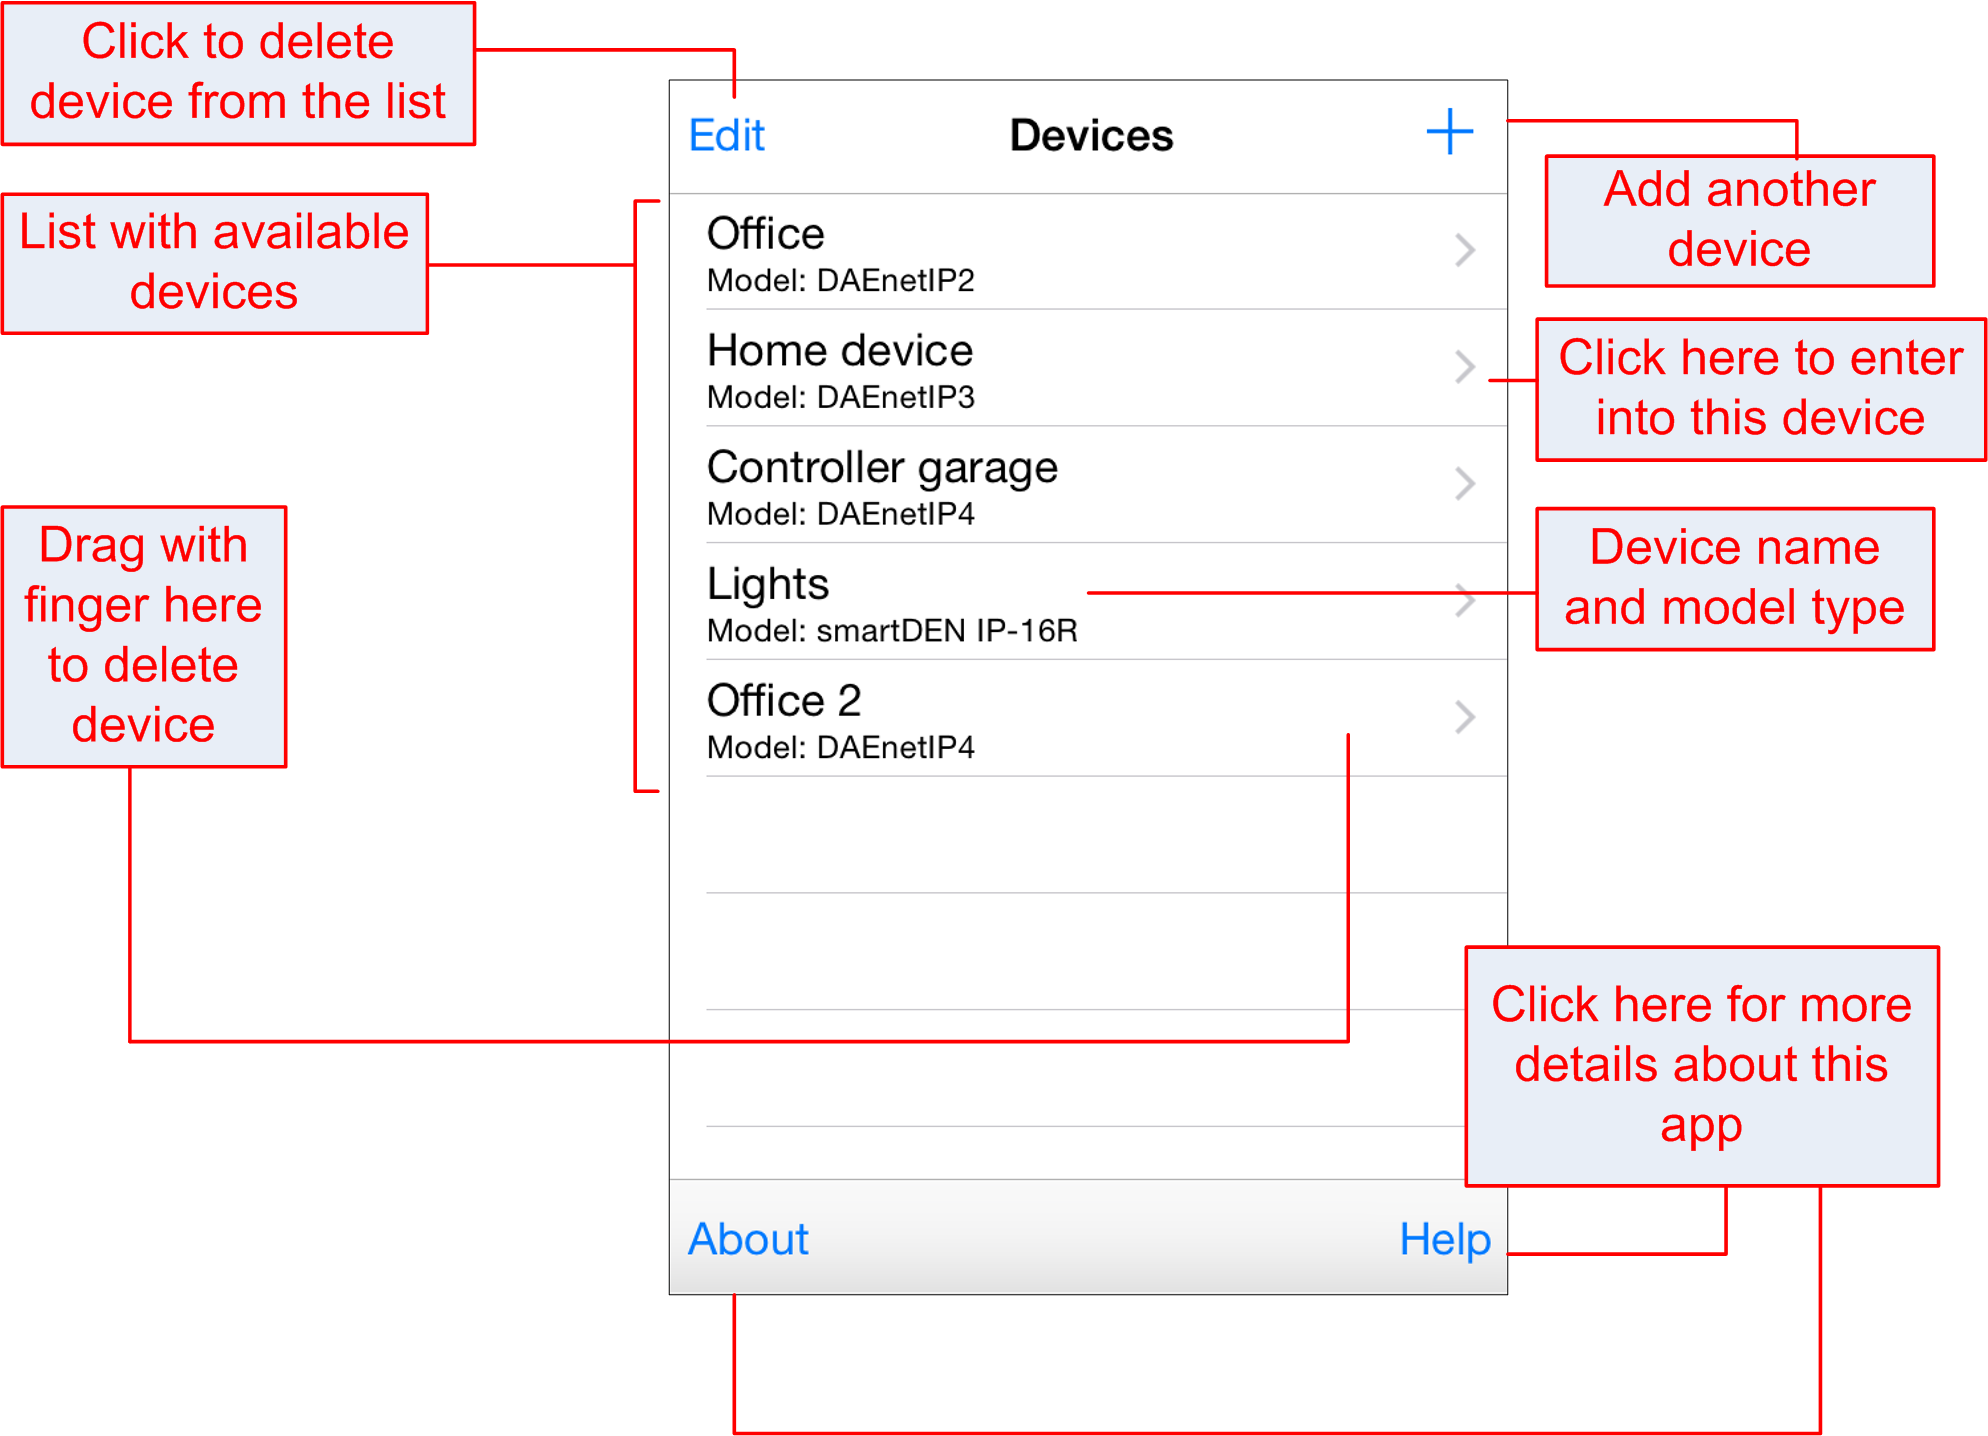
TOP
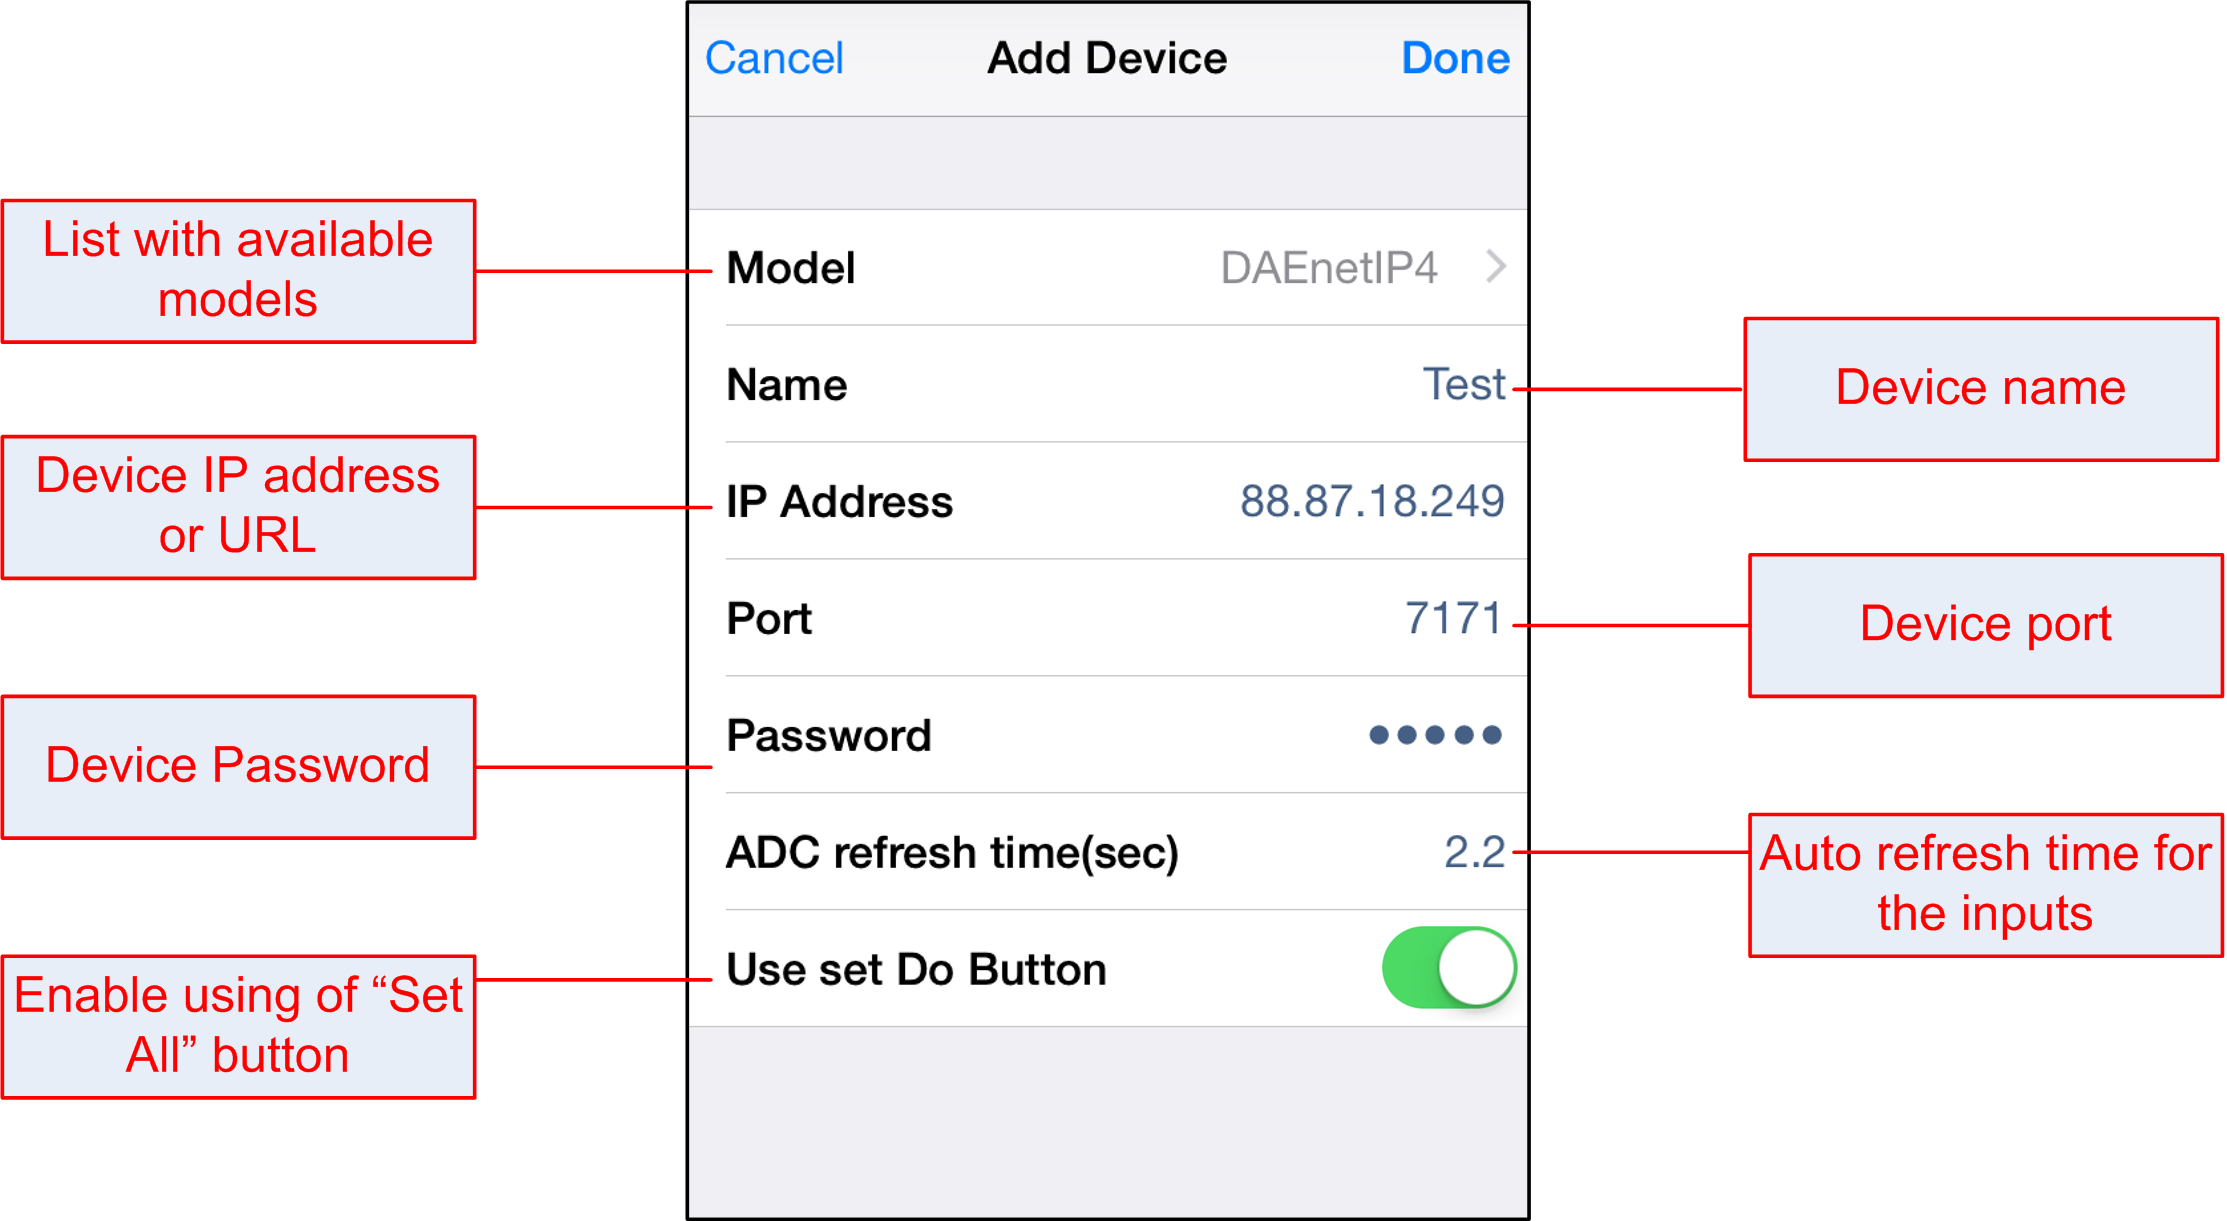
3. Add new device
If you want to add device firstly you will have to adjust its settings from the screen bellow:
TOP
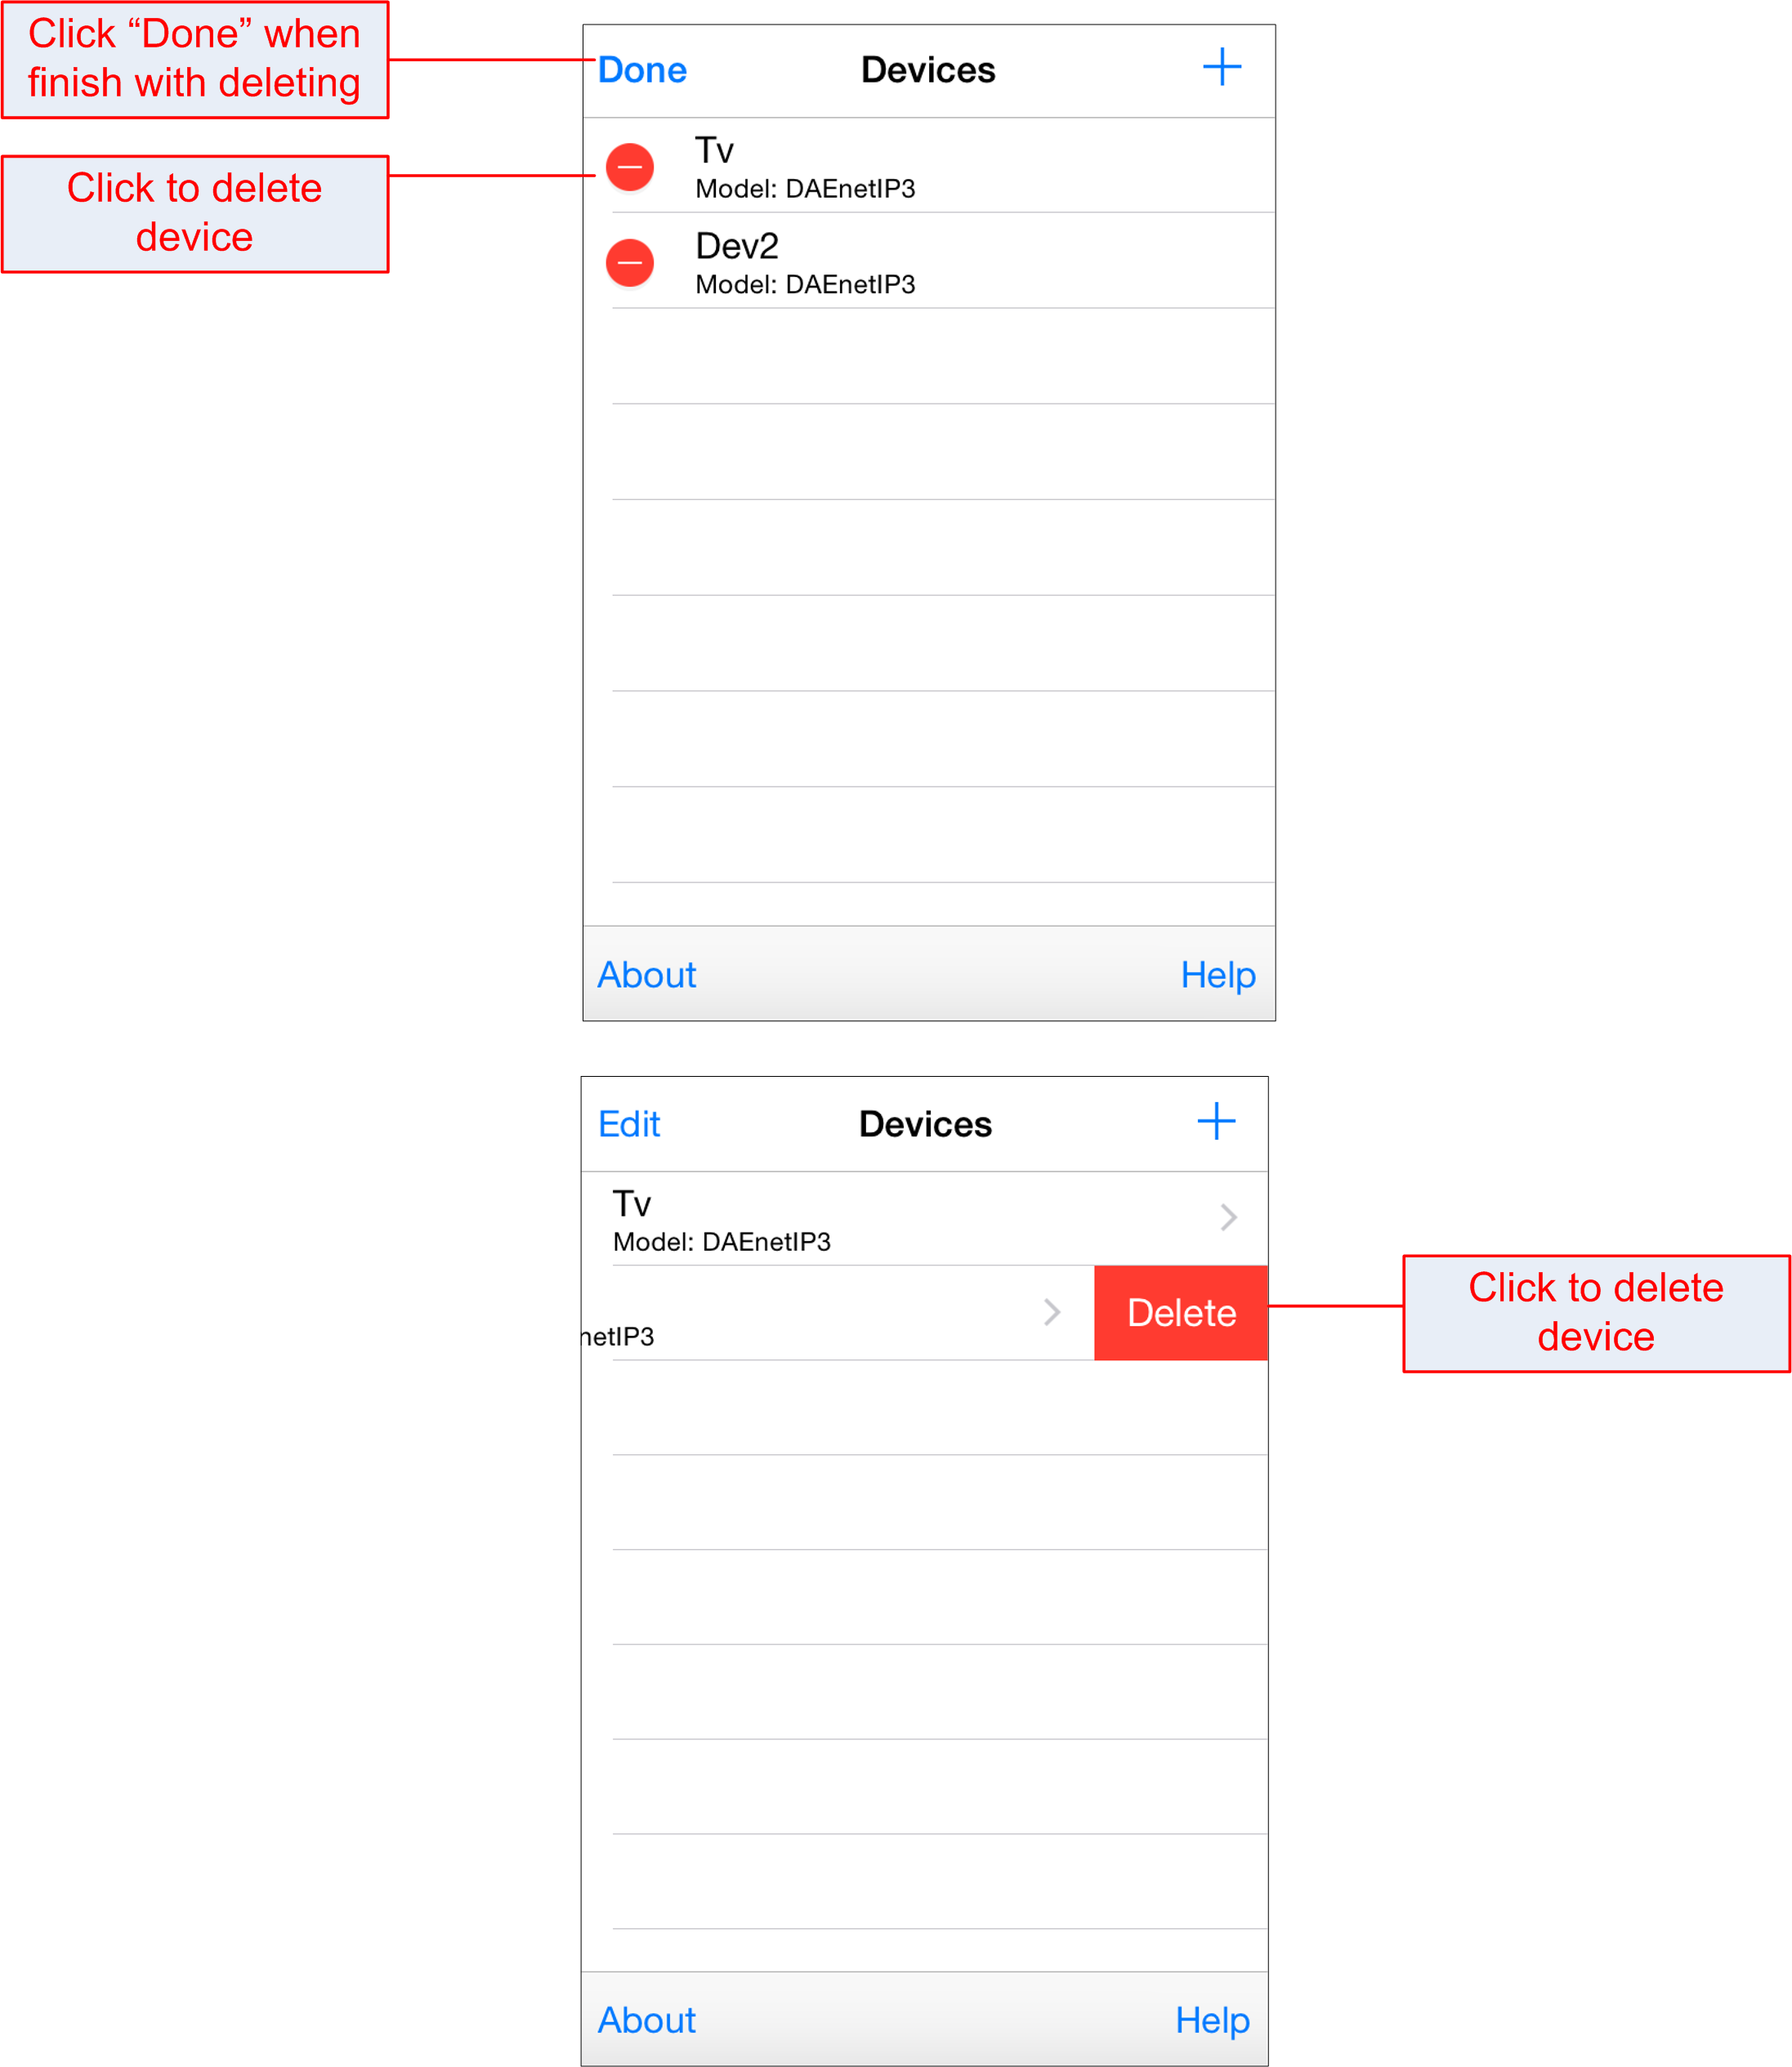
4. Delete device from the list
If you need to delete device, you can do it via one from the ways shown bellow:
TOP
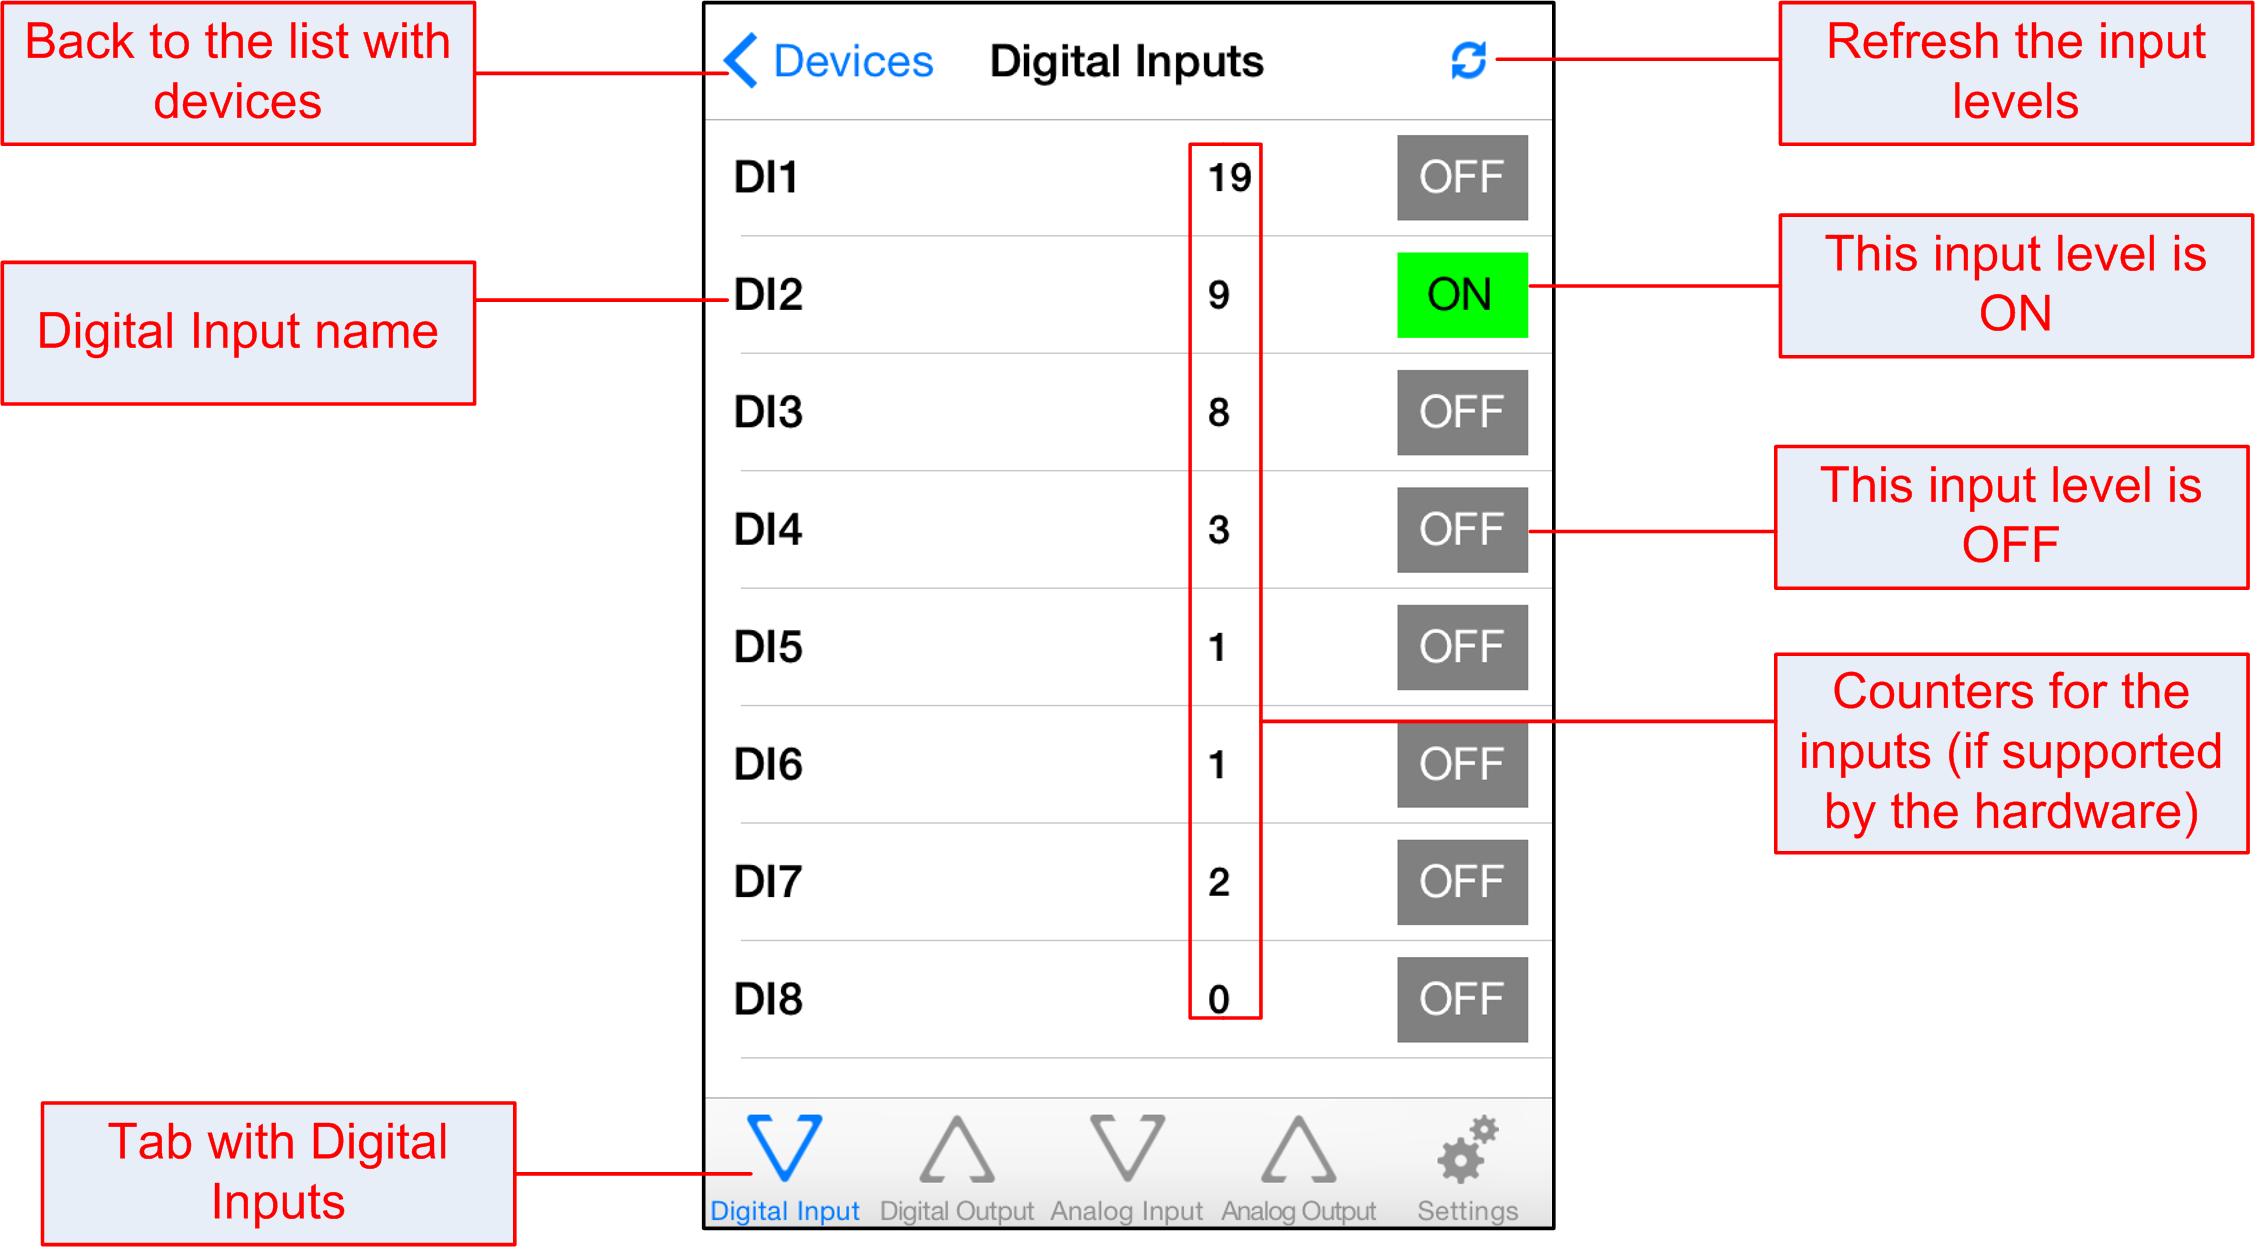
5. Digital Inputs Screen
The digital inputs serves to detect if there is voltage level at the input or on. They have 2 states - ON/OFF. Additionally some devices like DAEnetIP4 for example supports counters for the inputs which are shown as numbers before the ON/OFF state.
TOP
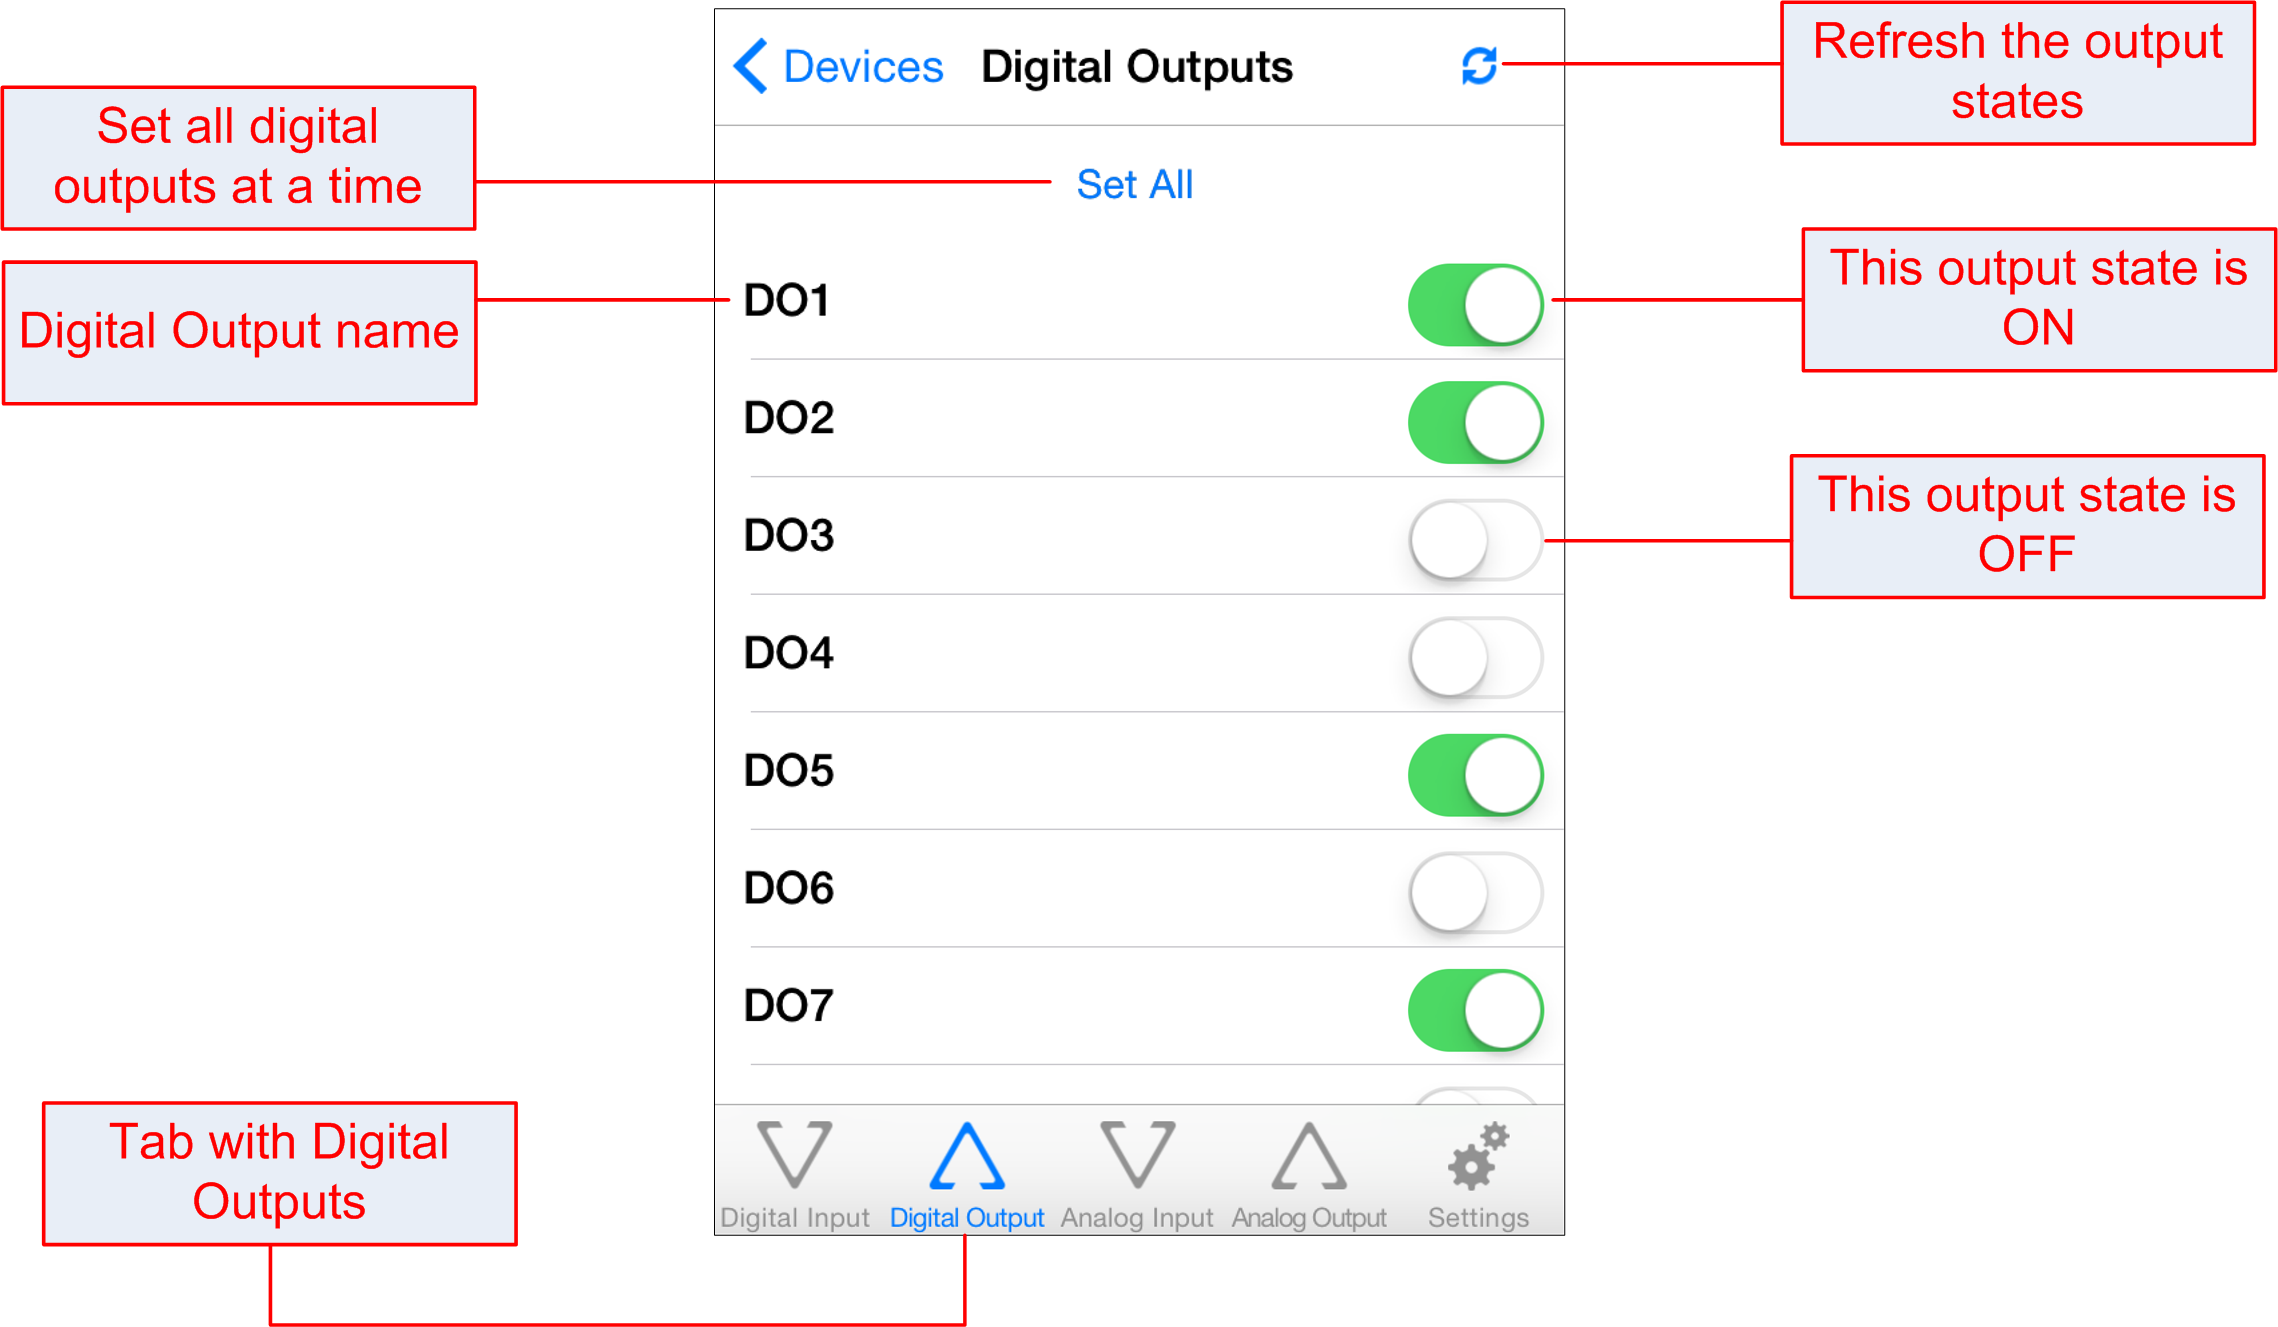
6. Digital Outputs Screen
If the option "Set DO" is enabled from the "Settings" section, the "Set All" button will be enabled and in this case all the states will be written with single command. Otherwise they will be set on check-box click:
TOP
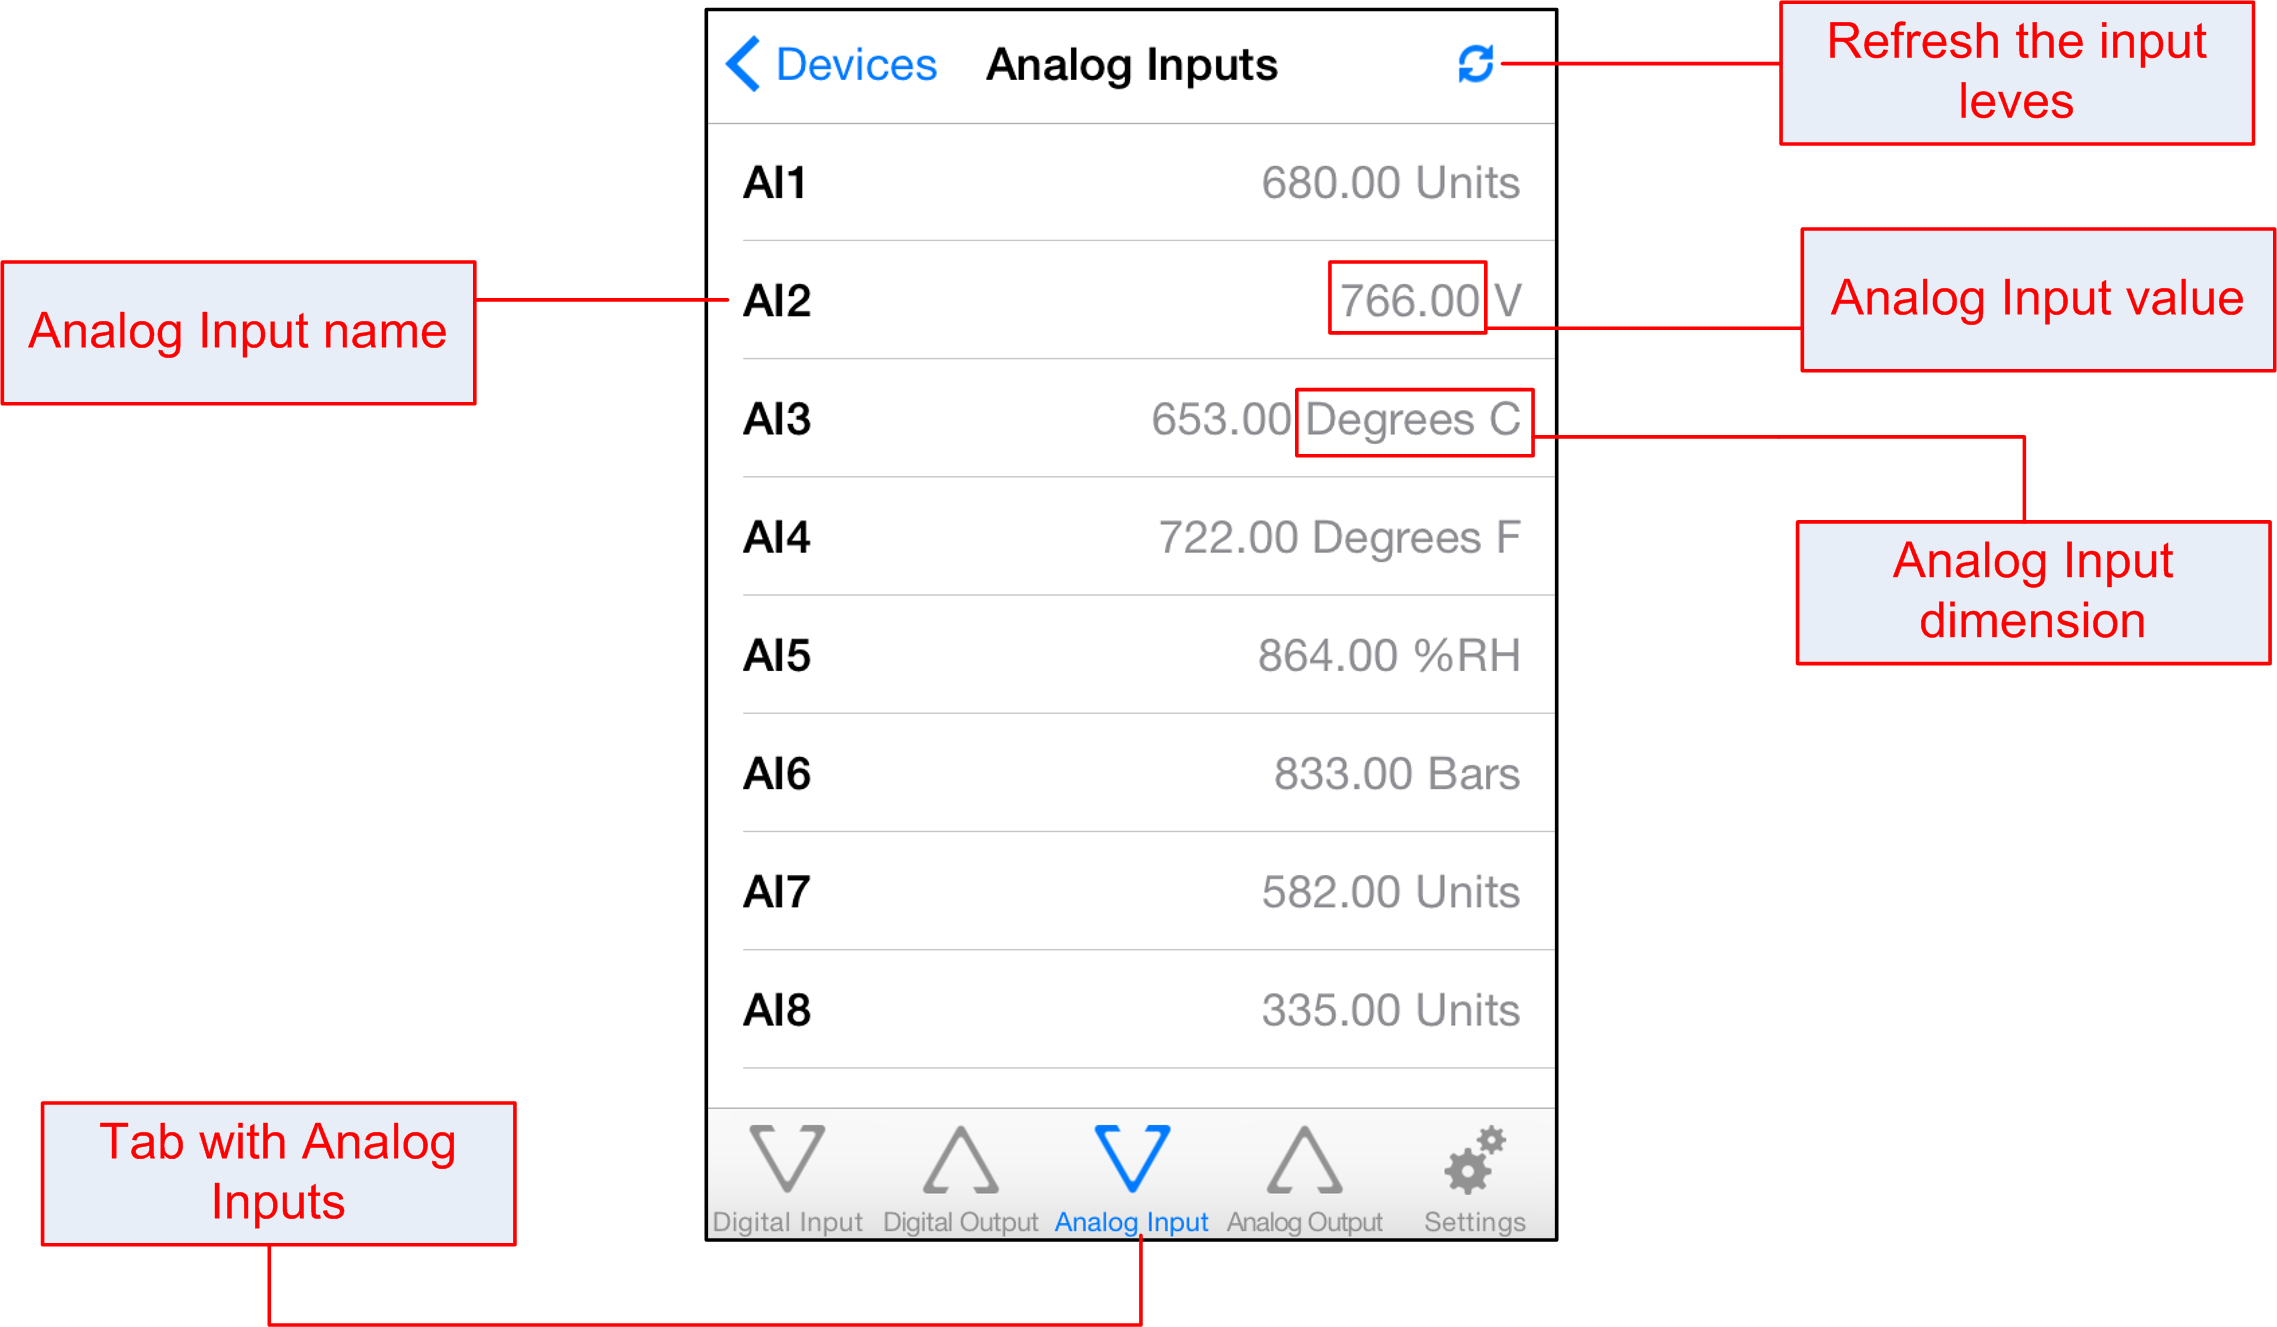
7. Analog Inputs Screen
Analog inputs values can be scaled and in this way they are shown in real units like Deg C, Deg F, Volts, Amperes and so on. Please note the scaling is done on software level (level iOS) and it is not done in the hardware side:
TOP
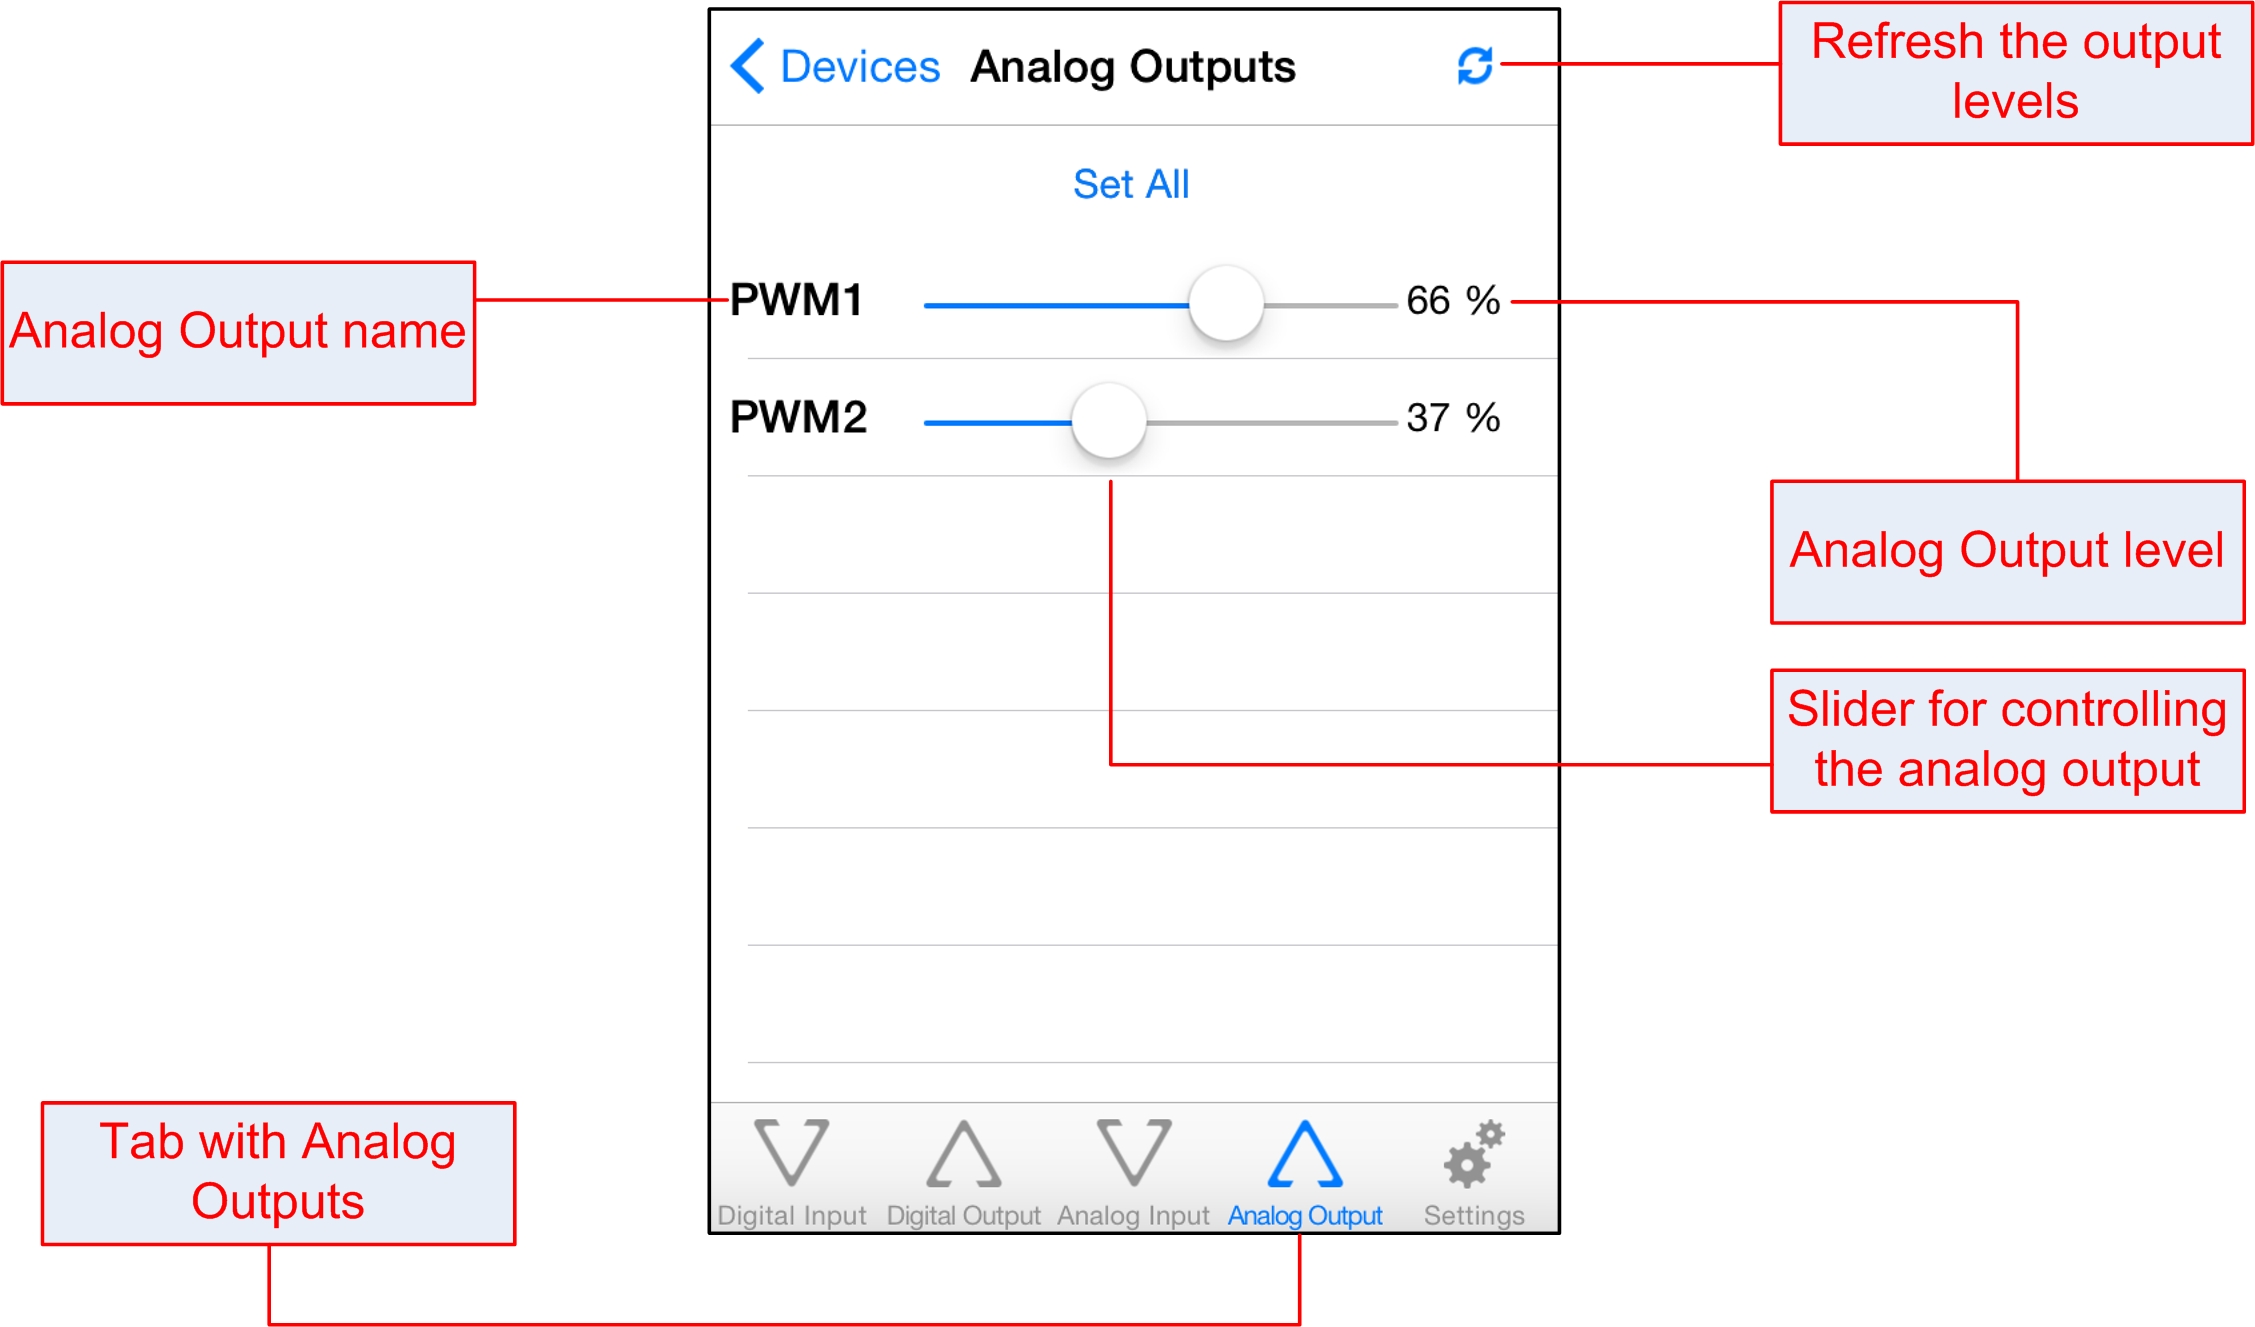
8. Analog Outputs Screen
These outputs are suitable for dimming lights for example:
TOP
9. Other Inputs Screen
This screen displays values from special inputs supported by some of our devices designed to measure temperature, humidity, pressure:

TOP
10. Settings - Main Screen
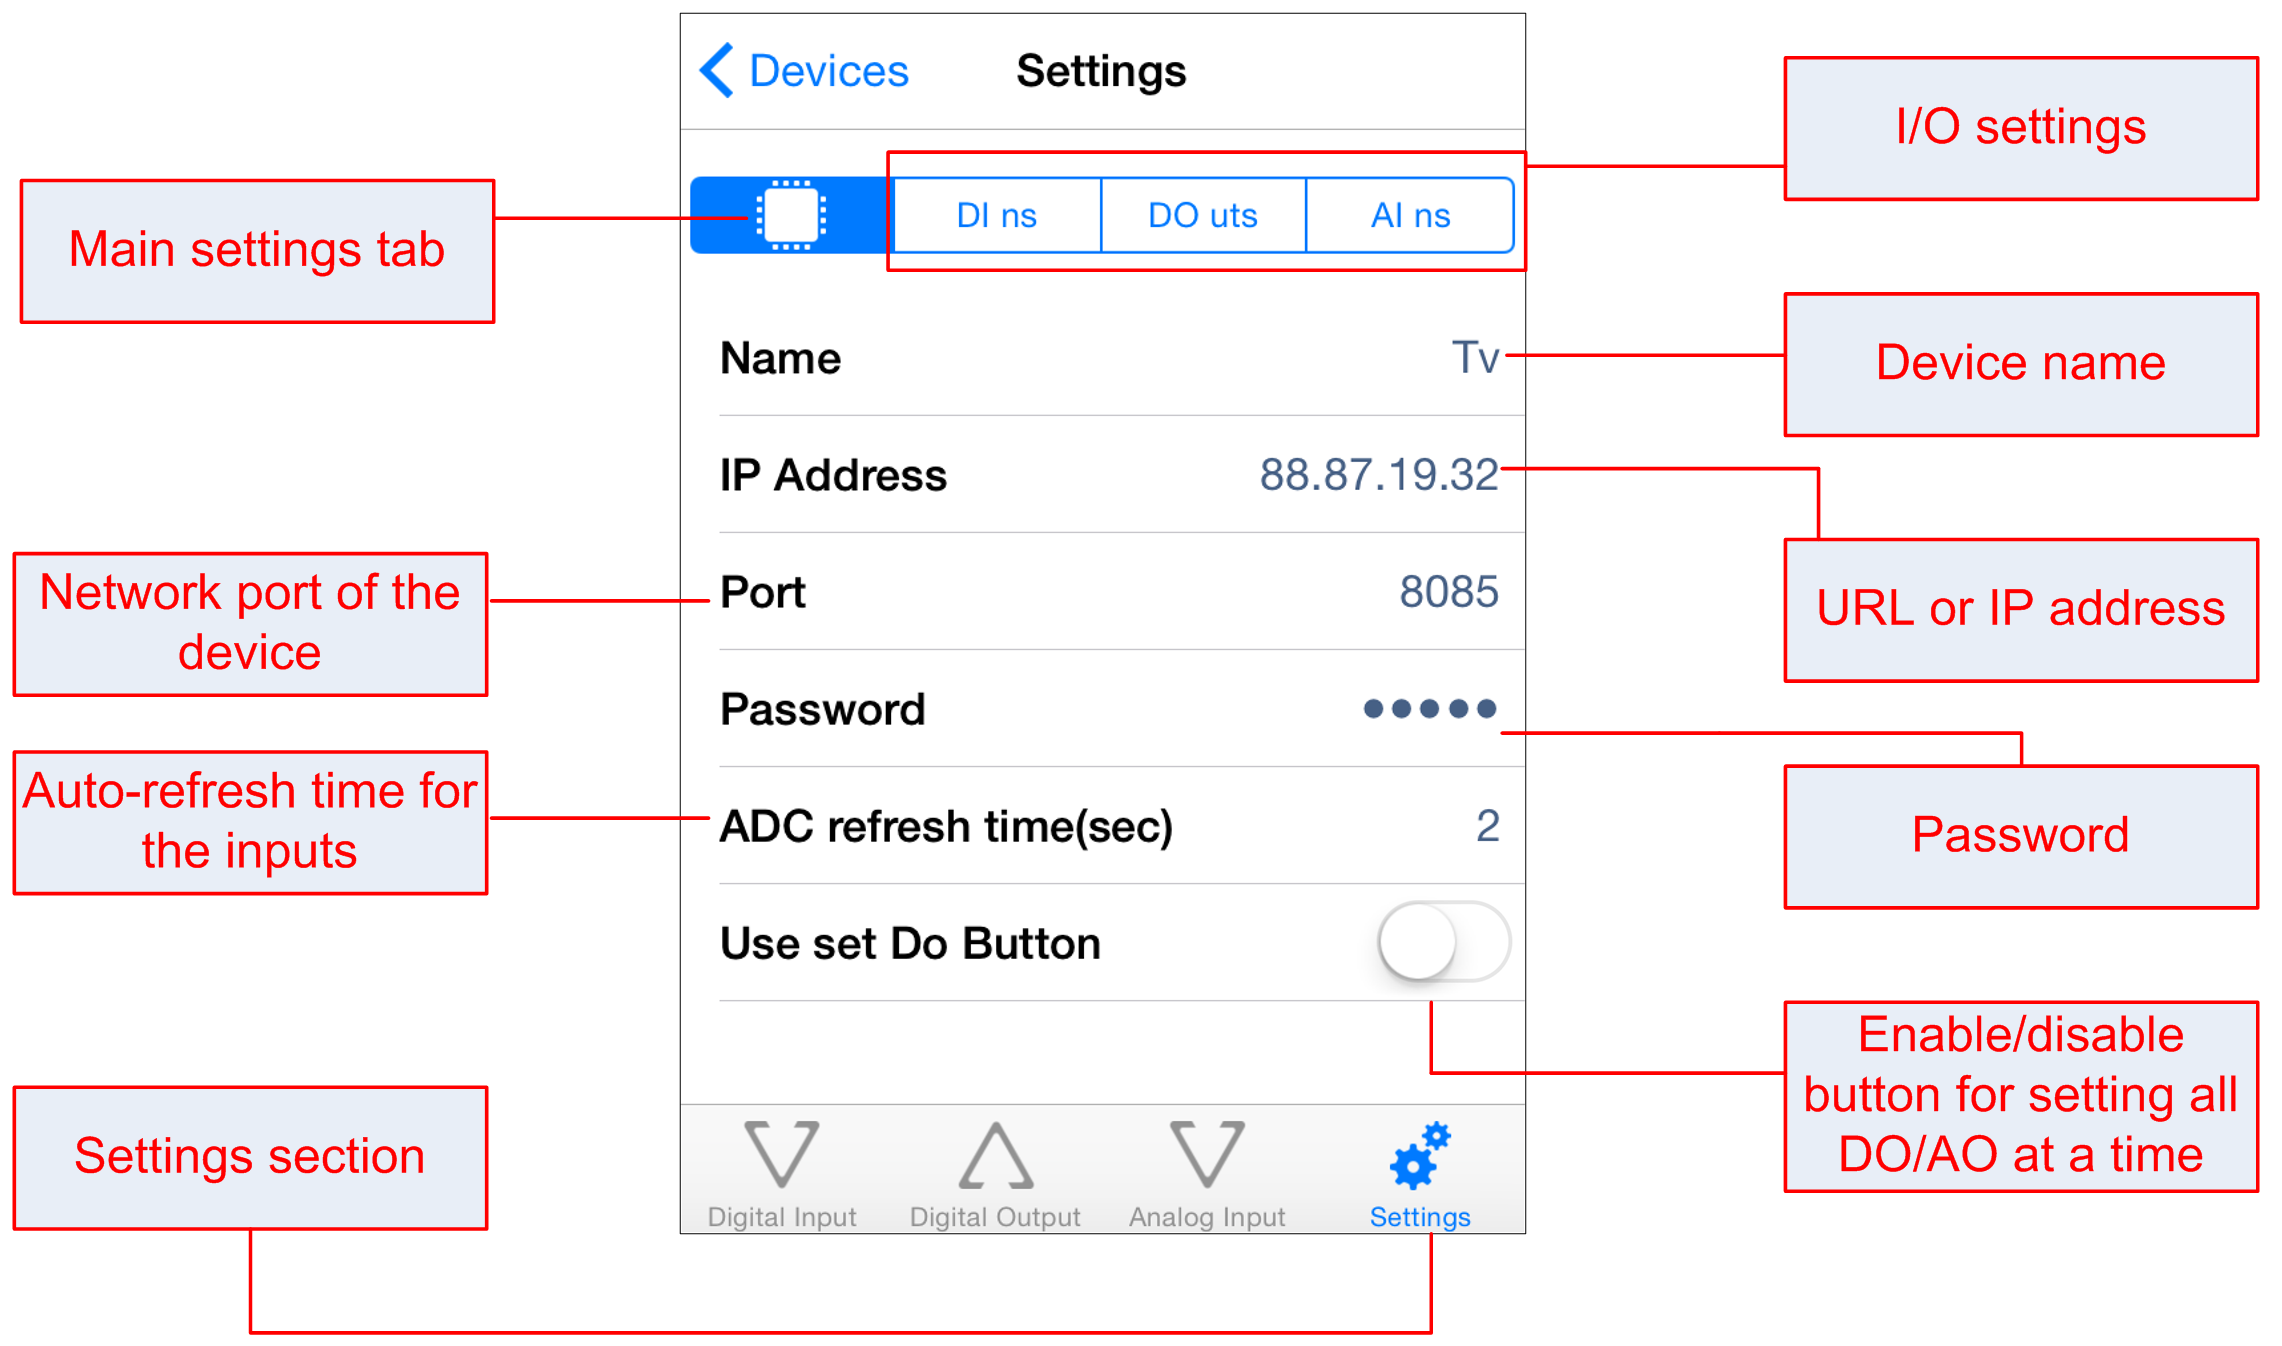
- Name - the name of the target denkovi device (saved localy on the mobile device), does not relate with any settings of the denkovi device;
- IPAddress - the IP or URL address of the target device;
- Port - the port of the target device;
- Password - the access password of the target device;
- Use set Do Button - if this is checked, the states of the digital/analog outputs will be send at a time, otherwise they will be set one by one;
- ADC refresh time (sec) - the refresh period for the inputs. If it is greather than 0, the values will be auto-refreshed with this selected period of a time. If 0 - it is disabled.
TOP
11. Digital Inputs settings
TOP
12. Digital Inputs Settings - edit values
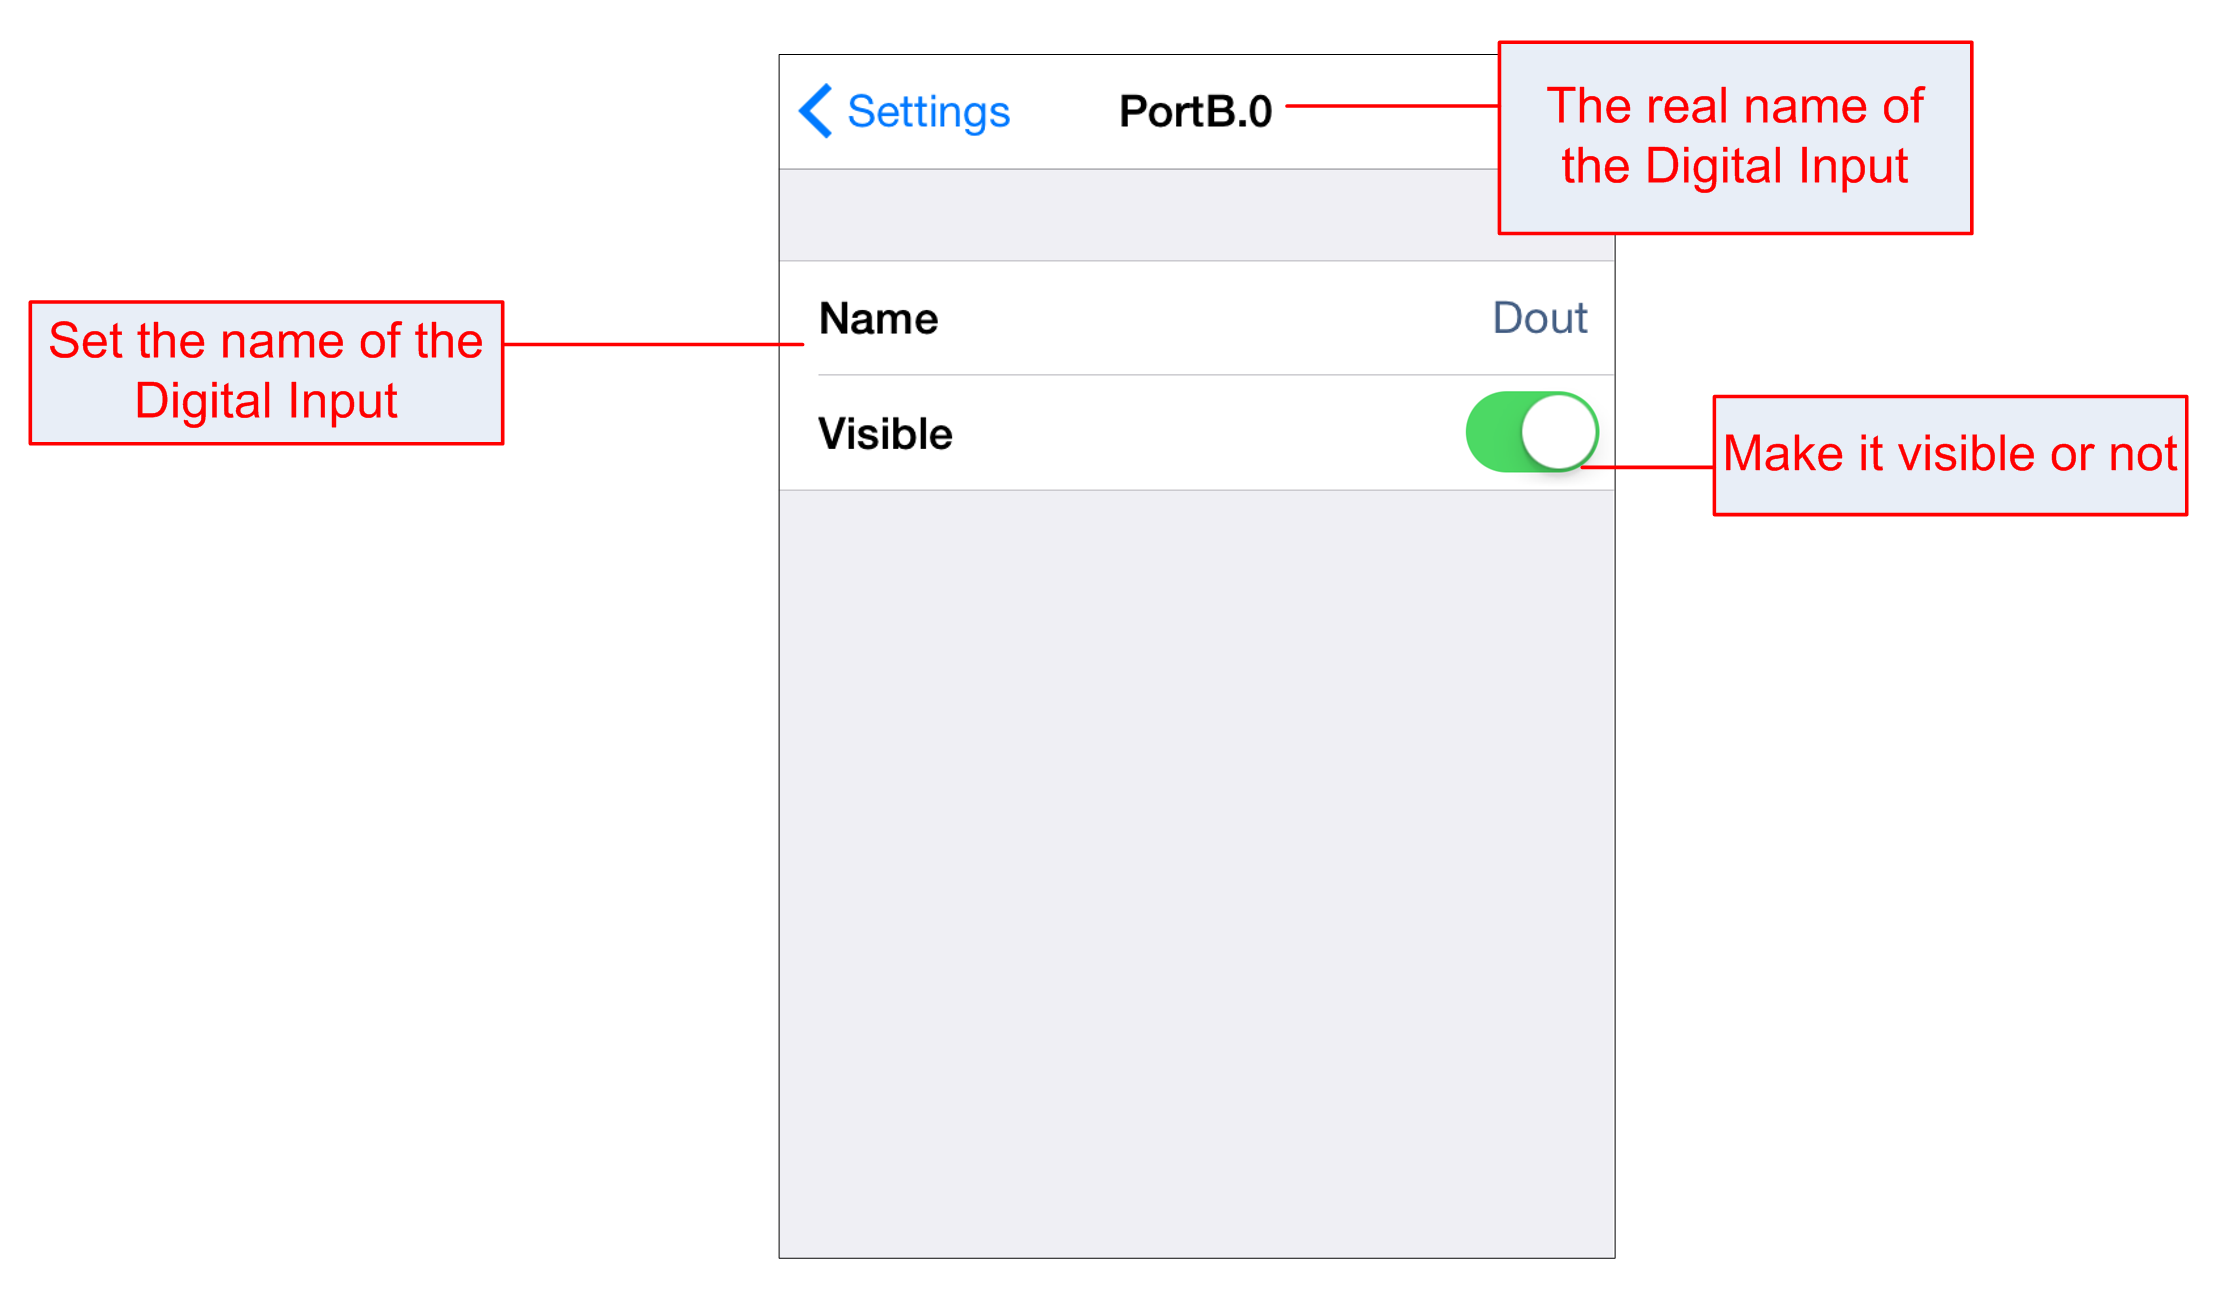
If the hardware supports that, the name here will be synchronized with the name of the digital input into the module.
TOP
13. Digital Outputs settings
TOP
14. Digital Outputs Settings - edit values
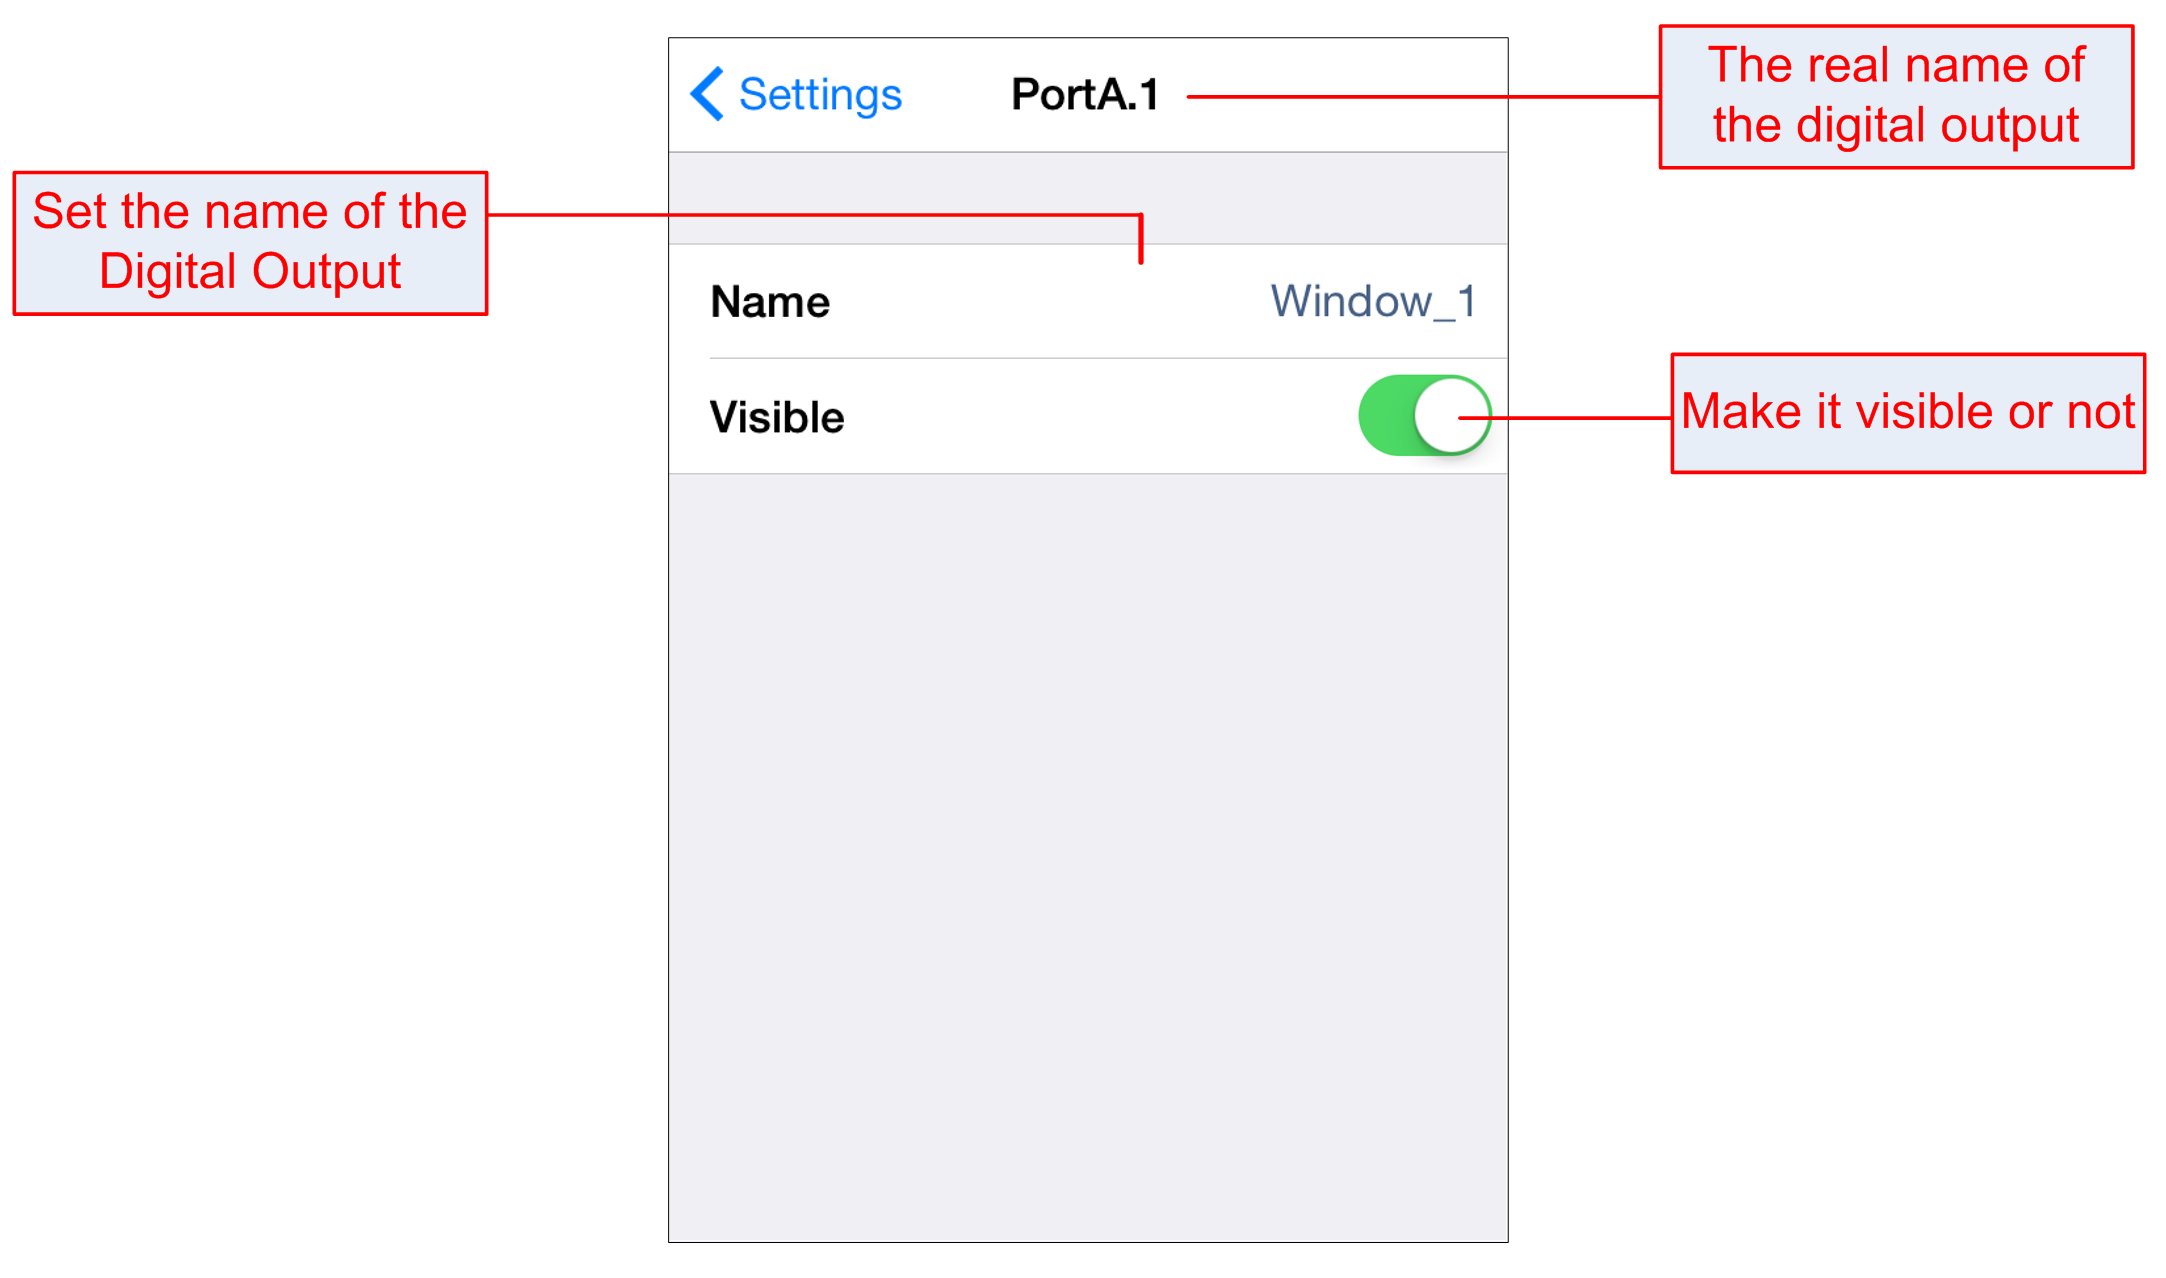
If the hardware supports that, the name here will be synchronized with the name of the digital output into the module.
TOP
15. Analog Inputs settings
TOP
16. Analog Inputs Settings - edit values
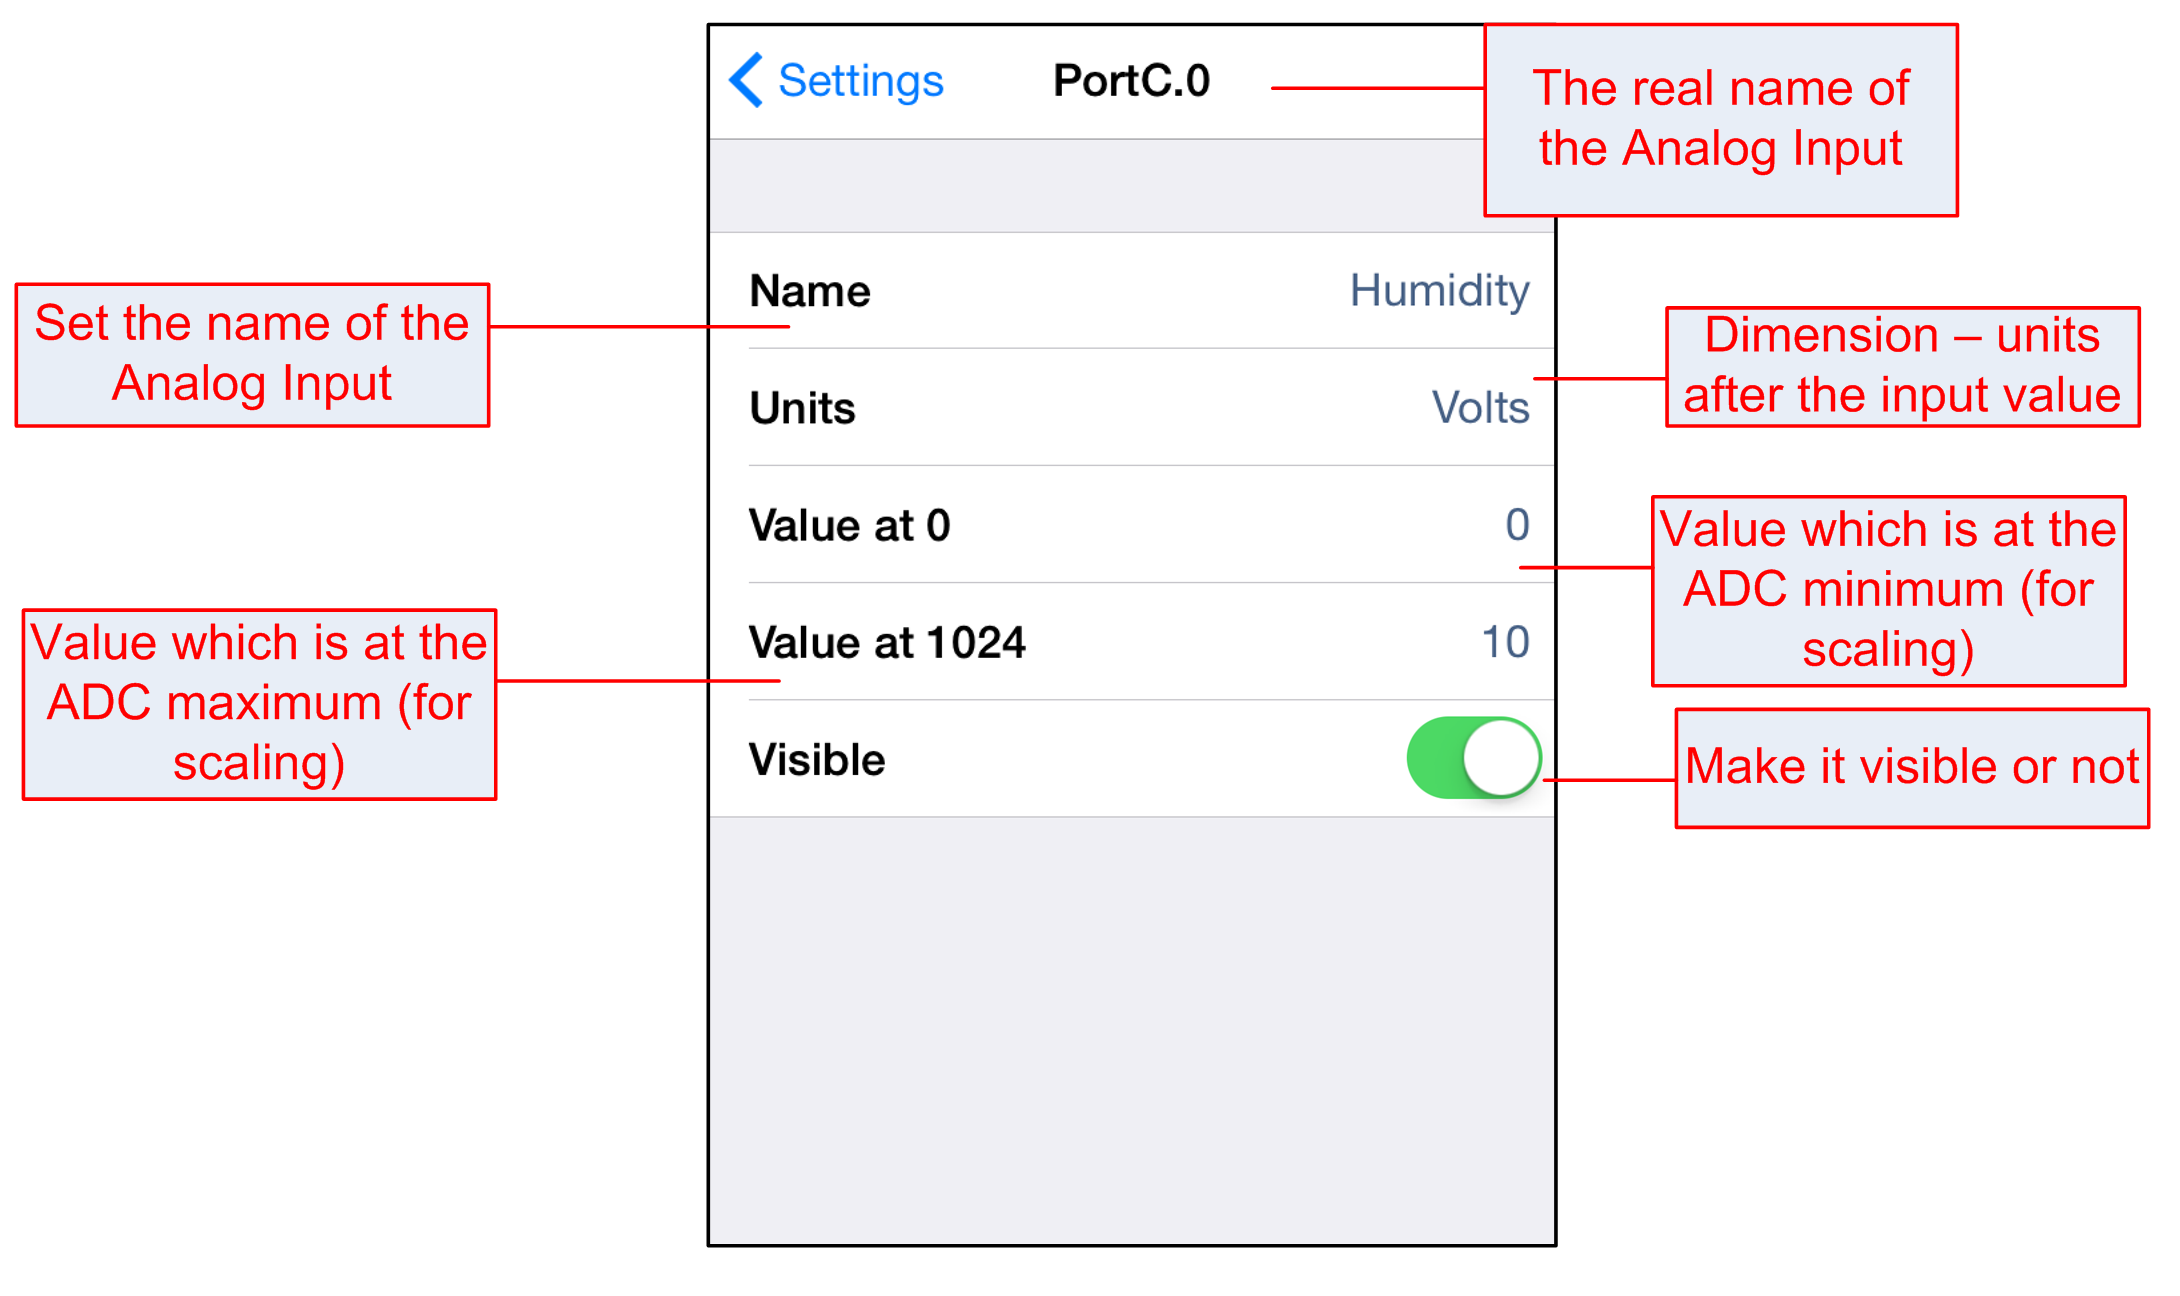
If the hardware supports that, the name here will be synchronized with the name of the analog input into the module.
TOP
17. Analog Outputs settings
TOP
18. Analog Outputs settings - edit values
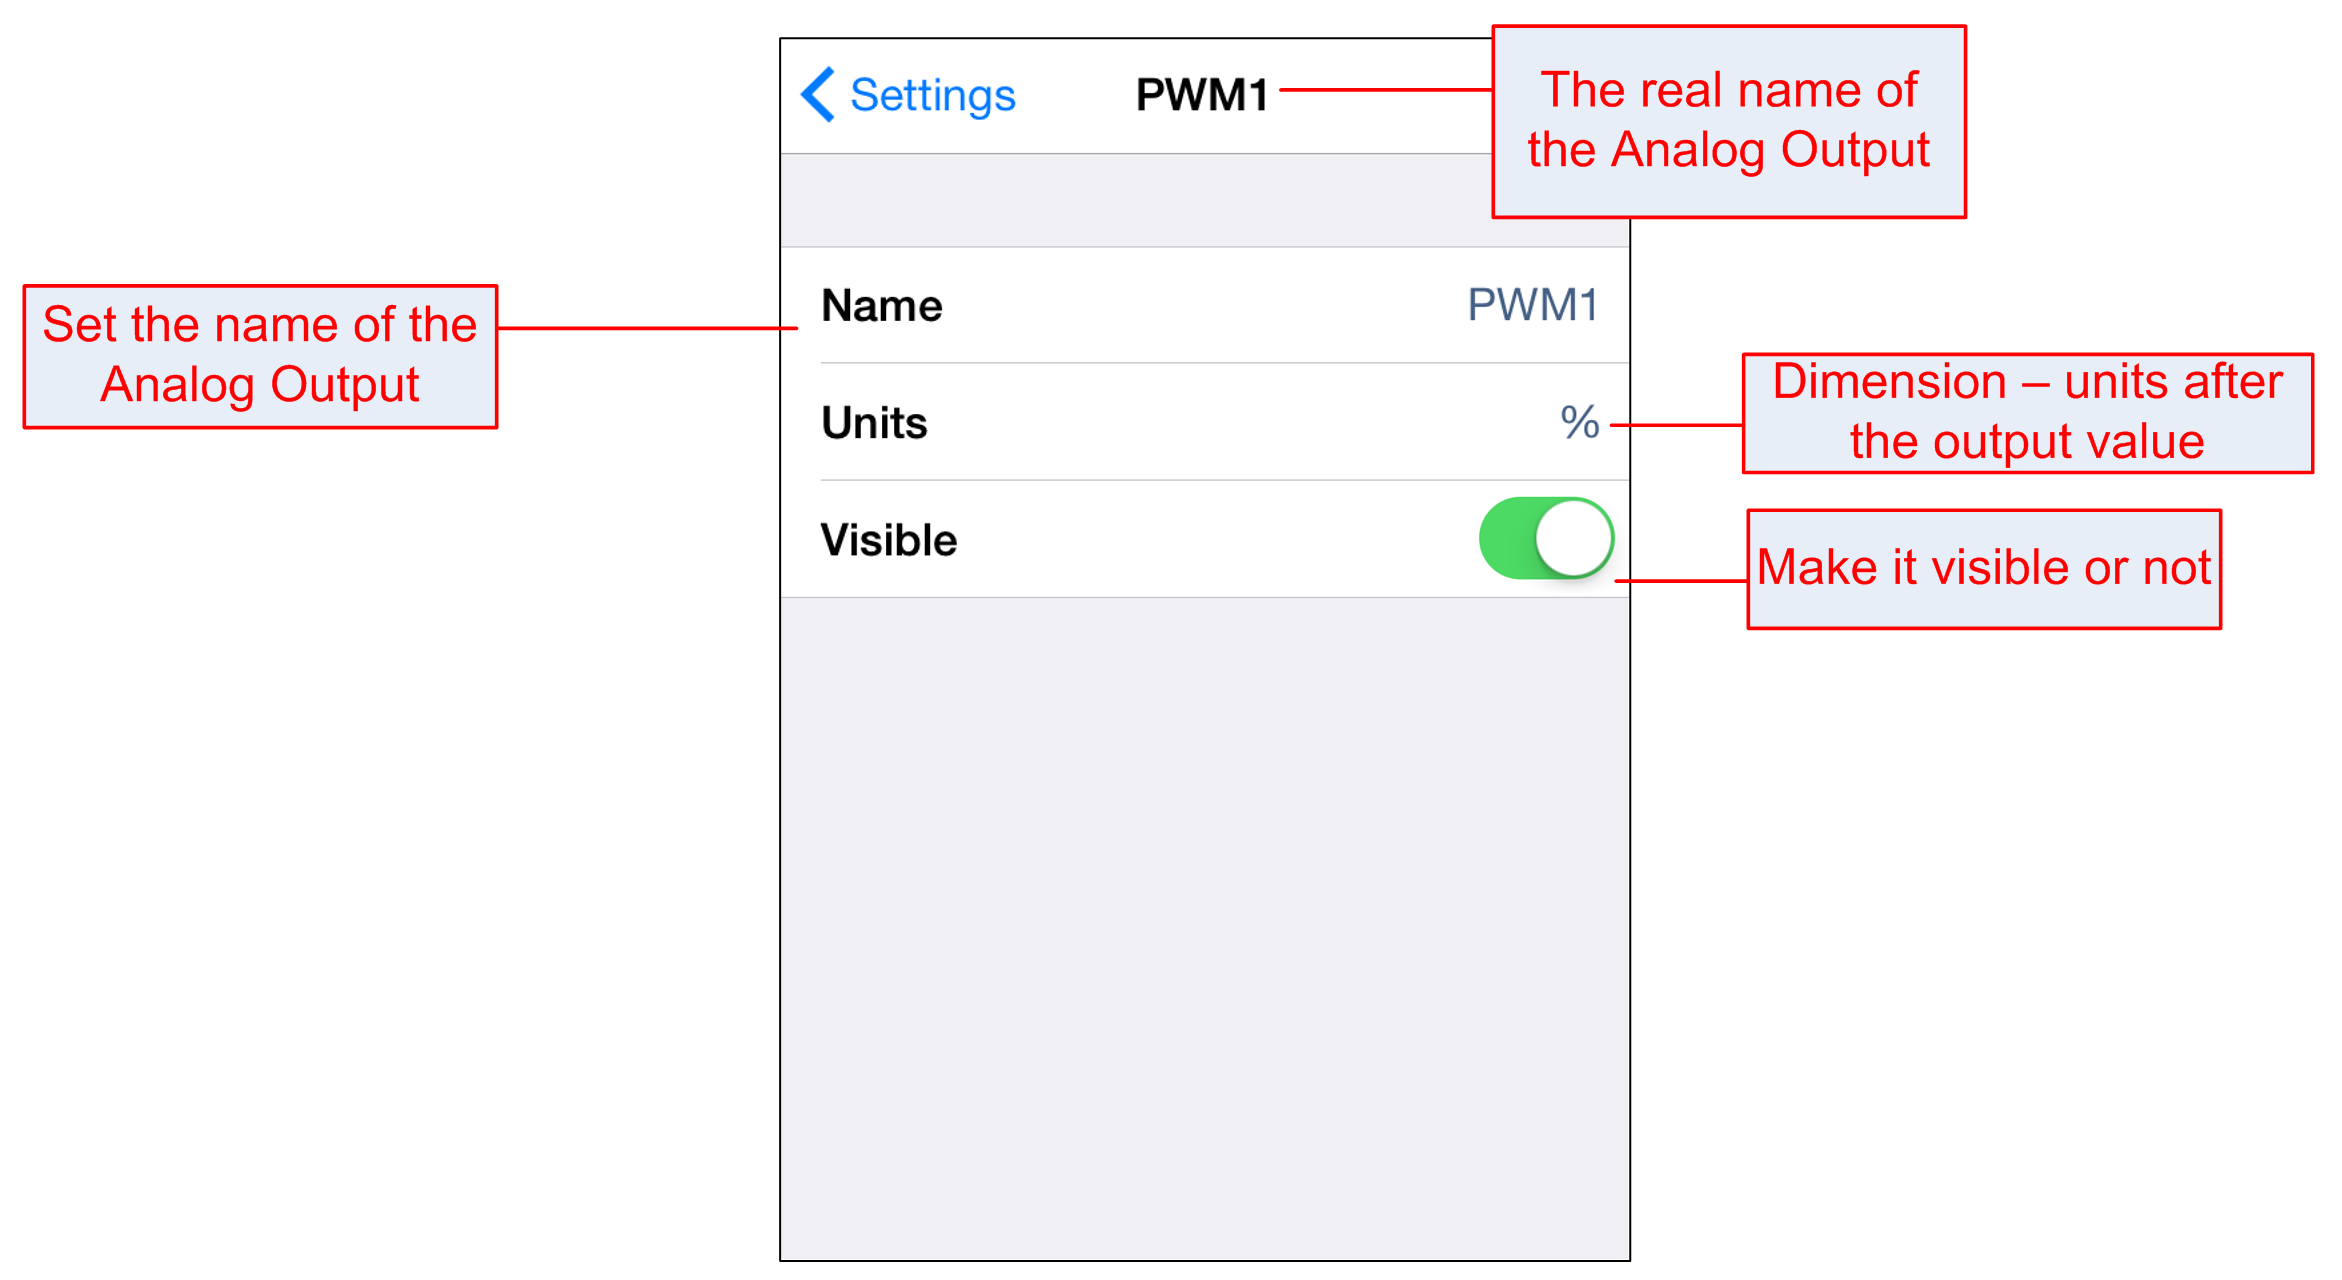
If the hardware supports that, the name here will be synchronized with the name of the analog output into the module.
TOP
19. Other Inputs settings
TOP
20. Other Inputs settings - edit values
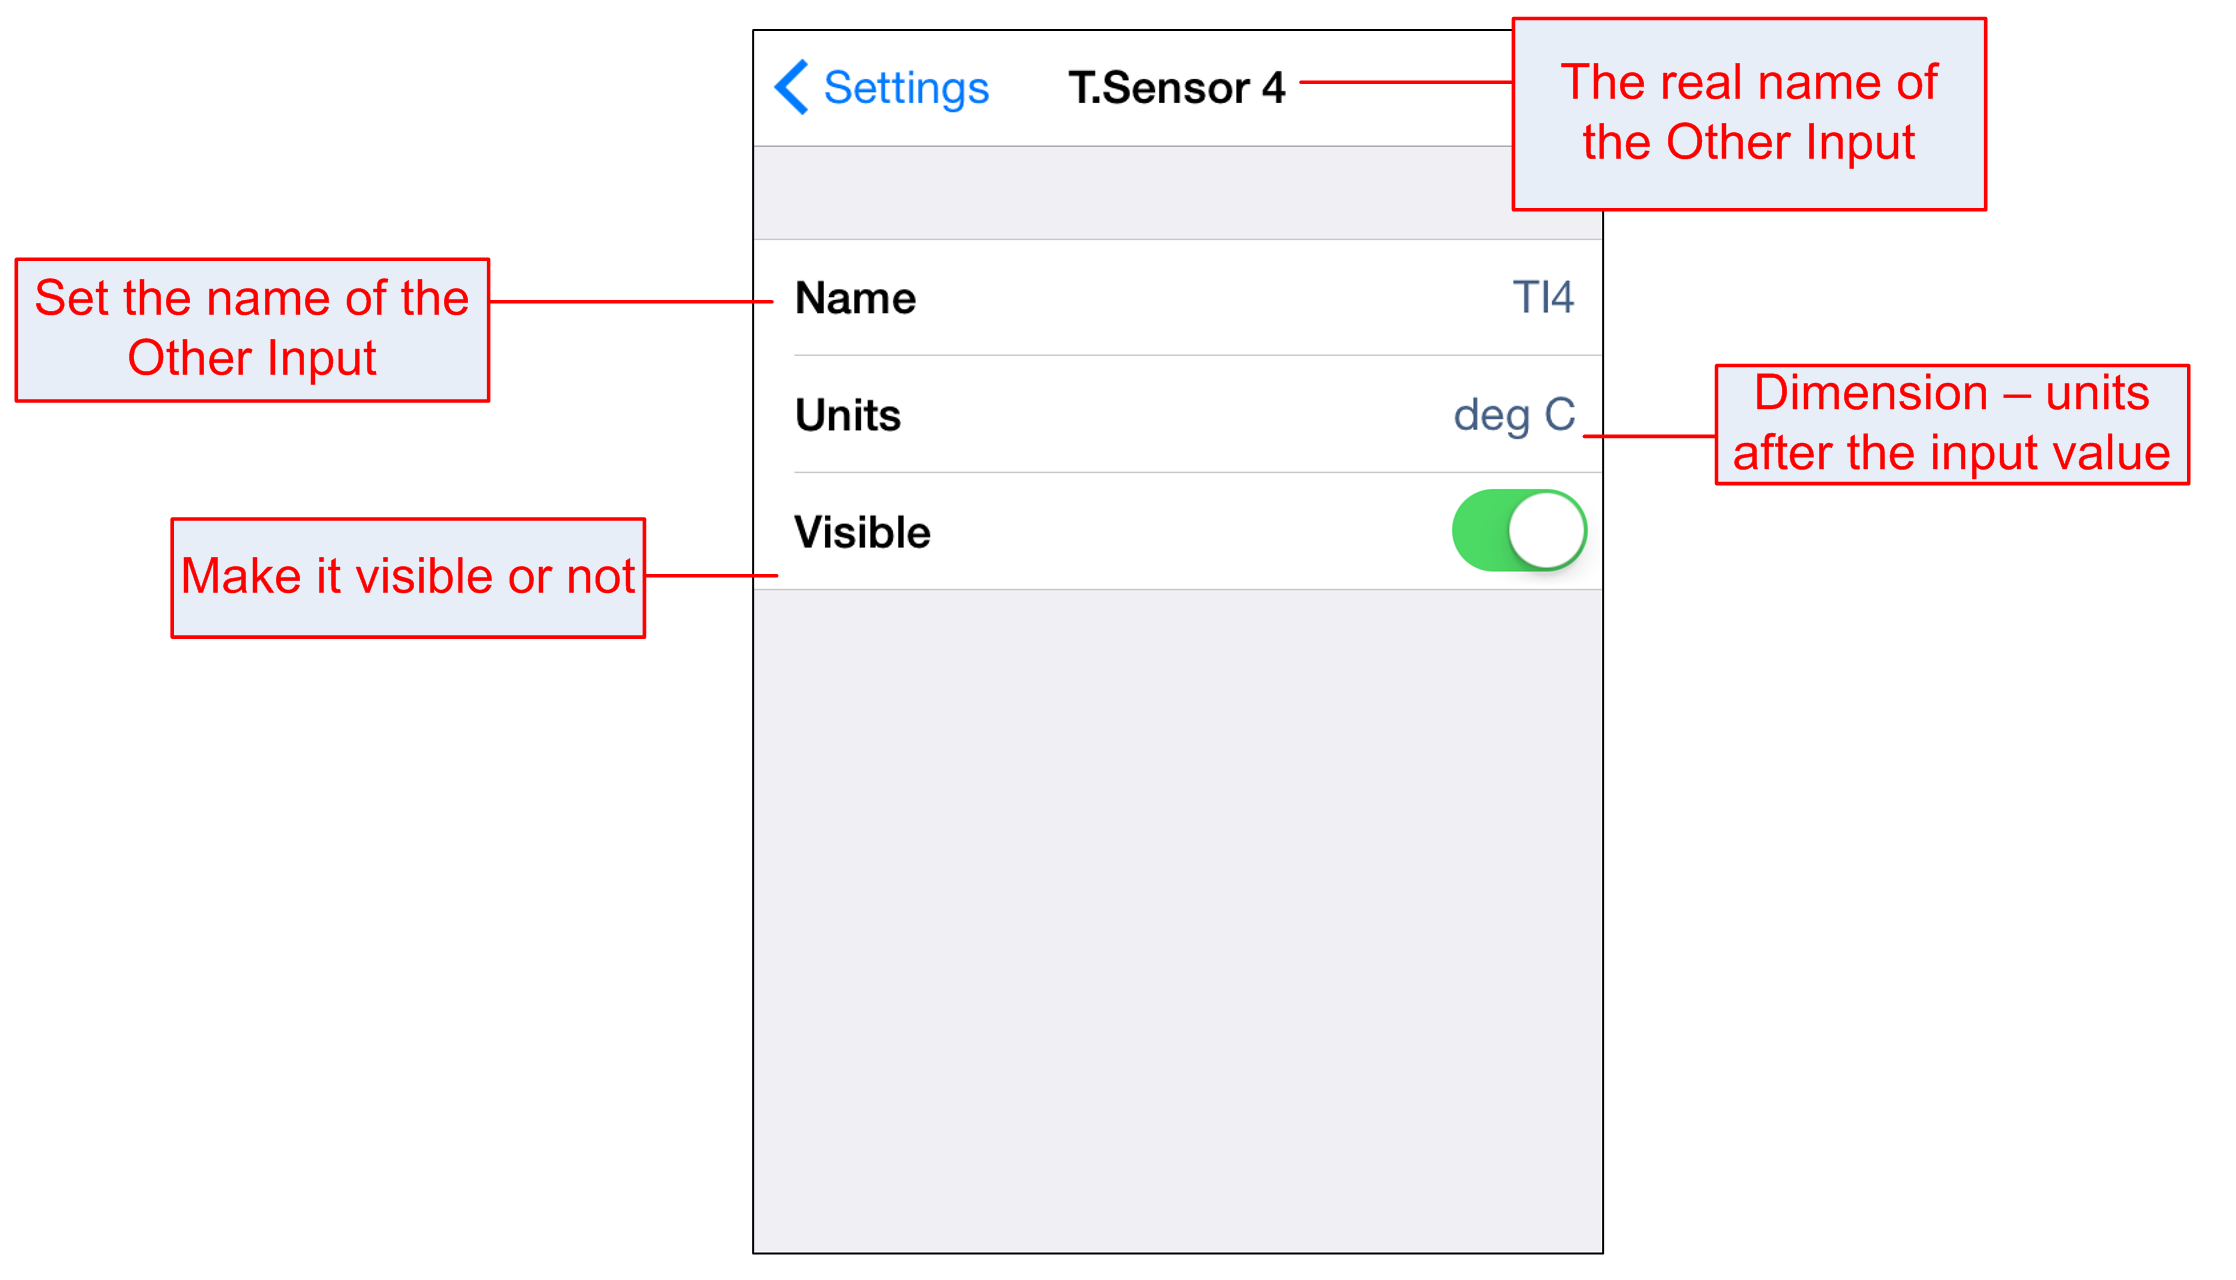
If the hardware supports that, the name here will be synchronized with the name of the other input into the module.
TOP
21. Quick Tutorial 1 - How to access DAEnetIP2 device directly with computer
The bellow three tutorials are for DAEnetIP2 based devices. The other denkovi devices settings are identical, depending on their own network settings - IP addresses and ports.
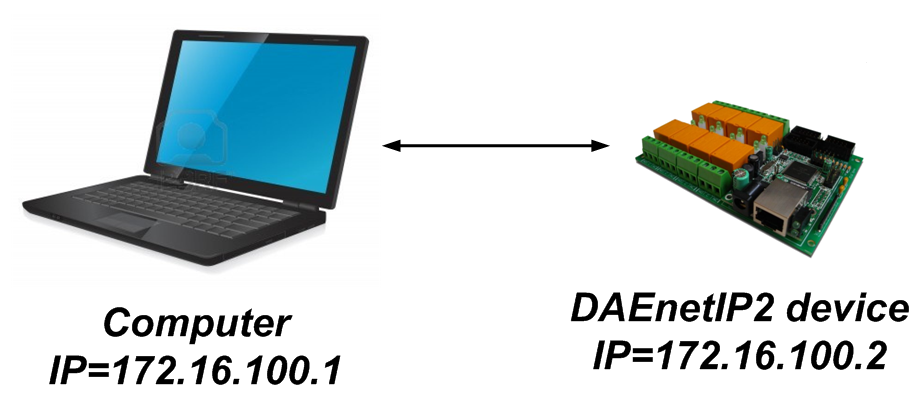
Bellow are given steps how to access the controller initially with computer. This must be done because the DAEnetIP2 devices are shipped with default IP address 172.16.100.2 (DHCP OFF) and you will need to change most probably their IP address to mach with your network range. So the first step is to connect with computer:
- Connect the DAEnetIP2
device
with your computer via
UTP
crossover cable
(note that the device does not support AUTO MDIX)
- Connect all the additional wires if any - to relays, sensors and so on...
- You must keep all the electrical and antistatic rules while working with DAEnetIP2 because it is electronic device. If you are not aware what to do contact with techincal person!
- Supply with voltage in the allowed range.
For example -
12VDC
stabilized
filtered power source
- Your initial computer IP should be in the device network. So it is recommend
to be 172.16.100.1. Change it.
- Open web browser and type 172.16.100.2 – default username/password are
“admin”/”admin”
- Now you can access all the parameters via your web browser. You can also change the IP address of the DAEnetIP2 controller which is the most important part to connect DAEnetIP2 in your local network(Quick Tutorial 2).
TOP
22. Quick Tutorial 2 - How to access DAEnetIP2 device over WLAN via router
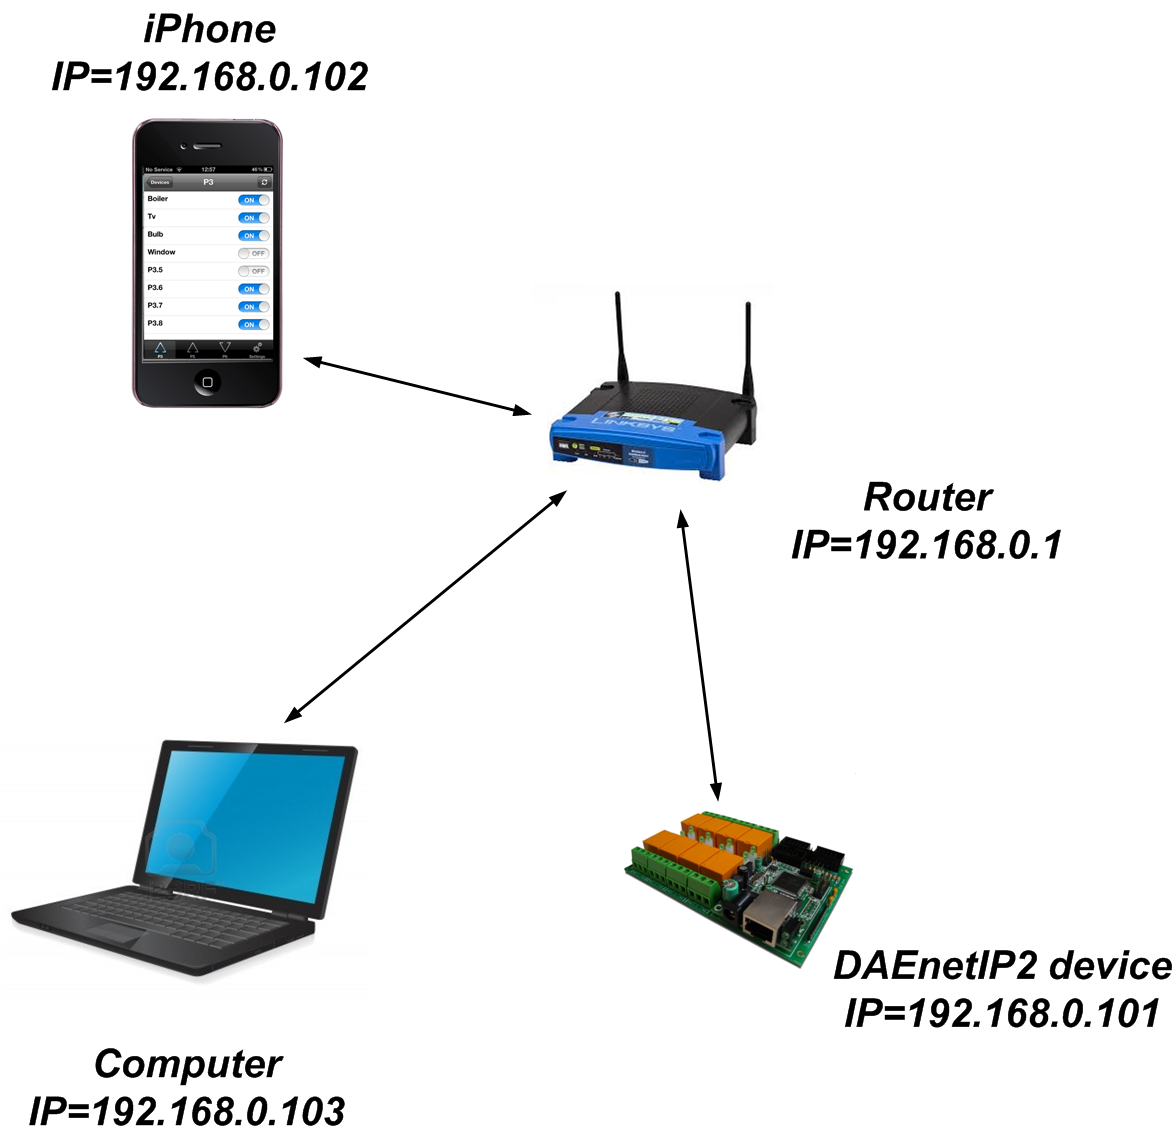
After you have access to the DAEnetIP2 dvice, you are able now to change its network settings - IP, Mask, Gateway... This must be done in order move it on your local network (WLAN). Bellow it is shown network diagram what you need to do to access the DAEnetIP2 via iPhone (or other mobile device or notebook) via local network (WLAN).
Adjust the DAEnetIP2 network parameters from
web server "Setup"
page:
- IP - must be in same network as your router (for example if router IP is
192.168.0.1, DAEnetIP2 IP may be 192.168.0.101). Please note if there is DHCP function running on, the DAEnetIP2 static IP address must be out of the DHCP range
- Mask
- Gateway - usually this is the IP of your router (in our example - 192.168.0.1)
-
Click submit and wait about 5 seconds
-
Power off the device
-
Now you may disconnect the UTP crossover cable from the DAEnetIP2 and
your computer
-
Connect the DAEnetIP2 module and the network router with
UTP straight
cable
-
Give back the old IP of your computer to be again in the router network
-
Open the web browser and enter the new IP of the module
From this moment you are able to access the DAEnetIP2 from your iPhone device as well. So the settings for this iPhone software in our example must be the following:
- IP Address: 192.168.0.101
- Port: 161 (the default)
- Password: private (the default)
TOP
23. Quick Tutorial 3 - How to access DAEnetIP2 device over Internet using port-forwarding

This is the most important part of setting up the DAEnetIP2 connections but and the most specific. There is not exact step-by-step tutorial how to do it because it is quite related with the router model you have. However there are some basic things you must take in mind in order to access DAEnetIP2 via internet from iPhone device:
- The way to do this is called Port-Forwarding
- DAEnetIP2 ports (by default) are: 161 (snmp), 80 (http)
- In some cases port 161 or snmp protocol at all is blocked by the some ISP. So you must contact with them in order to solve this
- You can check what are the port-forwarding settings for your router on this link
TOP
